Fixing a faucet with a stripped handle is a relatively straightforward task. Here’s a brief summary of the steps involved:
- Turn Off Water: Shut off the water supply to the faucet by closing the water valves located under the sink or near the faucet. This will prevent water from flowing while you work.
- Remove the Handle: Use a screwdriver or an Allen wrench (hex key) to remove the screw or set screw securing the handle to the faucet stem. This is usually located beneath a decorative cap or cover on the handle. Once the screw is removed, gently pull the handle off.
- Inspect the Stem: Examine the faucet stem for damage. If the stem is stripped, you may need to replace it. If the stem is in good condition, proceed to the next step.
- Replace the Handle or Adapter: If the handle itself is stripped, you can replace it with a new one. Alternatively, you can use a handle adapter or a faucet handle puller designed to grip and turn the stripped stem.
- Reassemble: If you’re using a new handle, slide it onto the faucet stem, aligning it with the set screw hole. Insert and tighten the screw to secure the handle in place. If you’re using an adapter or puller, follow the manufacturer’s instructions to attach and use it.
- Turn On Water: Turn the water supply back on by opening the valves under the sink. Gradually open the faucet to check for leaks and ensure it’s working correctly.
- Test for Tightness: Ensure that the handle or adapter is securely in place and that there are no wobbles or looseness. Make any necessary adjustments to achieve a snug fit.
- Cleanup: Clean up any tools and debris from your work area.
How to Fix a Stripped Faucet Handle
In this post, I will focus on how to fix a stripped shower faucet handle, but the same process can be used to fix a stripped kitchen/bathroom sink faucet handle.
You will need the following items for this repair:
- New faucet stem (optional)
- New faucet handle (optional)
- Philips screwdriver
- Flathead screwdriver
- Set of Allen wrenches
- Shower faucet wrench (optional)
Once you have all the items you need, follow the following steps:
1. Turn off Water to the Faucet
If you are working on your bathroom or kitchen sink faucet, there will be 2 shut off valves under the sink that turn off both the cold and hot water to the faucet. Just turn the knobs all the way clockwise.
Unfortunately, showers do not have shut off valves and you will need to turn off water to the entire house. Dash to the basement or wherever your main water shut off valve is located and turn off the water.
Sometimes you may have an access panel on the wall behind the shower faucet which conceals the shut off valves to the shower. If you have the access panel, remove it and turn off water from there.
- With the water turned off, open the faucet to drain the water already in the pipes.
- Plug off the shower/tub drain opening. This is every important to make sure you do not drop anything down the drain.
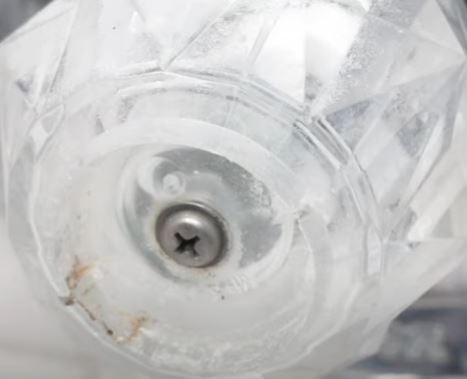
2. Remove the Faucet Handle

There are 2 types of faucet handles. You may have a knob-type handle or a lever-type handle. Both are however connected to the faucet stem using a screw.
- If you have a lever type faucet handle, turn it in the open position to reveal a hex screw underneath it. Remove it using the correct size of an Allen wrench.
- A knob-type faucet handle is connected to the stem using a Philips screw. To reveal the screw, pry off the index cap on the face of the handle using a flathead screwdriver or knife.
- Use a Philips screwdriver to remove the screw and pull out the handle.
As I had mentioned earlier, you may find that this screw is stripped and therefore not easy to remove it.
One of the hacks used to remove a stripped faucet handle screw is to place a rubber band over it to create a grip then turn it counterclockwise using a screwdriver to loosen it. This may or may not work.
As I said before, drilling through the screw is what I have found to be a better and faster solution.
3. Examine the Damage
With the faucet handle out, you can then determine if the handle itself is broken or it is the faucet stem splines that are worn out.
Replacing a faucet handle is simple. Just slide it in over the stem and secure it with the screw. If however it is the faucet stem that is worn out, you will need to remove and replace it with an exact same one.
A trick some people use when they find out that the faucet stem splines are worn out is to wrap Teflon tape around it instead of replacing it. The Teflon tape will increase the faucet’s handle grip on the stem, which will stop the handle from spinning.
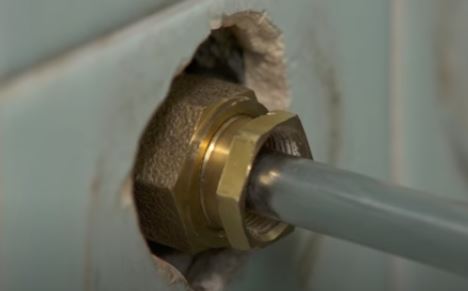
4. Remove the Faucet Stem
If you decided to remove and replace the faucet stem, this is how to do it:
- Remove the escutcheon. This is the decorative trim plate that is used to cover the hole on the wall. It could be screwed on the stem or installed using screws.
- If you see screws on the escutcheon, remove them using a Philips screwdriver.
- If you do not see any screws, turn the escutcheon counterclockwise to loosen it. You may need to use a wrench.
Note: Your escutcheon could be caulked on the bathroom wall. Cut through the bead of caulk with a knife and gently tap on it to completely free it before removing it.
- Remove the faucet stem. Check if the nut connecting the stem on the shower valve is accessible using wrench or it is recessed inside the wall. If it is recessed, you will need to use a shower faucet wrench to remove it. This wrench slides over the stem to engage the nut and all you will need to do is grab it with an adjustable wrench and turn it counterclockwise.
- Once loose, slide out the wrench and remove the stem with your hand.
5. Install the New Faucet Stem
- Use a piece of cloth to clean inside the shower valve to remove any debris or mineral deposits.
- Push in the new faucet stem and tighten it using the wrench.
- Install the escutcheon as it was.
- Slide in the handle and secure it with a screw.
- Try turning the faucet handle and check if it is working as it should.
- Unplug the shower/tub drain.
- Turn on the water to the shower and test the faucet again.
And that is how to fix a stripped shower faucet handle. If you have a Moen shower faucet, I have written a detailed post on how to replace the cartridge, which also entails removing and installing the handle. Read it here.
If you have a spinning Delta shower faucet handle, this post will show you how to replace the cartridge which again involves removing and installing the handle.