Here’s a brief summary of the steps to replace a Moen shower faucet cartridge:
- Gather the necessary tools and materials, including a replacement Moen shower cartridge, a screwdriver, adjustable wrench or pliers, plumber’s tape, and penetrating oil (if needed).
- Turn off the main water supply to the shower.
- Remove the faucet handle by locating and removing the screw securing it.
- If applicable, unscrew the trim plate to expose the cartridge.
- Use pliers or a wrench to loosen and remove the old cartridge by turning it counterclockwise.
- Clean the inside of the faucet body to remove any debris or mineral deposits.
- Apply plumber’s tape to the threads of the new cartridge and insert it into the faucet body, tightening it clockwise.
- Reassemble the faucet, including the trim plate and handle.
- Gradually turn on the main water supply to the shower.
- Test for leaks and functionality by turning on the shower and checking for any issues.
- Make any necessary adjustments to resolve leaks or other problems.
- Clean up your work area and ensure the faucet is functioning correctly.
Which Moen Cartridge Do I Need?
The easiest way to know which Moen faucet cartridge you need is by checking which series of faucet you have in the first place. There are 4 types of Moen cartridges to choose from.
Check if you still have the packaging or paperwork for the faucet/cartridge that you have in your shower. If you do, you will surely find the type of cartridge you need there.
The 2 common types of Moen shower faucet is the Moen 1222 and the Moen 1225. You will also have the 1222B and 1225B but you don’t need to worry that if you are a homeowner as they a re similar to 1222 and 1225 only sold in bulk.
What I know and according to Moen, the easiest way to know what faucet cartridge you have is by checking how your faucet turns on and if you can adjust water volume.
If you pull your faucet handle out to turn on the water and rotate it right or left to adjust water temperature, you need the Moen 1225 cartridge. For faucets that only allow you to the turn them to the right or left but offer no water volume control, you need a 1222 cartridge.
Another way to tell which Moen faucet cartridge you need is by determining which year your faucet was installed. If your faucet was installed after 2009, you most likely need a Moen 1225 cartridge.
The last method you can use is to remove the old cartridge and compare it with the ones on the Moen website. You can’t go wrong with this method.
How to Replace a Moen Shower Faucet Cartridge
You will need the following tools for this job
- A new cartridge
- Cartridge puller
- Pliers
- Set of Allen wrench
- Philips screwdriver
- Plumber’s grease
Once you have all the items you need, here is how to remove and replace a Moen shower/tub faucet cartridge:
1. Turn off Water to the Shower
Needless to say, you cannot replace a shower faucet cartridge with water still flowing to the valve.
Unfortunately, unlike other appliances that have shut off valves, you will need to turn off water to your whole house for this repair. Go to the basement or wherever your main water shut off valve is located and turn off the water.
Note: Some houses have a shower access panel on the shower wall behind the faucet which you can remove to access 2 shut off valves for the shower valve. Use the access panel if your house has one.
Once you have turned off the water, open the faucet to drain all the water still trapped inside the pipes. After that, plug off the shower/tub drain opening. You do not want to lose anything to the drain.
2. Remove the Faucet Handle
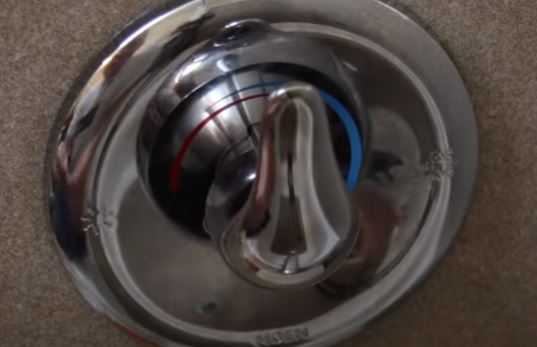
- Turn the faucet handle upside down. It is usually connected to the faucet cartridge using a hex screw on its underside.
- Use the correct size of Allen wrench to loosen and remove the hex screw. Pull out the handle and place it away together with the screw.
- With the handle out, you will then see a plastic piece (usually black) called the handle adapter, connected to the cartridge using a Philips screw. Remove the handle adapter using the screw driver.
- Pull out the temperature limit stop. This is the plastic piece (usually white) that controls your shower water temperature. It is also called an anti-scald device. They are actually 2 pieces pushed together. Pull them out and put them away together.
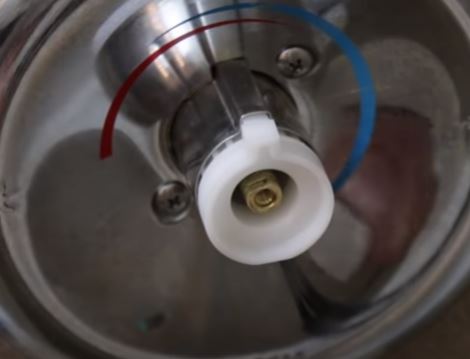
- Remove the stop tube. This piece slides out just like the temperature limit stop.
3. Remove the Escutcheon (Optional)
An escutcheon is the decorative trim plate that is used to cover the unsightly hole on the shower wall where the faucet is installed.
Depending on the position of the cartridge retaining clip, you may or may not need to remove the escutcheon. If the retainer clip can be pulled out without removing the escutcheon then don’t remove it. Otherwise you will need to remove it.
The escutcheon is connected to the wall using 2 screws. Remove then screws using a screwdriver and take it off.
Check also if the escutcheon is caulked to the shower wall. If it is, you will need to cut through the caulk with a knife then give it a few gentle taps to free it up.
4. Remove the Cartridge
- Pull out the cartridge retaining clip. This clip holds the cartridge inside the shower valve to prevent it from shifting, Grab it tightly with the pliers (or a small screw driver) and pull it up and out being careful not to drop it inside the wall.

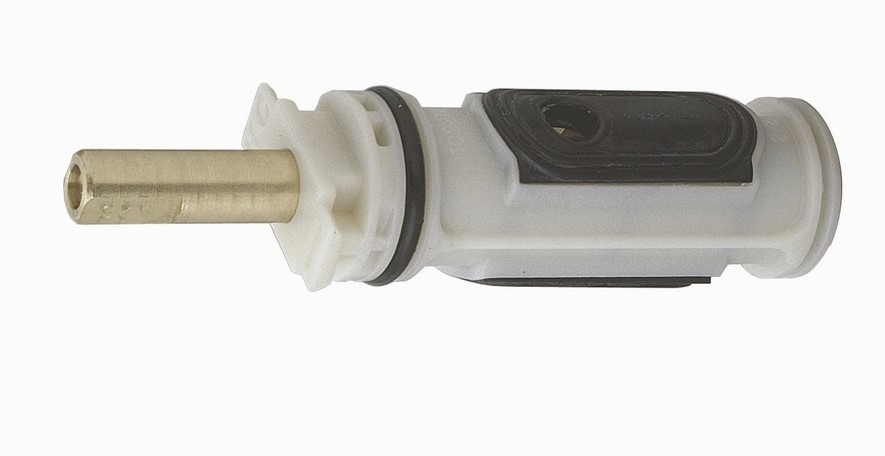
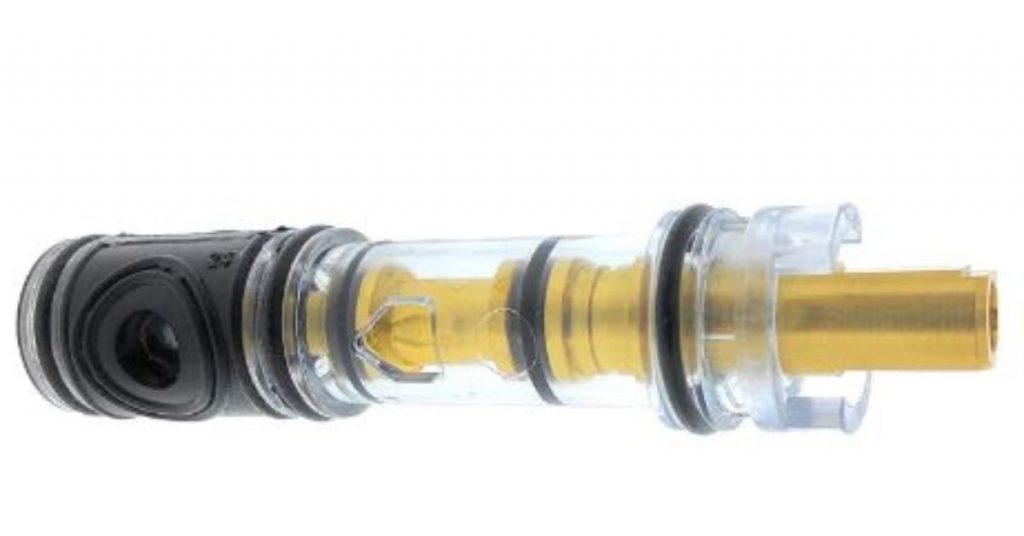
To remove a Moen faucet cartridge, you will need to use a Moen cartridge puller. There are 2 types of those. There is a small plastic piece that you use with pliers and there is a bigger metal one with handle.
- If you have the plastic cartridge puller, slide it inside the cartridge to engage it on both sides, grab it with the pliers and twist it right and left until the cartridge feels free (rotates freely).
- Remove the cartridge puller then grab the cartridge with the pliers. Make sure that the cartridge is straight as it was before then pull it straight out. The small notch on the shaft and the ‘HC’ should be at the top side.
- If you have the cartridge puller with a handle, you will notice that it has 2 shoulders that need to engage the 2 shoulders on the valve.

- Once you have pushed it inside, screw in the screw at the back then tighten the nut. Grab the handle and twist it right and left and when it feels free pull it straight out.
How to Remove a Moen Cartridge without a Cartridge Puller
If you do not have a Moen cartridge removal tool, you can still remove it easily. Make sure however that the cartridge retainer clip is removed first.
- Connect back the handle using the screw but without the stop tube and the temperature limit stop.
- Grab the handle and twist the it clockwise and counterclockwise until it frees up the cartridge then pull it out.
Sometimes you will encounter a stuck cartridge that will just not come out even if you have the cartridge puller. There several ways you can deal with that problem.
To remove a stuck Moen faucet cartridge check out this post that I wrote earlier.
5. Install the New Cartridge
- Use a rag to clean the inside of the shower valve to remove debris or clean out corrosions with an emery cloth.
- Start by applying grease on the black ovals on both sides of the cartridge as well as the O-ring.
- Push in the new cartridge inside the shower valve. Make sure that the ‘HC’ as well as small notch on the shaft are on the top side.
- Put the cartridge retaining clip back to its place, again being careful not to drop it inside the wall.
- Attach the escutcheon if you had removed it.
- Slide in the stop tube, temperature limit stop as well as the handle adapter.
Adjusting the Moen Shower Water Temperature
As I had mentioned earlier, the temperature limit stop is used to adjust the shower’s water temperature. The 2 pieces are joined together by teeth which look like a gear.
To adjust the water temperature, pull out the out piece and turn it counterclockwise to increase water temperature or clockwise to reduce the shower water temperature then push back in to connect with the inner piece.
You might need to adjust it several times to get your desired water temperature.
6. Connect the Handle and Test the new Cartridge.
- Slide in the faucet handle and secure it with the hex screw.
- Turn the water to the shower back on and open the faucet.
- Check if the faucet has sufficient water pressure for both cold and hot water.
- Turn off the faucet and check if there are any leaks.
And basically that is how to replace a Moen faucet cartridge.