A washing machine that won’t drain can be frustrating and result in wet, soapy clothes. Here’s a brief summary of common reasons why a washing machine won’t drain:
- Clogged or Blocked Drain Hose: A blocked or kinked drain hose is one of the most common reasons for drainage problems. Ensure that the hose is not bent or obstructed and that it is securely attached to the drain pipe or standpipe.
- Clogged Pump Filter: Washing machines have pump filters that can become clogged with lint, debris, or foreign objects. Cleaning or unclogging the pump filter can often resolve the issue.
- Pump Failure: The drain pump is responsible for expelling water from the washing machine. If it’s malfunctioning or damaged, the machine may not drain. You may need to replace the pump.
- Lid or Door Interlock Switch: Some washing machines have safety switches that prevent draining if the lid or door is open. Ensure that the lid or door is securely closed during operation.
- Drainage Path Obstruction: Foreign objects, like small articles of clothing or debris, can obstruct the drainage path inside the machine or in the pump. Inspect and remove any blockages.
- Faulty Timer or Control Board: Problems with the timer or control board can disrupt the machine’s drain cycle. Test and replace these components if necessary.
- Clogged Standpipe or Drainpipe: The standpipe or drainpipe that the washing machine empties into can become clogged with lint or debris. Check and clear any blockages.
- Air Gap Issues (for some models): If your washing machine has an air gap, it can become blocked or malfunction, preventing proper drainage. Clean or replace the air gap components as needed.
- Excessive Suds: Using too much detergent can lead to excessive suds, which can interfere with the draining process. Reduce detergent usage and run an extra rinse cycle to clear suds.
- Drain Hose Height: If the drain hose is positioned too high or not installed correctly, it can cause water to siphon out prematurely. Ensure that the hose is at the correct height and securely fastened.
- Worn or Damaged Belts (for some models): In older washing machines, worn or damaged belts can prevent the pump from functioning correctly. Replace the belt if it’s worn or damaged.
- Water-Level Pressure Switch: The water-level pressure switch detects the water level in the machine. If it’s malfunctioning, it may not signal the machine to drain. Test and replace the switch if necessary.
How to Fix It

To fix a washer that is not draining, you need to be methodical. Start with the easy fixes before moving to open up the machine.
Here is how I would do it myself:
1. Check the Lid Switch
If you have a top-loading washing machine that won’t drain, you could be dealing with a broken or stuck lid switch. These washers are usually designed in such a way that they will not spin and drain if the lid switch is not engaged.
To test if your washer’s lid switch is broken or just stuck, you will first need to know the type of washer you have. In older washer models, the lid switch is mounted on the lid itself and there is a hole on the washer where the switch goes through in order for the cycle to start.
If this is what you have, check on its status by depressing it by hand. If the lid switch is good (not broken), you should hear it click. If it doesn’t click it is definitely broken and will need to be replaced.
In new washer models, lid switches are usually placed behind the lid under the hinge. To check if the lid switch is working as it should, close the lid and you should hear it click. If it doesn’t click, it is either stuck or broken.
To check if the lid switch is broken or just stuck, lift the lid switch and push its underside with your palm in order to unstuck it. This usually happens when a heavy load is placed on top of the washer, or when you or several people sit on it.
If the above does not fix the problem, there is still one more thing you can do. With the washer lid open, put your hand under the hinge and push the switch back into place. Close the lid and you should hear it click again if it is fixed.
If all the above fails, the lid switch is broken and will need to be replaced. Note down your washing machine model and order an exact same one or take the old one with you to a home improvement store and ask for a similar one.
If you do not wish to replace the lid switch, you can explore the washer machine lid switch bypass option. For more information check out this video on You Tube.
2. Unplug the Washing Machine
The lid switch is the only test you should carry out with the washing machine still plugged to a power source. This is because it needs electrical power to activate it.
Once you have troubleshot the lid switch and it doesn’t seem to be the problem, the next place you will want to look is the drain hose and pump. You can however not do so with the power still on due to the risk of electrical shock.
Turn off power to the washing machine at the circuit breaker or simply unplug it. Unplugging the washer is usually the best option since you will need to move the washer about and the power cord if still connected can hinder that.
3. Check the Drain Hose for Bends or Kinks
In order for the washing machine to drain properly, the drain hose needs to be fully open. A kink on the hose will prevent that from happening, and you will notice that your clothes will be wet even after the cycle is complete.
To access the drain hose and check on its condition, pull the washing machine straight forward if is positioned very close to the wall (and hence the drain). Once that is done, check if the hose is straight from the washer to the drain.
If you notice any kinks, straighten them up as much as you can. Plug in the washer and start a short cycle. Check if the washing machine will start to drain properly.
If it doesn’t drain the water, unplug the washer from the power outlet and pull out the drain hose from the drain opening. Have a bucket nearby to drain the water already inside the hose.

What you want to do is check if the drainpipe (and especially the P-trap) is clogged or not. The P-trap is the U-bend that holds a constant amount of water at all time, which acts as a barrier preventing sewer gases from coming out of your washing machine.
Pour about 1 gallon of water slowly down the washing machine drain. If the water drains out without a problem, your drainpipe is not the problem. On the other hand, if the water drains out slowly, the P-trap could be clogged and will need to be cleaned.
To clean a P-trap just loosen the 2 joints (usually hand tight) and clean the trap. Once thoroughly cleaned install it back and check gain if the washing machine will start ton drain properly again.
If the P-trap is concealed, you will need to snake it with a drain snake. A clogged P-trap will also be stinky.
4. Drain the Washing Machine
If you have checked the lid switch and drain hose and both seem to be in great working condition, the next place to look is the drain pump. The drain pump is powered by a motor and pumps water from the tub, down the drainpipe via the drain hose.
Before working on the drain pump, you will first need to drain the washing machine. Draining a washing machine is easier if you have a newer model but for older models you will need to do it manually.
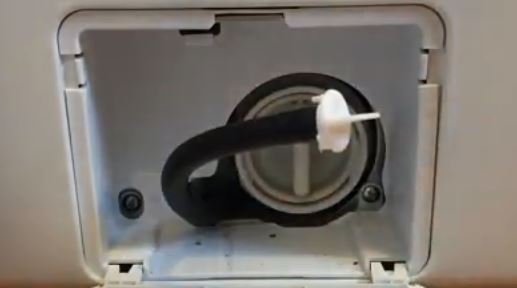
If you have one of the newer washing machine models, look for a small panel at the bottom corner of the washer. This is where the washer filter is housed. To remover the cover, pull the tab at the top and the cover will come out freely.

Once the cover is out of the way, you will see a small (usually black) hose. This is the hose you will use to empty your washing machine. Make sure you have a bucket or pan nearby.
Pull the hose out and remove the plug at the front of the front to start draining out the water. This will take a while to complete.

If you have an older washing machine without these panel, you will either need to scoop the water out of the tub using a cup and bucket or suck it out with a shop vac. Alternatively, pull out the drain hose from the drain and lay it on the floor and all the water will drain out.
5. Inspect the Drain Pump
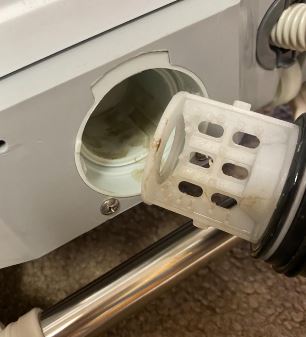
Again, if you have the newer models of washing machines, this process will be easier for you. Open the small access panel and check the condition of the washer filter. The washer filter is next to the small drain hose.
To remove the filter, turn it counterclockwise to loosen it and once loose pull it straight out. This is also called the washing machine coin trap. As its name suggests, it traps coins, hair pins and other small pieces that might jam and break the drain pump impellers.
With some models, you can also access the filter from the rear. Check you washer’s specification diagram to see where the filter is located.

Once the washer filter is out and it was the one responsible for preventing the washing machine from draining, you will notice that it will be quite clogged.
Clean the filter in a nearby sink and install it back. Plug in the washing machine to a power outlet and check if it will start to drain properly again.
Most washing machine manufacturers recommend that you should clean the filter at least once a year. Any time you notice an awful smell coming from your washing machine this is the first place you should check.
If you have an older model of washing machine, you will need to access the drain pump itself and check if it is indeed clogged, or if an impeller or belt is broken. This is tougher job than the one above but still totally doable.
- The drain pump could be located at the rear or front of the washer. To be sure of its location, look for an access panel on the front or rear bottom of the washer secured by screws.
- If you are not happy bending that much to remove the access panel and fix the pump, have someone help you lift the washer and place it on a bench or any other raised surface.
- Use a screwdriver to unscrew and remove the 2 screws. As you do this, hold the panel firmly to prevent it from falling off when you least expect it. Place the screws in a safe place to avoid losing them.
- To remove the panel, lift it from the bottom gently to unhook it from the top of the washer. Place it aside.
You will see the drain pump at the base of the washer where it will be connected to the drain hose.
6. Check for Clogs in the Drain Hose
For this to work you will need to disconnect the drain hose from the washer (from the rear of the washer) and drain. Again, be ready with a bucket and towels to drain the water already in the hose.
Once you have removed the drain hose, check for clogs form both of its ends. If you see any try to pull it out with a pair of needle-nose pliers.
If the clog is in the middle of the hose, you might not be in a position to see it. Blow air through the hose using your mouth. If the pipe is clogged, the air will face resistance and will not come out through the other end. Otherwise, if the hose not clogged you will notice the ease with which air will flow through it.
Unclogging a drain hose with a clog in the middle is not easy. Try to be as innovative as you can otherwise just replace it.
And that is how to fix a washing machine that is not draining. If everything in this guide fails, feel free to contact a licensed plumber to fix it for you. Depending on your location, it will cost between $50 and $100 or even more, especially if you have to buy a replacement part.
