Whether you are using a gas or electric water heater, you will at some point encounter problems with it. Of all those problems, lack of hot water is the worst I can think of, save for the rare explosions.
There is a difference between having no water in the house and having hot water, which runs out faster than it should.

If the water in your house only lasts a few minutes, you have a bad lower heating element, broken dip tube or sediment build up in the tank. I have written the solution to such a problem in this post.
If you have no hot water with an electric water heater, you most likely have a tripped breaker/reset button, bad thermostat or heating element. With a gas water heater, the problem could be a faulty thermocouple, tripped thermal switch or issues with gas supply.
You therefore have to first establish if your water heater is electric or gas-powered. This is really easy.
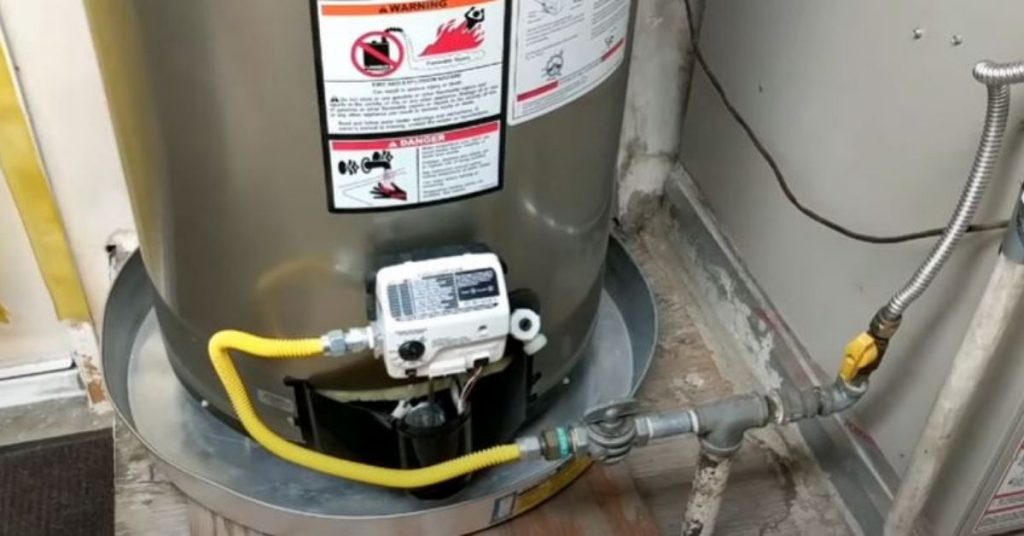
with a gas water heater, you will see the gas pipe to the water heater (usually black), the temperature control at the bottom of the tank and the exhaust gases vent. Electric water heaters have no vent but will be plugged in to a power outlet.
It is important to check whether you are having no hot water in the entire house or it is just one appliance. If it is just the shower or no bathtub that has no hot water, check out this post.
In this post, I will give a brief summary and then go ahead to give the full answer later. Here is why you have no hot water and what to do:
- Pilot Light or Ignition Issues: If you have a gas water heater, the pilot light may be out or the ignition system could be malfunctioning. Relight the pilot following the manufacturer’s instructions or have a professional inspect and repair the ignition system.
- Electric Element Problems: In an electric water heater, the heating elements may be faulty or burned out. Replace the defective heating element with a new one or seek professional assistance.
- Thermostat Misadjustment: Incorrect thermostat settings can lead to no hot water. Ensure the thermostat is set to the desired temperature, usually around 120°F (49°C).
- Tripped Circuit Breaker: For electric water heaters, a tripped circuit breaker can cut power to the heating elements. Check the breaker panel and reset any tripped breakers.
- Sediment Buildup: Accumulated sediment in the tank can insulate the heating element or burner, reducing its efficiency. Drain and flush the tank to remove sediment buildup.
- Faulty Pressure Relief Valve: A malfunctioning pressure relief valve may be releasing excess pressure, causing inadequate heating. Test the valve for proper operation and replace it if necessary.
- Water Heater Size: An undersized water heater may struggle to meet the hot water demand. Consider upgrading to a larger unit if necessary.
- Leaking Tank: Leaks in the tank can lead to a lack of hot water. Inspect the tank for leaks and, if found, replace the water heater.
- Gas Supply Issues: If you have a gas water heater, check that the gas supply is connected and the gas valve is open. If there are issues with the gas supply, contact a professional.
- Water Heater Age: Older water heaters may experience a decline in performance and eventually fail. Consider replacing the unit if it’s nearing the end of its lifespan.
- Blocked Ventilation: In gas water heaters, a blocked vent can disrupt proper combustion. Ensure the vent is clear of obstructions and debris.
- Frozen Pipes: In cold climates, frozen pipes can prevent hot water from reaching the taps. Thaw the pipes using safe methods, such as gentle heating or insulation.
- Plumbing Issues: Sometimes, issues in the plumbing system, like a closed valve or a water leak, can disrupt the flow of hot water. Inspect the plumbing for problems and repair as needed.
- Gas Valve Problems: If you have a gas water heater, the gas control valve may be malfunctioning. Consult a professional to diagnose and repair or replace the valve.
- Tripped High Limit Switch: In electric water heaters, a tripped high limit switch can shut off the heating elements. Reset the switch and investigate the cause of the overheating.
No Hot Water with a Gas Water Heater?

The first thing to do if you have no hot water on a gas water heater is to check if the pilot light is on. If the room is very bright, you might need to dim the lights in order to see the pilot light. The pilot light sight glass will be located at the bottom of the water heater.
In some water heaters, there is a small panel at the bottom that you will need to remove in order to see the sight glass and the pilot light.
The main reasons why a water heater pilot would go out are a faulty or bent thermocouple, lack of enough combustible air or the flame could be blown out by a powerful wind especially if the combustion chamber is not sealed.
If the water heater pilot light is off, you will want to do is to try to relight it. The instructions will most likely be printed on the water heater but I will walk you through them again.
The first thing to do before trying to relight your water heater pilot light is to ensure that you indeed have natural gas flowing to the water heater.
Turn on another fixture like the stove and if it lights normally then you have sufficient gas in your property. If the stove does not light as well, either your reservoir tank is empty or the gas supply company has turned it off.
When the stove is lighting up properly but the pilot light on the water heater is out, check if the water heater gas valve is open. Although rare, someone might have closed the valve ultimately turning off the pilot light.
When you are satisfied that the water heater should be receiving gas, go move ahead to relight the pilot light.
How to Relight a Water Heater Pilot Light
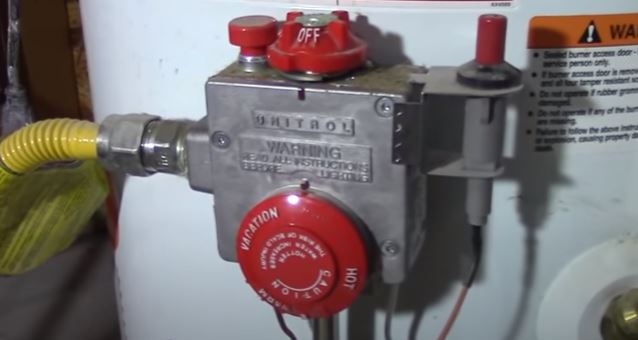
- Put the gas regulator valve to the off position.
- Wait for 5 minutes. This will allow any gas in the room to flow out. Make sure that the room is properly ventilated. In case there is a gas smell (usually a rotten eggs smell) do not try to light the pilot. Turn off gas supply to the water heater and open all doors and windows.
- After the 5 minutes move the gas regulator valve to the pilot setting.

- Press the gas valve control knob down (sometimes it is another adjacent button). This allows gas to flow to the pilot. While still holding the knob down, strike the igniter down repeatedly. This will create a spark which lights the pilot. The igniter is the red button (or sometimes black) with a copper wire connected to it. Keep holding the knob down for at least 1 minute.
- Release the knob slowly and check if the pilot light remains lit, or if it goes off immediately..
Note: If you can see the spark through the sight glass but no flame, the problem is almost always associated with the fuel. Either there is no gas flowing to your property, or it has been turned off.
Pilot Light Won’t Stay Lit?
If a water heater pilot light won’t stay lit, the problem is almost always electrical. In most cases the thermocouple is usually the culprit. Here, you will first need to check the reset switch then measure the voltage flowing to the thermocouple.
A gas water heater reset switch, also known as a door switch or a thermal switch is a device at the bottom of the water heater that controls the power flowing to the gas control valve. In case of an unsafe condition (too much heat in the chamber), this switch will trip, cutting off power and therefore gas supply to the burner.

With a tripped thermal switch, power cannot flow to the gas control valve and you can therefore not light the pilot. Check if this is the case with your water heater and reset the thermal switch.
In between the 2 terminals on the thermal switch you will see a small button. If the switch is tripped it will have popped out. Press it inside and if you hear it click then it was tripped. Try to relight the pilot switch again.
Note: A tripped thermal switch is caused by lack of combustion air or an obstructed exhaust. If the intake screen at the base of the water heater is clogged, vacuum out the dust. Inspect the exhaust baffle to make sure that it is not misaligned.
Now, if even after resetting the thermal switch the pilot light will still not stay lit, check the wiring to make sure that there are no loose connections or even contacts. Next try to bypass the thermal switch.
To bypass a water heater thermal switch, connect a jumper wire between the 2 connections or place a metallic bit across the 2 connections.
Try relighting the pilot switch with the thermal switch bypassed. If you are successful, know that the thermal switch is faulty and will need to be replaced.
Note: A water heater thermal switch bypass is strictly for testing only and you should never run the water heater with the switch bypassed. The switch is a safety device which is installed for your own good.
If even after doing the above you still can relight the pilot, it is time to test the thermocouple. A water heater thermocouple should be able to produce at least 20 millivolts in order to keep the gas valve open.
How to Test a Water Heater Thermocouple
While testing the voltage across a water heater thermocouple you might need an extra pair of hands as you need to do a series of activities concurrently.
Here are the steps to follow:
- Adjust your voltmeter to the direct current (DC) voltage settings.
- Disconnect the thermocouple from the gas control valve. In some water heaters, you will only need to pull out the connection but in others you will need to disconnect it with a wrench.
- Put one multimeter probe on the copper wire and the other at the tip of the thermocouple.
- With the probes still maintaining contact on the thermocouple, try to light the pilot again. Press down the gas valve knob and hold there in and strike the igniter a couple of times.
- Keep holding down the button as you watch the reading on the multimeter. This will probably last 3 minutes as the reading increases gradually.
A good water heater thermocouple should have between 20 and 30 millivolts in an open circuit. If you get less than that then you definitely need to replace it.
How to Test a Water Heater Thermocouple
No Hot Water with an Electric Water Heater
When you have no hot water and use an electric water heater, you could be having a bad upper thermostat or heating element. It could also be as a result of a tripped reset button or circuit breaker.
Troubleshooting an electric water heater that is no heating water is an easy task. We will start with the easiest places to check and then work our way to the hidden areas.
If you have no hot water and use an electric water heater, here is how to fix the problem:
1. Check the Circuit Breaker
Move straight to your electrical panel (located in a storage closet, basement or garage) and look for the breaker with the “Water Heater” sign on it or just the initials “WH”.
Check if the breaker is on the on or off position. If you find that the breaker is on the off position, it has tripped. This often happens due to a power surge. A faulty reset button can also trip the breaker.
Flip the breaker back to the on position and check what happens. If the breakers maintains that position and the water heater goes ahead to heat the water, you problem is fixed.
On the other hand if the breakers trips back to the off position, there is something wrong with your reset button, thermostat or heating element.
If the water heater circuit breaker was in the on position all along, turn it to the off position. There will be 240 volts of power flowing to the water heater and it is dangerous to operate it with live power.
2. Remove the Thermostat Access Panel

An electric water heater will most likely have 2 heating elements and thermostats. These are covered by metals plates on each half of the tank.
Power from the breaker fast flows to the upper thermostat which also has the reset button connected to it. It then flows to the upper heating element before flowing to the lower thermostat and heating element.
Whenever you have a bad upper heating element or thermostat, you will have no hot water. With a bad lower thermostat or heating element, you will hot water which will however run out fast, followed by cold water.
A thermostat is responsible for turning the heating element on and off, as the water temperature inside the tank changes. If the thermostat fails to turn the heating element off, the water temperature rises to 1800 F.
At that temperature, the reset button trips, cutting off power to the heating element. When that happens, you will no longer have hot water in your house.
To troubleshoot an electric water heater, you will need to access the thermostats and heating elements. Here is how you do it:
- Use a screwdriver to remove the screws attaching the upper access panel plate to the tank. Put the screws away in a safe place.
- Remove the insulation covering the thermostat and element or attach it over the thermostat with a piece of duct tape or electric tape.
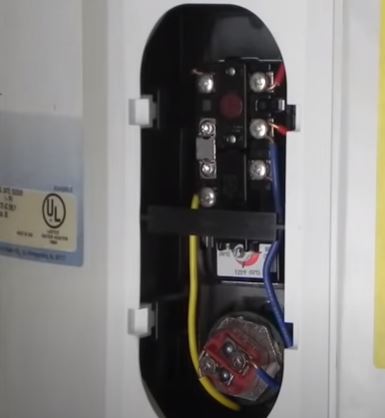
- You will also see a piece of plastic cover. This piece snaps on the thermostat and heating element. Remove it as well.
You can now see the thermostat, reset button and heating element. The thermostat is the piece with a series of screws and wires connected to it.

At the bottom you will see 2 wires connected to 2 screws. That is the heating element. The reset button is button on the thermostat (usually red in color).
3. Reset the Water Heater
As I have mentioned above, the reset button will trip if there is an unsafe condition. Check to see if the reset button has indeed tripped.
A tripped reset button will have popped out a little. To reset it, press it in until you hear it click. Sometimes it will not click so just press and hold it for at least 5 seconds.
At this point, you can put the cover back and power the water heater to check if the problem is fixed. I would however advise you to check for continuity across the reset button to see if it is faulty or not.
While at it, you should also test for continuity in the thermostat and/or heating element.
To test for continuity, you will need a multimeter and screwdriver.
- To avoid making connection mistakes later, take a picture of all the connections.
- Disconnect the wires from the screws. To do this, you will first need to loosen the screws a little with the screwdriver.
- Prepare your multimeter. With an analogue multimeter, you will need to set the dial to the least ohms of resistance settings. After that pinch the 2 probes together and move the dial to read zero.
- A digital multimeter will only need you to move the dial to the lowest ohms of resistance or to the tone settings if available.
- You will see 2 terminals (screws) on the left side of the reset button and 2 others on the right side. Place your multimeter probes on the left terminals and check the reading. Now move the probes to the right terminals and again check the readings.

In both of the above tests, you should have no continuity. If you do, the reset button is faulty and you will need to replace the thermostat.
4. Test the Heating Element
- Disconnect the 2 wires from the heating element screws (terminals).
- Adjust the multimeter to the least ohms of resistance.
- Place the 2 probes on the 2 terminals and check the multimeter reading.
A good heating element should register between 10 and 16 ohms. If there is no continuity the heating element is bad and will need a replacement.
To test if there is contact between the heating element and the tank, place one probe on the tank body and the other on one of the terminal. Check the reading. While maintaining contact with the tank, test the other terminal as well.
If you get any continuity reading, the heating element is grounded and will need to be replaced.
I have written a comprehensive post on how to replace a water heater element. Read it here.
If the heating element looks ok, you can as well test the thermostat for continuity. I have as well written a great post on how to test and replace a water heater thermostat. Read it here.
And basically that is how to troubleshoot a water heater if you have no hot water in your house. I hope this helps.
