Water heater elements will need to be replaced at one point or the other. The frequency of a water heater element replacement depends on the hot water demand rate, quality of water and the quality of the heating element itself.
Modern water heaters (above 40 gallons) will have 2 heating elements while old and small water heaters have 1 element.

The signs of a bad water heater element is when you have no hot water (caused by a bad upper element) or hot water which runs out fast (caused by a bad lower element). A reset button or water heater breakers that keeps tripping is also another sign of a bad heating element.
To test your water heater element, turn off power to the water heater and remove the thermostat access panel. Use a multimeter to test for continuity between the 2 element’s terminals. A good heating element will have 10-16 ohms of resistance.
To replace a water heater element, turn off both power and water supply and drain out the tank. Remove the thermostat access panel and disconnect the element wires. Using a 1 ½ inch socket wrench, remove the old heating element and thread in the new one. Fill the tank and turn on the power.
While replacing a water heater element without draining the tank is possible, you risk flooding the floor especially when replacing the lower heating element. To prevent this, open a nearby faucet (to relieve water pressure) and have your new heater ready to install as soon as you pull the old one out.
The cost of 2 heating elements (upper and lower element kit) is about $30. A professional plumber will however charge you between $200 and $300 to replace the heating elements for you depending on your area and work difficulty.
Replacing a lower water heater element is not different from replacing the upper one. Turn off power and water to the tank and drain out the tank. Loosen the element with a 1 ½ inch socket wrench and pull it out. Put the new one in and tighten it.
How to Replace a Water Heater Element

In this post, I will first give you a brief summary and then later provide the full answer. He is a brief summary of how to replace a water heater element:
- Safety Precautions: Before starting, turn off the power supply to the water heater at the circuit breaker or disconnect the gas supply if it’s a gas water heater. Also, shut off the cold water supply to the tank.
- Drain the Tank: Connect a garden hose to the drain valve at the bottom of the water heater and place the other end in a suitable drain or outside. Open the drain valve to drain the tank partially. This will reduce the water level below the element you’re replacing.
- Turn Off Water Supply: Close the hot water faucet at a nearby fixture to prevent backflow while draining the tank.
- Locate the Element: The heating elements are typically located behind access panels on the side of the tank. Remove the appropriate access panel to access the element you need to replace.
- Disconnect Wires: Before removing the element, carefully disconnect the electrical wires from the old element. Note the wire colors and their locations for reconnection later.
- Remove the Old Element: Using a suitable wrench or element removal tool, carefully loosen and remove the old heating element from the tank. Be cautious not to damage the tank’s threads.
- Inspect and Clean: Inspect the removed element for any signs of damage or corrosion. If necessary, clean the opening in the tank where the element was installed.
- Install the New Element: Screw the new heating element into the tank by hand, and then use a wrench or element tool to tighten it snugly. Avoid over-tightening to prevent damage.
- Reconnect Wires: Reattach the electrical wires to the new element, ensuring they are correctly matched to their respective terminals. Tighten the wire connections securely.
- Close the Access Panel: Reattach and secure the access panel covering the element.
- Refill the Tank: Open the cold water supply valve to refill the water heater tank. Allow the tank to fill completely, and then open a hot water faucet in your home to purge any air from the system.
- Turn On Power: Restore power to the water heater at the circuit breaker or reconnect the gas supply if it’s a gas water heater.
- Check for Leaks: Inspect the area around the newly replaced element for any signs of leaks. If you detect a leak, shut off the water supply and power and tighten the element further.
- Monitor Temperature: Wait for the water heater to heat up and reach the desired temperature. Monitor the temperature to ensure it’s functioning correctly.
- Final Checks: Finally, perform a final check to ensure that everything is functioning properly, and there are no leaks or issues with hot water supply.
While replacing a water heater is an easy job, you need to do it methodically to be sure you are doing it the correct way and safely.
Here is the step by step guide on how to replace a water heater element:
1. Turn off Power to the Water Heater
At any one given time, there will be 240 volts of power flowing to your water heater. You should never even attempt to work on your water heater with power to it still connected.
Look for your house’s electrical panel in a storage closet, garage or in the basement. There will be a breaker labelled “Water Heater” or with the initials “WH” on it. Flip it to the off position.
Note: In some instances, a bad water heater element or thermostat can trip the breaker to the off position, meaning you will no longer be having hot water. In that case, flipping the breaker back to the on position may be enough to fix your water heater problem.
2. Drain the Water Heater
A water heater is continuously being supplied with cold water. Replacing the element with the tank full of water and receiving more from the supply pipes will just flood your basement (or wherever you heater is). Some people do it but I would recommend it.
This is how to drain your water heater:
- Turn off the cold water supply valve. For a gate valve, you will need to turn the knob all the clockwise while for a ball valve you will need to position the lever at 90 degrees to the supply pipe.
- Connect a garden to the water heater drain valve at the bottom of the tank. Direct the other end of the garden hose out into the driveway or in a floor drain.
- To drain the tank, open the drain valve with a flathead screwdriver if it doesn’t have a lever. Standby as the tank drains completely.
- to help the tank drain faster, open the nearest hot water faucet. Leave it open (for a reason).
- Once the tank is drained, shut off the drain valve and remove the garden hose.
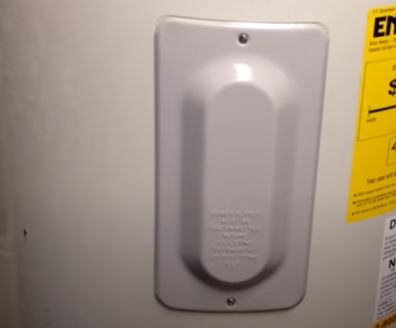
3. Remove the Access Panel
As I have already mentioned, your water heater will most likely have 2 heating elements and therefore 2 access panels as well.
Even when you have only one faulty heating element, I always advise that you replace both the both of them at once. Heating elements are cheap and you are guaranteed that you will not have to replace the other element in a few months or years.
Whenever possible, buy a complete kit and replace both heating elements and thermostats. This especially makes sense when you are bringing in a professional since that will not increase the cost by much, if any.
I usually recommend that you start with the upper element then replace the lower element later.
This is how to remove the access panel of a water heater:
- Use a screwdriver to remove the screws on the access panel cover plate. There will be either 1 or 2 screws securing the plate to the water heater. Keep the screws and plate away in safe place.
- Remove the insulation. With the plate out, you will see a piece of insulation covering the element and thermostat. If it is not removable, secure it on the tank with a duct tape or electrical tape.
- Remove the plastic cover. There will also be a plastic piece which snaps on the thermostat and heating element. Remove it as well.
With all the pieces out of the way, you can now see the heating element and thermostat. The heating element is at the bottom with 2 wires connected to it, while the thermostat is at the top with a series of wires and screws connected to it.
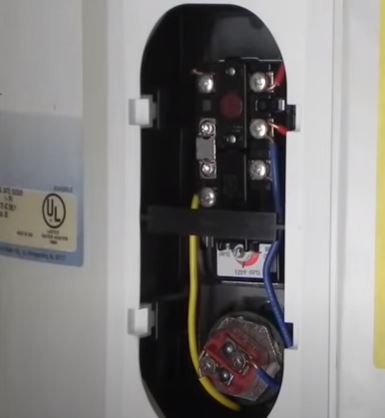
You will also see the rest button (usually red in color) on the thermostat. The thermostat temperature adjustment dial is the plastic piece which looks like a big screw.
A thermostat is responsible for turning the heating element on and off, as the water temperature inside the water heater changes. If the thermostat is bad, it will fail to turn on the element and you will have no hot water.
The water reset button, also known as the high temperature limit switch turns off power to the water heater in case of a faulty thermostat or heating element. It trips off at its rating of 180 degrees Fahrenheit.
A tripped water heater reset button will have popped out. If that is the case with yours, you just need to press it until you hear it click, or press and hold for about 5 seconds.
Resetting a water heater might just be enough to fix the problem you are having. Also check the temperature adjustment dial to be sure it is not set too low or too high. 120 degrees Fahrenheit is quite ideal.
4. Test the Heating Element for Continuity
A continuity test will basically test if your circuit is open or closed. You will need a multimeter for this step. Here is how to do it:
- Disconnect the 2 wires from the 2 screws on the heating element. To do this, loosen the screws a bit with a screwdriver then pull the wires out.
- Calibrate your analogue multimeter. If you are using an analogue multimeter, you will first need to calibrate it . Set the dial to the lowest ohms of resistance then pinch the 2 probes together. Move the needle to the zero reading.
- With a digital multimeter, move the dial to the lowest ohms of resistance or better still to the tone setting if you have that option.
- Place the 2 probes each on a separate water heater terminal (the 2 screws) and check the reading on the multimeter.
- After measuring the resistance in the upper element, remove the lower access panel and test the lower heating element as well.
A good heating element will have a resistance of 10-16 ohms. If you get none (or if the multimeter fails to beep), you have a bad heating element and a replacement is needed.
Note: If both heating elements appear to be good, your problem could be the thermostats. I have written a separate post on how to test and replace a bad water heater thermostat. Read it here.
5. Remove the Old Heating Element
There are 2 types of water heaters in as far as connection is concerned. You will either have a screw-in or a bolt-in water heater element. Although both are easy to remove and replace, we will focus on the screw-in type as they are the most used.
Thankfully, water heater elements have the same size off connection and hence the wrench used to loosen and tighten them is a standard one. If you do not already have it with you, buy a 1 ½ inch socket wrench since it is what you will need.
- Use the socket wrench to grab the heating element’s head and loosen it. Once loose unscrew it with your hand and pull it out.
- Examine its condition. It will give you a good picture of how things are inside the tank.
- Peep inside the tank and check if there is lime sediment which affects the efficiency of your water heater, and also makes it noisy.
- Before installing the new element, you can use a vac to remove the sediment. Check out more on that in this video.
- Use a toothbrush to clean the water heater element connection threads, especially if there are mineral deposits on them.
6. Install the New Heating Element
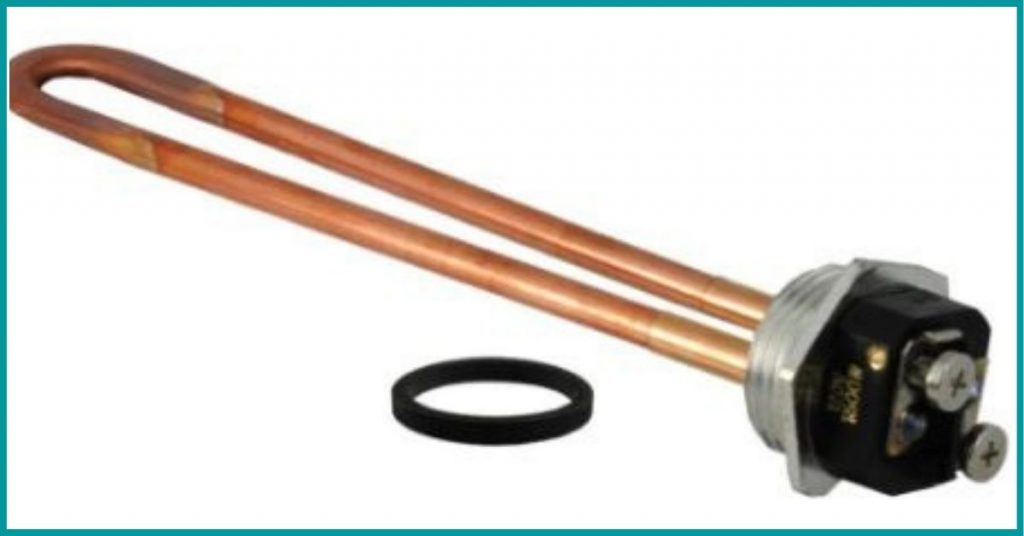
While installing a heating element, you need to make sure that you are replacing the old element with a similar one. By this, I am talking about wattage and voltage ratings. With this, you can go lower but not higher.
You can get your water heater element model number on the old element or on the data plate/sticker on the side of your water heater. If you are not sure, snap a picture of your water heater and take it with you to the nearest Home Depot or Lowes. They will sell you the right element for your water heater.
There are 3 types of heating elements for you to choose from: These are:
- High watt density heating elements
- Low water density heating elements
- Lime life heating elements.
High watt density heating elements are the basic types of heating elements and can be used in any water heater. They are inexpensive but not long lasting.
Low watt density heating elements are specially designed for areas with hard water to discourage mineral build up in the elements. You can replace high watt density heating elements with the low watt ones as long as they have the same wattage and voltage rating, although they are pricey.
Lime life or ultra-low watt density heating elements are premium elements with quality stainless steel surface to inhibit mineral build up which is the number one cause of faulty elements.
These elements will also resist dry-firing and are therefore ideal for areas that receive interrupted water supply. They are the most expensive among the 3 types. If you wouldn’t mind a recommendation check out this one on Amazon.
With your water heater elements already with you, it is time to install them.
- Slide in a washer inside the heating element and push it all the way past the threads. This is very important in preventing leaks.
- Push the heating element inside that tank and thread it in until hand tight.
- Tighten the element with the socket wrench but not too forcefully that you strip the threads.
7. Test the New Heating Element
- Turn on the water to the tank. Never test the heating element with an empty tank. The new elements will simply burn out.
- As the tank is filling with water, make sure that the hot water faucet remains open. This will help flush out air from the tank. Only turn the faucet off once it stops sputtering out the air.
- Check if there are leaks around the water heater element connection. If there isn’t, connect the wires to the screws as before and tighten them together.
- Put back the plastic piece, insulation and the cover plate.
- With the tank full, turn on the power to the water heater.
- Wait for about 20 minutes for the element to heat the water.
And that is how to replace a water heater element
How to Replace a Water Heater Element without Draining the Tank
Although I usually don’t recommend this process, this is how I would do it:
- Turn off water to the water heater.
- Remove the cover plate and disconnect the wires from the heating element.
- Turn off the water supply valve.
- Open the nearest hot water faucet. This will help to release pressure from the tank.
- Loosen the heating element with the socket wrench but don’t unscrew it fully.
- Cut a 2 liter water/soda bottle in 2 halves from top to bottom. To prevent water from spilling all over the floor, place one half under the element connection and the other end pointed to an empty bucket.
Note: Have the new element by your side ready to stick in in once you pull out the old one.
- Unscrew the old element quickly and as soon as it is free pull it out fast and immediately push and thread in the new one.
- Tighten it with the wrench to prevent leaks.
- Open the water supply to the tank.
- Once the tank is full turn on the power.
- Wait for about 20 minutes for the water to be sufficiently heated.
That is how to replace a water heater element without draining it.