Most homeowners will from time to time experience lack of hot water in the shower but rarely is there no cold water. But it happens.

Causes of No Cold Water in the Shower and Solutions: A Brief Summary
Causes:
- Water Heater Issues: Problems with the water heater can lead to a lack of cold water in the shower. If the heater is malfunctioning or set to a high temperature, it may be delivering only hot water.
- Shower Valve Malfunction: The shower’s mixing valve or cartridge may be faulty, preventing the proper mixing of hot and cold water. This can result in either all hot water or only cold water coming out of the showerhead.
- Supply Line Issues: A blockage or damage in the cold water supply line to the shower can restrict or completely cut off the flow of cold water.
Solutions
- Check Water Heater Settings: Ensure that the water heater is set to an appropriate temperature that allows for a mix of hot and cold water. Adjust the thermostat if necessary.
- Inspect the Shower Valve: If the shower valve or cartridge is malfunctioning, it may need repair or replacement. Consult a plumber to diagnose the issue and replace the faulty components.
- Check Cold Water Supply: Inspect the cold water supply line to the shower for any blockages, kinks, or damage. If needed, repair or replace the supply line to restore cold water flow.
- Bleed Air: In some cases, air may get trapped in the pipes, affecting the water temperature. Turn on both the hot and cold faucets in the shower and let the water run for a few minutes to bleed out any air.
- Balancing Valve Adjustment: Some showers have balancing valves that regulate water temperature. Adjusting these valves can help achieve the desired mix of hot and cold water.
- Professional Plumbing Inspection: If the issue persists or if you’re unsure of the cause, it’s advisable to seek the assistance of a professional plumber. They can conduct a thorough inspection, identify the root cause, and recommend the appropriate repairs.
How to Fix a Shower without Cold Water

As I have mentioned above, if you have a shower or bathtub with no cold water you will need to replace the faucet cartridge. While this is a task most homeowners can comfortably do on their own, call in a professional plumber if you don’t fill comfortable doing it.
The first thing you will need to do however is to determine the type of faucet you have. Majority of shower faucet manufacturers like Moen and Delta will send you the replacement parts for free. This is because the parts have a lifetime warranty.
Give your faucet manufacturer a call and they will send you a replacement kit in a few days. If you are not ready to wait that long, grab a kit in your nearest home improvement store. The cost will be about $20.
Once you have the new cartridge with your, it is replace the old one. This is how:
1. Remove the Faucet Handle
- Before doing anything, start by plugging off the bathtub/shower drain. You do not want to drop anything down the drain.
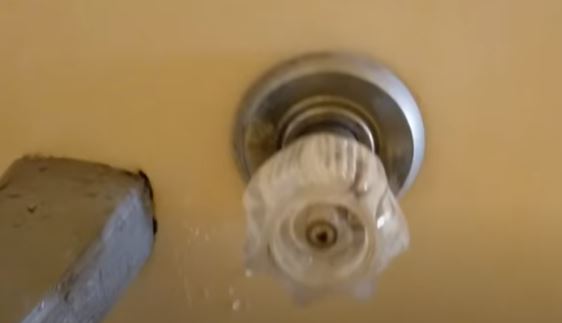
- There are 2 types of shower handles. You will either have a lever-type handle or a knob-type faucet handle.
- With a lever-type handle, there will be a screw securing the handle to the stem on its underside. Remove the screw with an Allen wrench and pull the handle out.
- If you have a knob-type handle, the handle will be connected to the stem using a long screw. To access the screw pry off the small cap at the front of the handle using a knife. Remove the screw with a screwdriver.

Note: If the handle is stuck, you will need to pull it out as you wiggle it about. This is often caused by mineral deposits or rust.
2. Remove the Escutcheon
An escutcheon is the cover plate which hides the unsightly hole on the wall where the faucet is installed. It is purely for aesthetic purposes.
Your escutcheon will in most cases be connected using screws. In some instances, the escutcheon is simply screwed on the shower faucet stem. You will only need to turn it with your hand but some have a nut that you need to loosen with a wrench.
Some escutcheons will be caulked on the bathroom wall. If that is the case with you, cut through the caulk with a sharp knife. You may need to tap gently on it to completely free it.
Pull out the escutcheon and the small tube known as a stop tube.
3. Turn off Water to the Shower Faucet
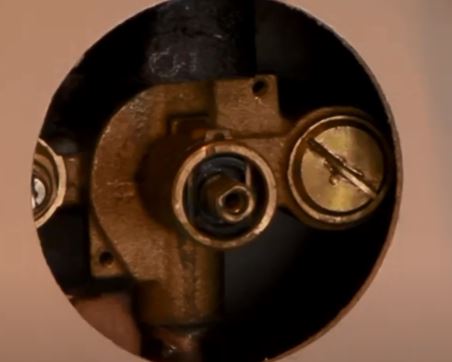
With the handle and escutcheon out, you can now see the whole shower valve body. Check if there are 2 screws, one on each side of the valve.
The 2 screws are the cold and hot water shut off valves. Use a screwdriver to turn the screws so that no water will be flowing to the shower valve.
If unfortunately your shower valve does not have these valves, you will need to turn off water to your entire house. Dash to your basement or wherever your main house shut off valve is and turn the valve all the clockwise or perpendicular to the water pipe if you have a lever handle.
4. Remove the Cartridge
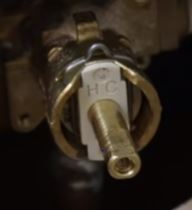
- Pull out the cartridge retail clip. The cartridge is usually held in place by a retaining clip. Grab the clip firmly and pull it out. Be careful not to drop it inside the wall. You may grab the cartridge with pliers or insert an Allen wrench on the hole at the top.

Pulling out the shower faucet cartridge is not always easy. If it has been in place for many years, it will be in most cases stuck and trying to pull it straight will only break it, which means cutting out and replacing the entire valve.
If you look inside your new cartridge kit, you will see another piece called a cartridge puller. There are 2 types of cartridge pullers.
The first type is a smaller plastic piece that you slide inside the cartridge stem. Grab it with a pair of pliers and use it to turn and twist the cartridge right and left until it frees up.
The second type is metallic cartridge puller with a handle and shoulders which engages the shoulders on the cartridge. If you do not have a cartridge puller that is the one I would recommend buying.
- After twisting the cartridge a couple of times and is already turning freely, grab its stem with the pliers and pull it straight out gently while twisting it at the same time.
- After pulling out the cartridge, make sure that all the O-rings have come out with it. If broken pieces have been left inside the valve, pull them out.
- Clean the valve opening with a small piece of rag.
5. Install the New Cartridge
- Lubricate the cartridge. Your new cartridge will come with a clear lubricant in a clear plastic bag. Use it to lubricate the O-rings on the cartridge.
- Check the correct orientation of the cartridge and slide it inside the valve. If your cartridge has an “HC”, that is the top side.
- Push in the retainer clip.
- Install the stop tube and the escutcheon.
- Slide in the handle and secure it with the screw
If you have to caulk the escutcheon to the wall, do not do so until you have confirmed that indeed you can receive sufficient cold water in the shower.
No Cold Water in Shower after Replacing Cartridge
If you have replaced your shower faucet cartridge and still there is no cold water in your shower, you most likely have a defective shower-balancing spool. This is usually caused by clogging especially by minerals like calcium.

A shower-balancing spool is the part on the shower valve that balances out the hot and cold water ratio to prevent a sudden cold water shock or scalding hot water. Cleaning or replacing the spool will in most cases fix the problem.
To remove the pressure-balancing spool you will need to first remove the faucet handle and escutcheon. You will then see the brass head on the shower valve which looks like a large flathead screw.
To remove the pressure-balancing spool you will need a big flathead screwdriver. Turn it counterclockwise and when it is free pull it out. You will need to pull it forcefully in case the O-rings are stuck.
Grab the pressure-balancing screw with your hand and shake it about. A properly functioning spool will have a piece moving freely inside. At this point you may decide to replace it with a new one or clean it.
To clean the pressure-balancing spool, boil it in an equal part of water and vinegar solution. As sign that it is good to go, you should hear the little piece inside moving when you shake it.

Put it back inside and screw it with the screwdriver. Install the escutcheon and faucet handle and check if the cold water is flowing freely again.
