A constantly dripping shower head is not only irritating but an expensive problem to have. Not only will it increase your water bills but it will also stain your bathroom surface and walls, and hence the need to fix it as soon as possible.

A leaking/dripping shower head is caused by a worn out faucet washer or a chipped faucet seat, allowing water to pass through even when the faucet is turned off. It could also be caused by a clogged or/and worn out shower head O-ring, causing leaks from around the threads/hose connection.
Fixing a leaking shower head is a really easy job and sometimes you don’t even need to buy anything. Even when you have to buy something, it is usually a cartridge or just washers/O-rings which costs under $5 dollars, which is way less than a plumber would cost.
If your shower head is continuously dripping water hours after it has been turned off, you are dealing with a worn out faucet washer or a chipped faucet seat. In a properly functioning shower faucet, the faucet washer pushes strongly against the seat creating a watertight seal.
A shower head that leaks or drips water from around the threads or hose connection is indicative of a worn out shower head O-ring or even a clogged showerhead, as a result of mineral deposits and debris and this is how to fix it:
- Turn Off the Water: Shut off the water supply to the shower. You can usually find the shut-off valve in the shower or bathroom, or turn off the main water supply to your home.
- Remove the Shower Head: Use a wrench or pliers to carefully loosen and remove the shower head from the shower arm (the pipe that connects to the wall). Wrap a cloth or towel around the shower arm and shower head to protect the finish from scratches.
- Inspect and Clean: Examine the shower head for visible damage, like cracks or worn-out gaskets. Clean the inside of the shower head by removing any mineral deposits or debris that may be causing the leak.
- Replace O-Rings and Washers: If the shower head has rubber O-rings or washers, inspect them for damage or wear. Replace any that are worn out or damaged.
- Teflon Tape (Thread Seal Tape): Apply a few wraps of Teflon tape (thread seal tape) to the threads on the shower arm. This helps create a watertight seal when reattaching the shower head.
- Reattach the Shower Head: Carefully screw the shower head back onto the shower arm. Hand-tighten it as much as possible without over-tightening to avoid damaging the threads.
- Test for Leaks: Turn the water supply back on and test the shower head for leaks or drips. If it still leaks, you may need to tighten it slightly or replace damaged parts.
- Replace Shower Head (if necessary): If the shower head continues to leak, consider replacing it with a new one. Ensure the new shower head is compatible with your existing plumbing.
How to Fix a Leaking Shower Head

Let us start with a worn out shower head washer/O-ring. Fixing a leaking shower head as a result of a worn out or warped O-ring is way easier compared to a shower head whose faucet washer and seat are worn out and chipped.
Here is how to progress:
- Turn off the water supply to the shower head at the faucet.
- Grab the shower head with your hand and try to turn it counterclockwise.
- If the shower head won’t turn, wrap duct tape or a cloth around the connection nut and turn it with an adjustable wrench or pliers. This will prevent the finish from peeling off.
If after removing the shower head you still see water dripping from the pipe, the problem is certainly a faulty shower faucet and not the showerhead. On the other hand if there is no water water dripping after removing the shower head, the faucet is not the problem.
- Check the overall condition of the shower head. Are there mineral deposits and debris inside it? Tap it against the palm of your hand to remove as much debris as possible.
- Use a needle-nose pliers to remove the O-ring from inside the shower head. Check if it is worn out or just warped. If any of that is the case it will need to be replaced.
- Drop the shower head in a bowl full of vinegar and leave it there for 30 minutes.
- While you wait for the vinegar to dissolve the mineral deposits from the shower head holes, turn on the shower faucet to flush out any debris trapped inside the pipe. This will prevent them from clogging the shower head after you connect it back.
- After the 30 minutes, remove the showerhead from the vinegar and clean it in the bathroom sink using a brush. Use a thin pin or toothpick to poke through each hole just to make sure that they are all opened.
- Put in a new O-ring inside the shower head groove. Please buy an O-ring that matches your shower head as all O-rings are not universal. You should do this prior to starting the repair.
- With a wire brush or old toothbrush, clean the shower head’s pipe threads to remove all old Teflon tape.
- Apply around 4 wraps of Teflon tape on the pipe threads for a watertight seal.
- Connect the showerhead back on the pipe. Start off slowly to avoid cross threading.
- When the showerhead is hand tight, use a wrench or pliers to tighten it a little more, but not crazy tight. Do not forget to wrap a wash cloth or duct tape on the shower head while tightening it.
- Turn on the water to the shower head and check if the leak has stopped. 99% of the time this repair will fix a leaking showerhead faucet if the O-ring was the issue.
Is It a 2-Handle Faucet?
There are different types of shower faucets but they all work the same way. A faucet handle is connected to the faucet stem which has a washer at the tip.

When your turn the faucet handle to shut off the water to the shower head, the stem pushes forward, squeezing the washer against the faucet seat and hence blocking water flow to the shower head.
When you want water to flow to the shower head, you turn the faucet in the opposite direction, a move which pulls the washer from the faucet seat allowing water to flow out. The constant pushing and pulling of the washer against the faucet seat causes it to wear out and warp.
A worn out faucet washer means that the stem is in direct contact with the faucet seat (metal to metal contact) which causes it to chip/burr. A burred faucet seat will tear a new faucet washer and hence the need to replace both the washer and the seat.
You will either have a 2-handle shower faucet or a single-handle shower faucet. If you have a 2-handle shower faucet, you have to first determine if the leaking shower head water is hot or cold.
That way you will know which washer and seat to replace. If you have the time, you can also opt to replace both the cold and water faucet washers and seats. with that you will have the peace of mind for a few years.
How to replace a leaking shower faucet washer and seat
- Turn off the water supply to your house. You cannot fix a shower faucet when the water supply is still on. Dash to your basement or wherever the shut off valve is and turn off the water.
- Turn on the faucet fully to drain out all the water still trapped in the pipe.
- Cover the shower drain with a towel/rag to prevent dropping screws down the drainpipe.
- On the faucet’s handle, you will see a small cap at the front. Use a flathead screwdriver or pocket knife to pry it off.
- You can now see a screw that connects the handle to the stem. Use a Philips screwdriver to remove it. Slid out the faucet handle.

- You will then see a sleeve called a stop tube that is usually hand tight, turn it counterclockwise and remove it out as well.
- Disconnect the cover plate (escutcheon) by removing the screws either at the front or on the side. In some faucets the cover plate and the stop tube are usually one piece.
- Use an adjustable wrench to loosen the faucet stem lock nut by turning it counterclockwise.
- Remove the faucet stem and check at the condition of the washer. Is it dented, warped or just worn out? It will need a replacement.

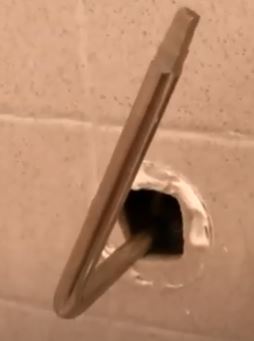
- Grab a flashlight and look inside the faucet opening at the condition of the of the faucet seat. If it looks damaged in any way you must replace it as well. To remove a faucet seat you need a faucet seat wrench. A faucet seat wrench is simply a tapered Allen wrench.
- Insert the faucet seat wrench inside the faucet opening until you engage the seat. Turn the wrench counterclockwise until you remove the seat.

- Put the new faucet seat in the wrench and put it back. Tighten it gently so as not to strip the threads.
- Remove the faucet washer screw and the old washer on the faucet stem and replace them with new ones. Make sure the new washer is nicely positioned inside the groove, as it can be a little hard to push it in all round when new.
- Push the faucet stem back in place and tighten it with a wrench. Always tighten the connections with your hand until snug before picking up the wrench. A ¼ turn with a wrench is in most cases sufficient.
- Screw in the cover plate and the stop tube. Remember that the stop tube should only be hand tight. Putting a wrench on it will deform it.
- Slide in the faucet handle and secure it with the Philips screw. Pop in the screw cover.
- Turn on the water to the shower and check if the leak has stopped. This repair will fix a shower head that leaks hours after turning the water has been turned off.
Is it a Single-Handle Faucet?
A single-handle shower/bathtub faucet is more modern than the 2-handle faucet shower system. You can control the shower water temperature and pressure from the single handle. This faucets also come with anti-scald devices, installed at the front of the cartridge.
Single-handle shower faucets use 2 washers backed by springs to turn on and off the water flow to the shower head. By turning the faucet handle, you will compress the washer against the spring, shutting off the water to the shower head.
If there is a problem with the spring or washer, the seal will be broken and you will have a constantly leaking shower head. In this case, the best thing to do will to replace cartridge, but you can also replace the washers and the springs only as illustrated in this video.
Here is how to fix a leaking shower head with a single-handle faucet:
- Turn off the water to the shower. Head to the basement and turn off the water supply to the shower/house.
- Open the shower faucet to drain out the water still left in the pipe.
- Cover the shower drain with a towel or rag so as not to drop a screw down the drain.
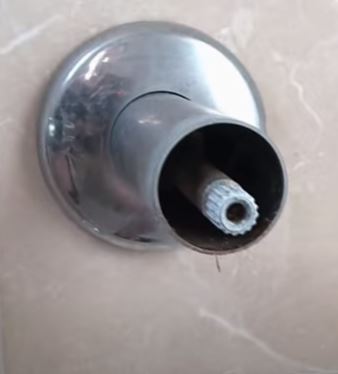
- Your shower faucet handle will either be connected to the cartridge using a Philips screw like the ones used in 2-handle faucet systems, or an Allen screw on its underside. In case of the former, turn the faucet upwards and loosen the screw with an Allen wrench. You don’t need to remove the screw all the way out.
- Once the handle is out, you will see a ring that you will need to grab with a wrench/pliers and turn it counterclockwise to remove. Some faucets will have a secondary sleeve. Remove it out as well.
- Check if the cover plate is caulked to the wall. If it is. Cut the caulk with a putty knife and remove the cover plate by unscrewing the 2 screws on it.
- Removing the cover plate will give you a chance to see a clip which holds the cartridge in place. Hook the clip with a screwdriver or needle-nose pliers and pull it out. Some clips will however be so out that you will not need to remove the plate.
- If you keenly look at the stem of the cartridge, you will notice that the flat part is facing up. That is really important since that is the same way you will put the new one in. Grab the cartridge with the pliers and pull it out gently. If the cartridge has been in place for a long time, it can snap so you should consider buying a cartridge puller.
- Once the old cartridge is out, clean the inside of the faucet with a screwdriver and a piece of rag to avoid future leaks.
- Apply some plumber’s grease on the new cartridge and push it inside, being careful to make sure that the groove/flat surface on the stem faces up.
- Insert the clip to secure the cartridge.
- Screw in the cover plate but don’t caulk it to the wall just yet.
- Now slide in the sleeve and ring and tighten them in together, though not crazy tight.
- Attach the handle and put in the screw.
- Turn on the water and test the new cartridge for leaks.
Read also:


