A French drain refers to a trench filled with gravel and a perforated pipe which are then wrapped with a drainage fabric to direct surface water and/or groundwater away from your property in areas prone to flooding. They are installed in the yard or around the perimeter of the house.

Here’s a brief summary of what you need to know:
- Purpose: French drains are primarily used to manage excess water and prevent flooding or water damage in areas like basements, yards, or crawl spaces.
- Design: A typical French drain consists of a trench filled with gravel or rock and a perforated pipe placed at the bottom. The trench is sloped to guide water away from the problem area.
- Function: When water enters the trench or surrounding soil, it flows into the gravel-filled trench and into the perforated pipe. From there, it’s redirected to a designated drainage area, such as a storm sewer or a dry well.
- Installation: Installing a French drain requires digging a trench, placing the perforated pipe, covering it with gravel or rock, and then backfilling the trench. Proper slope and placement are crucial for effective drainage.
- Types: There are different types of French drains, including interior and exterior options. Interior French drains are installed inside basements to manage groundwater, while exterior French drains address surface water and prevent it from seeping into structures.
- Preventive Measure: French drains are often installed as a preventive measure to protect properties from water damage and dampness, especially in regions with high rainfall or poor soil drainage.
- Maintenance: Regular maintenance may include cleaning debris from the drain and checking the pipe for clogs or damage to ensure proper function.
- DIY vs. Professional: While DIY installation is possible for simple projects, it’s recommended to hire a professional for more complex or large-scale French drain installations to ensure effectiveness and compliance with local regulations.
- Cost: The cost of installing a French drain varies depending on factors such as size, location, and the extent of the drainage problem. It’s generally considered a cost-effective solution for water management.
- Legal Considerations: Before installing a French drain, check local regulations, as there may be permitting requirements or restrictions on where and how you can redirect water.
Yard French drains cost between $10 and $16 dollar per linear foot to install. French drains around a house will however cost as high as $12000 for a 1500-square-foot basement with a depth of 6 feet. A cheaper option is an interior French drain which costs about $3000.
The History
Unlike other things that start with the word “French”, French drains are neither glamorous, stylish nor anything romantic, and most important are not a French invention.
French drains were popularized (not necessarily invented) by Henry Flagg French who was a lawyer and assistant Treasury Secretary in the United States in his book Farm Drainage in 1859.
Henry French’s drains were made of ordinary roofing tiles although better drain tiles were invented. These tiles were installed with a 1/8-inch spacing between them for water admittance.
Modern French drains are made of PVC or corrugated flexible pipes. PVC pipes are used when the trenches are straight but if the trench is curved then corrugated pipes are flexible enough and hence the natural choice.
French drains are installed in such a way that they are sloping from the area you intend to remove the water to the area you need to dump it. This allows water to flow out via gravity, just like the sewer line from your house to the street or septic tank.
Do they Really Work?
French drains may look simple but they are indeed very effective. Unlike the usual surface drains which only drain water in one dedicated area, French drains collect water across the entire length of the drain, minimizing the likelihood of water flooding in the area.
For the French drains to work properly however, they need to be properly installed. Here is what I mean:
- The depth has to be right. French drains should have a depth of between 18 inches and 2 feet when being installed in the yard. Those built around hose foundations should however be deeper. Shallow French drains will not achieve their object and you will still have flooding water in your yard.
- The slope has to be right. As I have already mentioned, French drains should carry water from a point of high elevating to a low-lying area. The way to do that is to ensure that the drain is gradually sloping from the area you need to remove water to where you intend to drain it. As a standard, French drains should slope downwards by 1 inch for every 10 feet of pipe.
- The perforations need to face down. This is very important. Most people assume that since the water comes from above the perforations need to be at the top of the pipe. That is a mistake. With the perforations up, it means water will have to accumulate around the pipe until it reaches the perforations.
- Dirt should not get into the drainage. When building a French drain, you need to ensure that dirt/soil will not get into the system. To do this, you need to cover the pipe and gravel with a drainage fabric that allows water through but not dirt. Clean the inlet grate regularly as well.
Common Mistakes
In addition to the above, there are some very common mistakes that most homeowners make when building French drains.
These mistakes prevent the French drains from working as envisioned and hence the reason some people are of the opinion that French drains are not as effective as advertised. The common mistakes that people make when building French drains are:
1. Not Using a Drainage Fabric
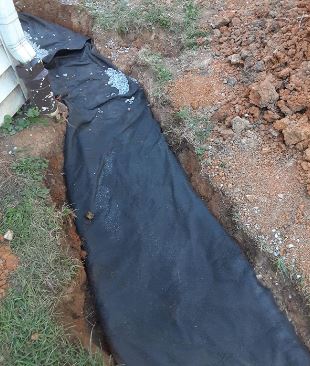
To help you imagine how a French drain ought to look like, the perforated pipe and gravel need to be wrapped inside the trench like a burrito using a drainage fabric.
A drainage fabric allows water to pass through it while at the same time keeping soil and other debris at bay. Failure to use a drainage fabric will have soil (especially if you have clay) penetrating through the gravel and clogging it, affecting the efficiency of the drainage system.
Apart from that, the soil will be deposited inside the perforated pipe and it may even plug the holes meaning you will need to pull it out.
There are still people who insist that you don’t need to use a drainage fabric. Their argument is that the soil will plug the fabric as well, reducing the efficiency of the drainage system. That is however not the case if you use a quality drainage fabric.
The best material to use on your French drain trench is a 4 to 4.5 ounce weight nonwoven geotextile drainage fabric. These drainage fabrics last for decades without a problem.
2. Using the Wrong Type of Gravel
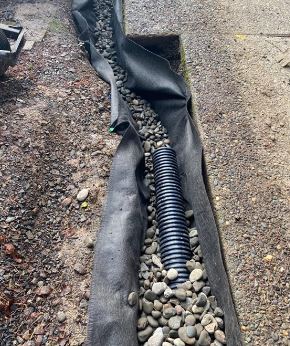
Selecting the correct type of gravel ensures that water permeate through it fast and without clogging the system. The best type of gravel to use in a French drain is 1 to 1.5-inch round rock.
The only disadvantage to this point is that that type and size of rock is not readily available everywhere, meaning you may need to use other types and sizes of gravel. All in all, you should avoid crushed rock that tends to compact and clog the holes on the pipes or pea-sized gravel which reduces the flow rate of the water from the yard.
If you cannot find 1-1.5-inch round rocks in your area, you can used crushed stones provided that you will also used sock-wrapped drainpipe to prevent plugging of the drainpipe holes.
3. Digging Where You Shouldn’t
There are lots of utilities buried around your property. While bursting a water service line or sewer line is expensive, digging through a power or gas line can be very dangerous.
Before you start to dig your French drain trench, you need to be sure that nothing lies in the path you intend to follow. The only way to be sure is by calling 811 and all the local utilities will come to your property and mark along paths of existing utilities.
If you have lived in your property for a long time and know exactly where each utility line passes through, you can go ahead and start digging.
4. Negative Slope or No Slope in the Drain
As I have already mentioned, a French drains works the same way a sewer line works. It gradually slopes from the point where you need to remove flooding water to the area you want to drain it.
If you make a mistake and you end with no slope or even a negative slope in your French drain trench, it means that there will be no force to channel the water away and your problem will therefore persist.
How to Install a French Drain in the Yard
If you need to remove pooling/flooding water from your yard, installing a French drain will be easy, cheaper and fast. Depending on the length of the drain, it will take you one or 2 days to complete the job.
Before starting the job, you will need the following:
- PVC pipe (4-inch in diameter or larger) or a corrugated drainpipe
- Gravel
- Drainage fabric
- Pipe fittings
- Inlet grate
- Shovel
- Power drill
The following are the steps to follow;
1. Determine the Drain French Path
You will first need to determine where surface water is pooling around in the yard and where you want to take it. Use flags or paint to mark the intended drain path from start to finish.
As I mentioned earlier, you will need to first ensure that there are no utility lines that are installed along that path.
The plan is to always take water away from your property. As a rule of thumb, the French drain should start from a point of high elevation and end in an area of low elevation. This will help you achieve a nice slope so that the water can drain out naturally.
2. Dig the Trench
After marking the intended path of the French drain, all you need to do now is start digging. As you dig, you need to be careful about the depth, width and the slope on the French drain trench.
For a simple French drain in the yard, it should have a depth of at least 18 inches and a width of 9 to 12 inches. Remember that your French drain should slope down at least 1 inch for every 10 feet of drainpipe.
3. Line the Trench with a Drainage Fabric
This is very critical step. When buying your French drain drainage/landscaping fabric, you need to get the measurements right.
As I mentioned earlier, the fabric should form a burrito wrap with the gravel and drainpipe. The size of your trench will help you determine what size of fabric you need to buy.
After lining the trench with the drainage fabric, you should have at least 10 inches of fabric on each side of the trench. When you are done installing the drainpipe and filling the trench with gravel, the excess fabric is overlapped to completely seal the gravel and drainpipe.
To help you determine the width of the drainage fabric you need, let us assume the trench is 12 inches wide and 18 inches deep. This will translates into 12 inches + (18*2) inches + (10*2) inches = 68 inches.
4. Pour the Gravel
Pour 3 inches of gravel in the trench and make sure that it is compact. This initial layer of gravel will act as bedding for the drainpipe.
This is just the first layer of gravel. More will be poured at the top of the drainpipe. Some people don’t follow this method but the drainpipe should be sandwiched between the gravel.
5. Lay the Drainpipe
Start by positioning the inlet grate where water is more likely to pool. Although water is removed by the entire length of the drain, installing an inlet grate ensures that pooling water is removed fast.
The only thing you will need to do is ensure that you keep the area around it clean to prevent soil and other type of debris from entering the drainpipe and clogging it.
If your trench is not straight, you will need to use a flexible corrugated drainpipe with cut slits. Otherwise use a rigid PVC pipe which is easy to maintain (by snaking or hydro jetting) in case of a clog.
With PVC pipes, you will need to drill holes 6 inches apart along the sections of the drainpipe. You can also opt to buy pipes with pre-drilled holes.
Connect the pipes together and lay them on top of the layer of gravel. It is vital to remember that the holes on the drainpipes should be at the bottom and not the top. You will be surprised by the number of people who make that mistake.
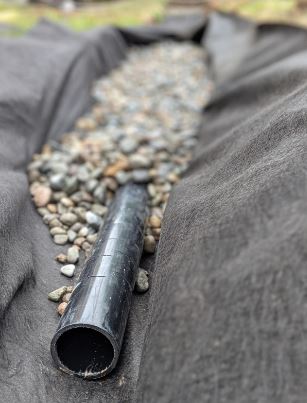
The drainpipe above for instance is installed wrongly. Note that the holes are at the top of the pipe and not the bottom.
6. Fill the Trench with Gravel
After laying the drainpipe in the trench, fill the trench with the remaining gravel but remember to keep it below the ground level. Wrap the gravel and drainpipe using the extra drainage fabric (remember I said at least 10 inches on each side).
To cover the French drain burrito, different people use different materials. Some use top soil while others plant grass and still there are those who opt for landscaping rock/gravel.
Installing French Drain Around the House
French drains are not only used to remove pooling water from the yard, but they can also be used as a solution for wet basements. Wet basements are caused by water which is admitted through the house’s foundation.
These types of a French drains are called footing drains. It reroutes water from around the house to elsewhere keeping your basement dry.
Footing drains should ideally be installed when the house is being built otherwise they are both difficult and expensive to do later. Unlike the yard French drains which are a DIY project, these type of French drains will need a professional to install.
Alternatively, you can install what is known as a interior French drain. These drains intercept the water as it enters the basement and channels it elsewhere but they are mostly used together with sump pumps due to lack of sufficient slope on the drainpipe.
It is also not cheap since you will have to cut through walls if you have a finished basement. But that is a small price to pay if the water is already ruining it.
And that is pretty much it in as far as French drains are concerned. I hope this guide was helpful.
Related article: How to unclog an outdoor drain.


