Moen Shower faucets are some of the best in the industry. Although they last longer than most of the other faucets, the definitely don’t last forever. You will from time to time deal with a leaking Moen shower/bathtub faucet.

A leaking Moen shower faucet is usually caused by a faulty cartridge. The 2 washers which shut off the cold and hot water flow are in most cases worn out, allowing water to drip even when the faucet is turned off.
While replacing the 2 O-rings/washers is possible, the best way to fix a leaking Moen shower faucet is to replace the cartridge. Moen faucets have a lifetime warranty so all you have to do is to email/call them for a replacement.
If you have a bathtub-shower-combo and you notice that your shower head is dripping water or that there is water dripping from your bathtub spout, the shower faucet is often the culprit. Replacing the cartridge will fix this problem at once.
How to Fix a Leaking Moen Shower Faucet
Before getting down to business, you will need to gather a few tools. These are:
- New Moen faucet cartridge
- Pliers
- Philips screwdriver
- Allen wrench
All Moen faucet cartridges are not interchangeable. If you are not sure which one to buy, look for the faucet series number on the escutcheon (cover plate) or underneath the faucet handle and order a matching cartridge.
Here is how to fix/replace a leaking Moen shower faucet cartridge:
1. Turn off the Water
You cannot repair a shower faucet when there is full water pressure in the pipes. The first to do therefore is to turn off water supply to the shower (and possibly the entire house) and drain that which is already in the pipes.
- Dash to your basement or wherever the water shut off valve is located and turn it off. Usually, this valve is located in the basement near the water heater or outside the house on a wall, next to the water meter. Turn the valve counterclockwise or if you have a ball valve turn it so that the lever is at 90 degrees to the supply pipe.
- Turn on the shower faucet all the way to drain the water already in the pipes.
- Cover the shower or bathtub drain with a rag/towel to prevent screws from falling down the drainpipe.
2. Remove the Faucet Handle

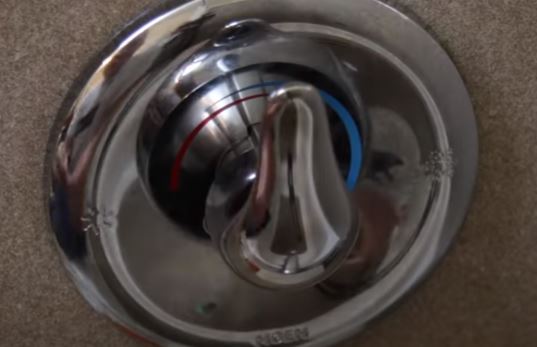
The faucet handle is attached to the cartridge using a screw on its underside. To access the cartridge you will first need to remove the handle. While most Moen handles will look this way, there also other variations. One way or the other the handle will have a screw somewhere.
- Turn the faucet handle all the way so that it faces up. You will see screw inside a groove at the bottom of the handle.
- Use an Allen wrench to remove the screw. Please make sure that you use the correct size off Allen wrench to avoid defacing the screw head. Loosen the screw by turning it counterclockwise. Note that you don’t need to remove the screw all the way out.
3. Remove the Old Faucet Cartridge
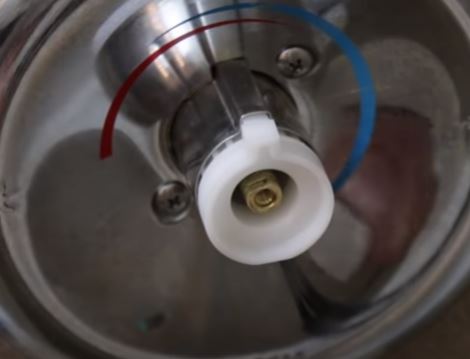
- Once the faucet handle is out, you will see a plastic holder (usually black) connected to the cartridge using a Philips screw. Remove the handle holder using the Philips screwdriver.
- When the faucet handle holder is out, you will see the temperature limit stop, which is basically a white plastic part that slots into a sleeve known as the stop tube. This is what lets you turn the faucet handle either left or right to select cold or hot water as well as the water pressure. Pull out the temperature limit stop and put in a secure place.
- Remove the stop tube. This part is usually not threaded to anything so all you have to do is pull it out. Sometimes it maybe sticky and you have to wiggle it a little bit to remove it.

If you look carefully, you can see a clip which attaches the cartridge to the faucet body. The clip holds the cartridge in place so that water pressure in the valve does not push it out.
In case the clip is easily accessible, you can pull it out without having to remove the cover plate, also known as an escutcheon. The best tool for that job in that case would be a needle-nose pliers.
If the valve was however roughed-in deeper in the wall, you will have no alternative but to remove the cover plate.
- Check if the cover plate is caulked into the wall. If that is the case cut the caulk with a putty knife.
- The cover plate is connected to the wall using 2 screws. Use the Philips screwdriver to remove the screws and pull out the plate.
- With the Allen wrench or screwdriver, pull out the clip while being very careful not to drop it inside the wall.
- To remove the cartridge, grab it with a pair of pliers and gently turn it right and left a couple of times just to loosen it. When it feels free. pull it straight out. Some cartridges especially those which have been in place for a long time will be very sticky hence you might have to buy a cartridge puller to prevent them from snapping
4. Install the New Cartridge

Prior to installing the new cartridge, it is a good practice to first clean the valve. Use an old toothbrush, to scrub off calcium and other mineral deposits. If there are lots of debris inside the valve, turn on the water slowly to flush out the debris. This will prevent leaking from the new cartridge.
When that is done it is now time to install the cartridge. Here is how to proceed:
- Start by greasing the cartridge. Your new cartridge will most likely come with a lubricant. Apply it on the 2 holes on the cartridge. If it doesn’t, apply your grease all around it. This will make it easy if you ever have to replace it again.
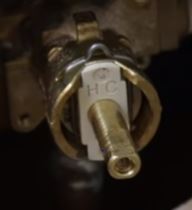
- Push the cartridge in the valve. It is very important that you get this point right. If you look at the end of the cartridge (one which you attach the handle), you will see 2 flat edges. One flat edge has a little groove. The side with the groove should always be the one at the top. Alternatively, look for the initials HC on the cartridge. This initials should also be at the top. With this in mind simply push the cartridge inside the valve.

- Insert the clip. If the cartridge is in the right position, the clip will slide in easily.
- The next step is to attach the cover plate. Align the screws holes and put the 2 screws in. Tighten them with a screwdriver.
- Once the cover plate is fastened to the wall, put in the stop tube and make sure that it goes through the slot on the cover plate.
- Push the adjustable temperature limit stop in the stop tub and make sure that it is properly engaged.
- Screw in the faucet handle adapter.
- Connect the handle. Slide in the handle and fasten it with its screw. To do this right, look for a groove inside the handle and align it with the slot on the handle adapter.
5. Test the New Moen Shower Cartridge
Turn on the water supply to the shower and check for leaks when the faucet is turned off. Open the water and let it run and then turn it off. Check if the faucet is shutting off precisely.
If you have a shower-bathtub-combo, divert water to the shower head and turn the faucet off. Check if the shower head is dripping/leaking.
If you are satisfied with the checks then you have successfully fixed a leaking Moen shower faucet. On the other hand if the problem persists please call in a professional plumber.
FAQs
1. Why is Moen faucet leaking after replacing the cartridge?
If you replace your Moen faucet cartridge but the faucet is still leaking, either the new cartridge was defective or it was the wrong model. Call Moen with the old cartridge model number and they will advise you accordingly.
2. Which Moen Cartridge do I need?
To know the correct model number of the Moen cartridge for you shower faucet, you will need to know the model number of your faucet first. This number can be found on the underside of the faucet handle or on the cover plate, also known as the escutcheon.
