Fixing a bathroom sink leaking underneath requires identifying and addressing the source of the leak. Here’s a summary of the steps to fix this common issue:
- Turn Off the Water: Before starting any repair, turn off the water supply to the sink. This is usually done by closing the shut-off valves located beneath the sink.
- Clear the Area: Remove any items stored under the sink to create a clear workspace.
- Inspect the Leak: Carefully examine the area under the sink to locate the source of the leak. Common sources include:
- Faulty Drainpipe: Check the drainpipe connections for loose or corroded fittings. Tighten any loose connections with a wrench or pliers. If the pipe is damaged, replace it with a new one.
- Leaky Faucet Connections: Inspect the connections between the faucet and the water supply lines. Tighten any loose fittings or replace damaged parts like O-rings or washers.
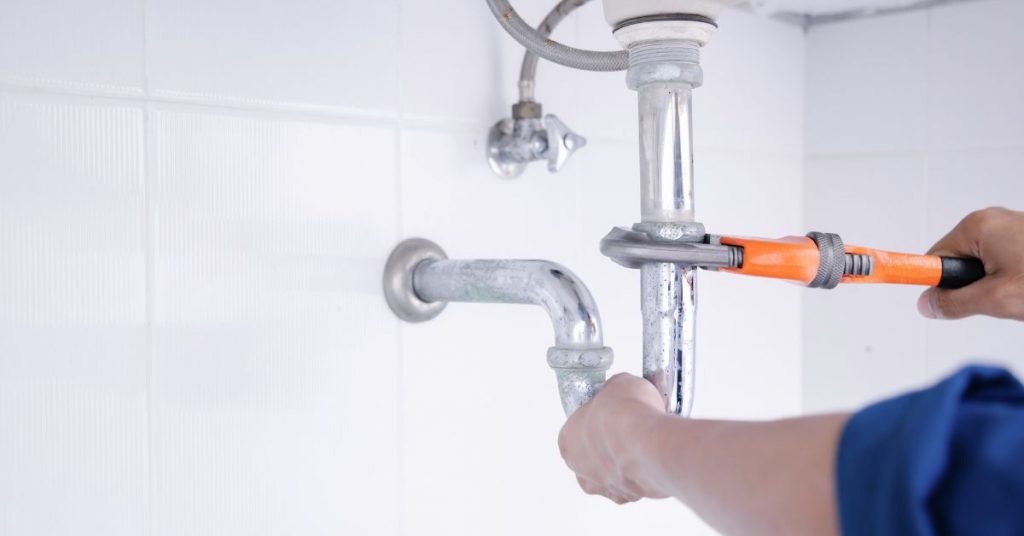
- Faulty P-trap: The P-trap is a curved section of pipe beneath the sink that can develop leaks. Check the P-trap connections for leaks or loose fittings. Tighten connections, replace worn-out washers, or replace the P-trap if necessary.
- Use Plumbers Tape or Sealant: For threaded connections that continue to leak after tightening, apply plumber’s tape (Teflon tape) to the threads to create a better seal. Alternatively, use a thread sealant or pipe joint compound.
- Replace Seals: If the leak persists, it may be due to damaged seals or gaskets. Replace these components with new ones that are compatible with your sink and plumbing.
- Inspect the Sink Basin: Sometimes, the sink basin itself can develop cracks or damage that causes leaks. If you suspect this is the issue, consult a professional plumber for repair or replacement.
- Test for Leaks: After making the necessary repairs or replacements, turn the water supply back on and test for leaks. Be vigilant in checking for any signs of water seepage or dripping under the sink.
- Reassemble and Secure: Once you’re confident that the leak is fixed, reassemble any disassembled parts, such as the P-trap and drainpipe. Ensure that all connections are secure but not over-tightened to avoid damage.
- Clean Up: Dry the area under the sink and clean up any residual water. Keep an eye on the repaired area for a few days to ensure there are no further leaks.
How to Fix a Bathroom Sink Leaking From Underneath
To fix a leaking bathroom sink, you need to first investigate the source of the leak. You may need to start by wiping all the water on the floor and on the body of the sink drain so that you can see the exact point of the leak.
Once you have identified the source of the leak, proceed to fix it as follows:
1. Align the Drain Connections
When you have a plastic bathroom sink drain, it is not unusual for the drain line connections to be misaligned, especially if you use the bathroom sink cabinet to store things. Since the connections are often hand-tight, pulling or pushing the drainpipe can easily misalign it causing it to leak.
Start by inspecting the sink drain. Does the connections look misaligned? If they do, the solution will be an easy one.
Loosen the connections to align the drain line and then tighten them. To be sure that the problem is fixed, fill the tank with water then drain it out all at once.
2. Tighten the P-trap Connections

A P-trap is the U-shaped bend of the sink drain. It is shaped as such to hold water at all times which acts as a barrier preventing sewer gases from coming up to your bathroom.
The bathroom sink drain line has several connections where the tailpiece is connected to the P-trap, P-trap to the trap arm and trap arm to the drainpipe in the wall. Slip nuts backed up by plastic washers are used to make the connections tight.
With time, these connections can become loose causing the sink to leak water in the cabinet. Tightening them is often enough to stop the leak.
If you have a plastic drain line, the connections only need to be hand-tight. However, if you have a metal drain line you can give the connections a ¼ turn using a wrench and then check if the leak has stopped by filling the sink with water and then draining it.
If the leak persists, you will need to replace the washers. Washers are cheap and replacing them is easy. Just make sure you put them in the right way otherwise they will leak again.
To replace the slip nut washers, start by placing a bucket under the sink to drain the water in the trap then disconnect the P-trap. Slide out the old washers and slide in the new ones. Connect the P-trap back and confirm if the leak has stopped.
3. Tighten the Pivot Rod Retainer Nut
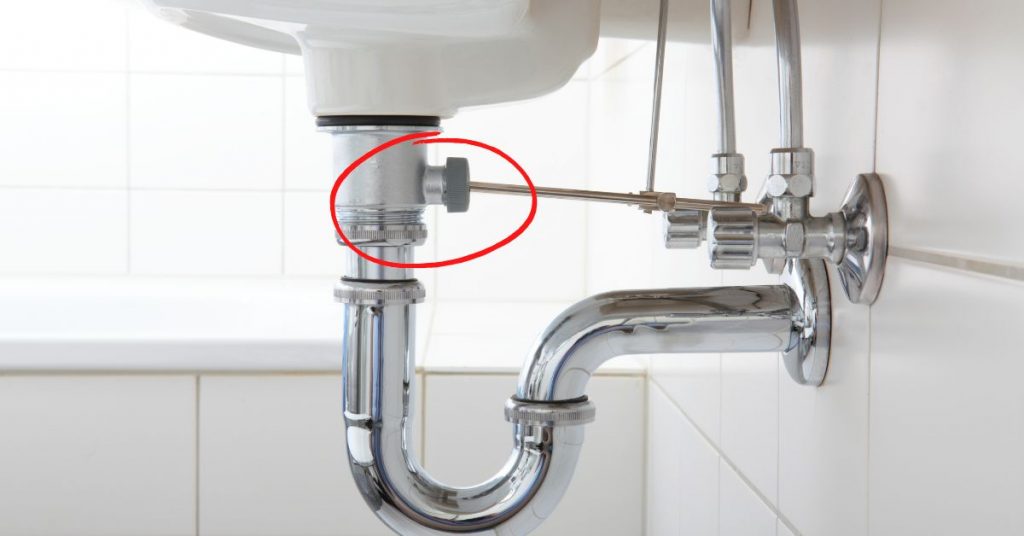
If your sink has a pop-up stopper mechanism, you will have a pivot rod which connects the mechanism to the actual sink stopper inside the drain line. A retainer nut backed up by a washer is used to create a watertight seal where the pivot rod enters the sink drain.
Just like with other connections, that nut can become loose after years of usage causing your sink to leak from underneath.
Again, tightening the retainer nut is usually enough to fix the leak. Since the nut is plastic, it is only supposed to be hand-tight. If you must use a wrench be very gentle.
If the leak does not stop after tightening the nut, the washer/gasket is most likely worn out. In that case you will need to replace it. This is how:
- Disconnect the pivot rod from the clevis rod and mark the exact hole where it was connected to.
- Loosen the pivot rod retainer nut.
- Pull out the pivot rod.
- Replace the old washer/gasket with the new one.
- Slide in the pivot rod and make sure it hooks to the stopper.
- Tighten the retainer nut.
- Connect the pivot rod to the clevis rod.
Check if the leak has stopped.
4. Tighten Water Supply Line Nuts
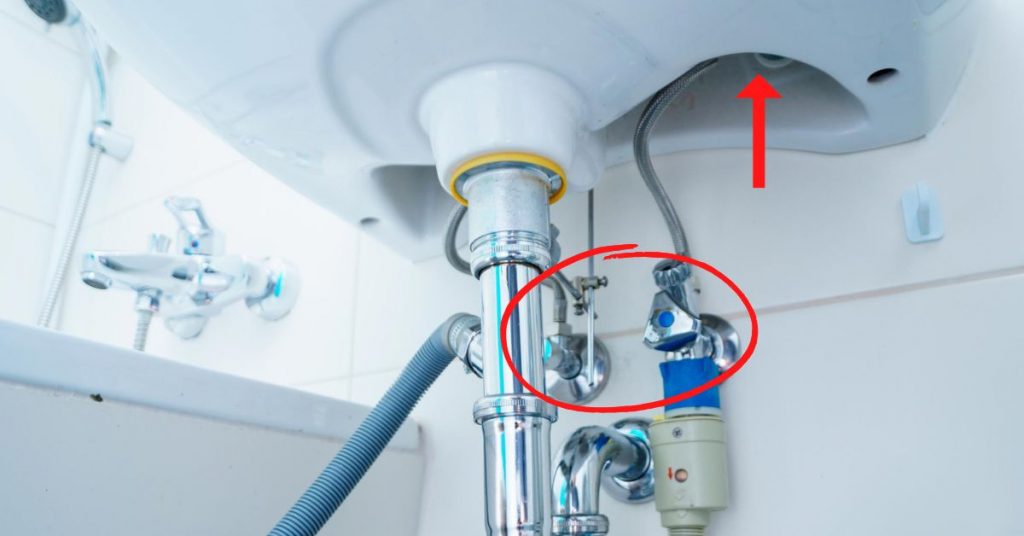
Your bathroom sink will have 2 water supply lines. One will be for delivering hot water to the faucet while the other one delivers cold water.
The water supply lines are also connected to shut off valves which allows you to turn off water to the sink. The packing nuts used to connect the water supply lines to the shut off valves can become loose and leak.
If that is where the leak is coming from, grab a wrench and give the nut a ¼ turn in a clockwise direction to tighten them. You should immediately see if the leak have stopped.
The water supply lines are also connected to the faucet underneath the bathroom sink using nuts and washers. Those connections leak a lot.
Again, tightening the nuts which forces them to compress the washers/seals will stop the leak. Unfortunately, accessing those nuts is usually a nightmare and that is why you may need a tool known as a basin wrench.
Again, giving the nuts a ¼ turn in the clockwise direction will stop the leak otherwise you may have to replace the washers.
5. Seal the Sink Flange

If your bathroom sink is leaking underneath especially from the drain flange, it is a sign that the washer is worn out or the plumber’s putty has been washed out.
Before removing the flange and resealing it, I would however recommend tightening the flange locknut using a wrench. If the nut is loose the sink will leak. Proceed to reseal the flange if that does not work.
This is how to do it:
- Clear items from underneath the sink.
- Disconnect the P-trap and keep it away.
- Disconnect the stopper pivot rod from the drain.
- Use channel locks or a wrench to disconnect the nut holding the flange in place then take it off with the washer as well.
- Inspect the washer. If it is worn out it will also need to be replaced.
- Take out the flange and clean it.
- Clean the sink drain opening in order to get a good seal.
- Roll a bead of plumber’s putty between your palms then apply it around the lip of the flange.
- Push the flange through the sink drain opening then place a heavy object on it to hold it in place.
- Slide in the washer and locknut from underneath the sink and tighten them together.
- Scrape off excess putty from the sides of the flange.
- Drop the stopper inside the sink drain opening and connect it to the pivot rod.
- Connect the P-trap and make sure that all the connections are tight.
- Fill the sink with water then drain it just to be sure that the leak has been fixed.
For more information on how to seal a sink drain check out this post.
Finally
And basically that is how to fix a bathroom sink leaking underneath. If the leak persists you may need to call in a plumber.


