A water heater that is not heating water is easy to troubleshoot as I will outline in this post. Even when you have to replace something, the replacement part will be cheap and easy to replace.
In brief these are the reasons why an electric water heater is not heating water:
- Tripped Breaker or Blown Fuse:
- Reason: A tripped circuit breaker or blown fuse can cut power to the water heater.
- Solution: Check the circuit breaker panel and reset the breaker or replace the fuse. Ensure a dedicated circuit for the water heater.
- Faulty Thermostat:
- Reason: A malfunctioning thermostat may not accurately control the water temperature.
- Solution: Replace the faulty thermostat with a compatible replacement following manufacturer guidelines.
- Burned-Out Heating Element:
- Reason: One or both of the heating elements may be burned out or damaged.
- Solution: Turn off power, disconnect the wires, and replace the faulty heating element(s) with new ones.
- Sediment Buildup:
- Reason: Sediment accumulation on the heating elements can insulate them, reducing efficiency.
- Solution: Drain and flush the water heater to remove sediment buildup.
- Faulty High Limit Switch:
- Reason: A malfunctioning high limit switch can shut off power to the heating elements prematurely.
- Solution: Reset the high limit switch and investigate the cause of overheating, which may involve replacing a faulty thermostat.
- Wiring Issues:
- Reason: Loose or damaged wiring connections can disrupt electrical flow to the heating elements.
- Solution: Carefully inspect and tighten all electrical connections, and replace damaged wiring if needed.
- Aging Water Heater:
- Reason: As water heaters age, they may become less efficient, leading to reduced heating capacity.
- Solution: Consider replacing the water heater with a newer, more efficient model if it’s reaching the end of its lifespan.
- Cold Inflow or Cross-Connections:
- Reason: Cold water mixing with hot water due to cross-connections or issues with the cold water supply can lower the temperature.
- Solution: Ensure proper plumbing configuration to prevent cross-connections and address any issues with the cold water supply.
- Broken Dip Tube:
- Reason: A broken or deteriorated dip tube can allow cold water to mix with the hot water supply.
- Solution: Replace the damaged dip tube with a new one to direct cold water to the bottom of the tank.
- Insufficient Power Supply:
- Reason: An inadequate electrical supply can prevent the water heater from heating water properly.
- Solution: Consult an electrician to ensure the water heater receives the required voltage and current.
- Overheating Protection:
- Reason: The water heater may shut off to prevent overheating in case of a malfunction.
- Solution: Reset the high limit switch and investigate and address any overheating issues.
- Plumbing Leaks:
- Reason: Leaks in the plumbing system can reduce water pressure and hot water supply.
- Solution: Inspect the plumbing for leaks and repair or replace damaged components.
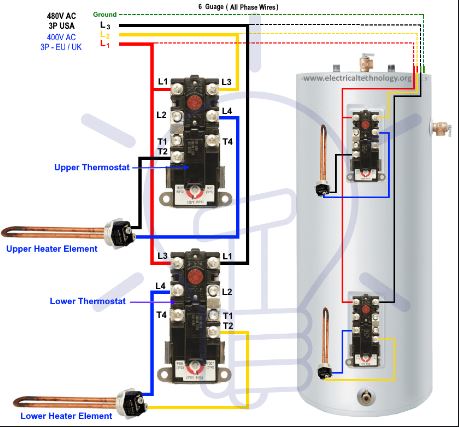
Most electric water heaters will have 2 thermostats and 2 heating elements, at the top and bottom halves of the tank. A reset button is also mounted on the top thermostat.
A water heater reset button, also known as an emergency cut off (ECO) or high temperature limit switch is a device that cuts of power to the water heater when the water temperature rises past the thermostat setting, and exceeds 1800 F.
A reset button that keeps tripping is caused by a shorted heating element, faulty thermostat, loose wiring or it could be faulty itself. Whenever water temperature in the water heater hits 1800 F, the reset button trips, cutting off power to the water heater. When that happens, the heating element will stop heating the water.
How to Troubleshoot And Fix a Water Heater that is Not Heating
To troubleshoot and a fix an electric water heater that is not working, you have to be methodical. Start by looking at the easiest places to access, and when you rule them out you advance to the hidden spots.
This is how to troubleshoot and fix an electric water heater that is not heating:
1. Test the Power Supply
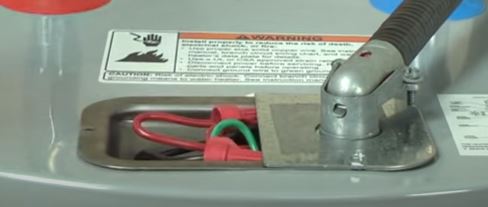
The first thing you need to do is to ensure that the water heater is actually being supplied with power. A properly working water heater should be receiving 240 volts of power
To check if your electric water heater is indeed receiving power, remove the junction box cover at the top of the water heater and test for voltage across the 2 wire terminals using a multimeter.
Note: You do not need to remove the wire nuts. Just stick the multimeter probes inside the nuts and check the read out on your multimeter.
If you confirm that the water heater is indeed being supplied with sufficient power, the problem is confined within the heater connections. You most likely have a bad thermostat, heating element or reset button.
On the other hand if you have no power flowing to the water heater, you have a problem with your electrical connection. This will most likely be caused by a tripped water heater breaker or a blown fuse.
2. Inspect the Circuit Breaker
If you don’t know where you main electrical panel is, it will most likely be located in the basement, garage or in a storage closet. Open it and look for the breaker labelled “Water Heater” or the initials “WH”.
Check if the breaker has tripped. A power surge or an unsafe condition in the water heater will cause the water heater circuit breaker to trip and avert the danger.
If the water heater circuit breaker has tripped, flip it back to the ON position. In some instances, this may be enough to fix the problem.
If the circuit breaker trips back to the off position immediately or after a few minutes, you definitely have a problem with the heating element, thermostat, or reset button that you need to fix.
Before working on the water heater make sure that power to the water heater is indeed completely turned off. Working on the water heater with 240 volts of power flowing through it is very dangerous.
3. Remove the Thermostat and Heating Element Access Panels
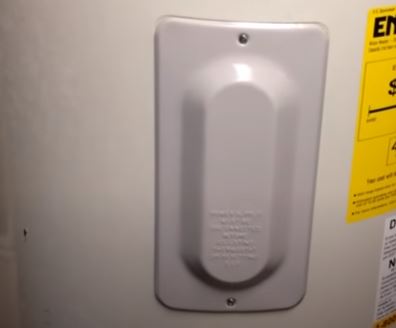
As I had mentioned earlier, an electric water heater will most likely have 2 thermostats and 2 heating elements. Both the upper and lower heating elements and thermostats are concealed using a metallic cover plate secured to the water heater using screws.
- Start by removing the upper access panel.
- Use a screwdriver to remove the screws. Keep the screws and cover plate away in safe place. You don’t want to lose them.
- With the panel out, you will see a small piece of insulation. You can either remove the insulation out fully, or secure it against the tank with duct tape.
- Remove the protective plastic cover plate. Some water heaters will have a piece of plastic cover which snaps on the thermostat and heating element. Remove it as well.

With the above pieces out of the way, you can now see the heating element, thermostat, reset button and the thermostat temperature adjustment dial.
The thermostat is the piece with a series of screws and wires connected to it, while the heating element is at the bottom with only 2 wires and 2 screws connected to it. The head of the heating element is six-sided and threaded to the water heater.
Water heater reset buttons will in most cases be a red button, located on the thermostat and above the heating element. They will also be labelled as such.
You will also see the thermostat temperature adjustment dial which looks like a big plastic screw. It will also have markings from the least to the highest temperature adjustment.
4. Check the Reset Button
A water heater reset button is a safety device. It detects fault in the water heater connections and cuts off power by tripping. Needless to say, when your water heater reset button has tripped it will forthwith stop heating water.
The first thing you want to check here is whether the reset button has tripped. A tripped reset button will have popped out.
To reset a tripped water heater reset button, press the button until you hear it click. If it doesn’t click, press and hold the it for at least 5 seconds.
Sometimes the reset button itself will be faulty. To test whether it is good or not, you need to test it for continuity.
Continuity basically measures whether a circuit is open or closed. An open circuit means the part being tested is not allowing power to flow through it, while an open circuit means the part being test is allowing free flow of current.
- Before doing anything, get out your phone or digital camera and take a picture of the reset button, thermostat and heating element connections. That way, you will be in a position to remember where each wire was connected to later.
- Disconnect all the wires from the all the screws.
- Prepare your multimeter. With an analogue multimeter, set the dial to the lowest reading of ohms of resistance. To calibrate it, pinch the 2 probes together and move the needle to the zero reading.
- With a digital multimeter, move the dial to the lowest ohms of resistance setting but if you have the tone setting (indicated by a microphone symbol) move the dial there.
- Carefully look at where the reset button is located. You will see 2 screws on the left and 2 screws on the right.
- Measure the resistance across the left terminals by a placing each probe on a screw, then repeat the same test with the right terminals.

With a good reset button, the reading on your multimeter should be zero for both tests. Any other figure other than that, the reset button is faulty and will need a replacement.
To replace a water heater reset button, you will need to replace the thermostat as well. Get the model number of the thermostat and buy a replacement.
5. Test the Thermostat for Continuity
A water heater thermostat is responsible for turning the heating element on and off, with respect to the water temperature inside the water heater. A faulty thermostat will however fail to turn the heating element on.
Usually, when you have no hot water at all it means you have a bad upper thermostat or heating element. Hot water that runs out pretty fast is caused by a bad lower thermostat or heating element.
Here is how to test a water heater thermostat for continuity:
- Use a flathead screwdriver to turn the thermostat adjustment dial to the highest setting.
- You will see a set of 4 screws (terminals) on the thermostat. Use your multimeter to measure the resistance across the left terminals then shift to the right terminals.

- Again, use the flathead screwdriver to adjust the temperature adjustment dial to the lowest setting.
- Repeat the test above.
In both of the above tests, the resistance reading on your multimeter should be zero ohms. If you get more than that, you definitely have a bad thermostat that you will need to replace.
6. Test the Heating Element for Continuity
The Upper heating elements alternates with the lower heating element while heating the water inside the tank. This elements do not however last forever. They can burn or short, and when that happens you will no longer be receiving hot water.
A shorted heating element means that it is in communication with the tank body, in which case the element will be grounded.
Here is how to test for continuity in a water heater element:
- The heating elements has 2 terminals with 2 screws and wires connected to it.
- Disconnect the 2 wires from the screws.
- Use your multimeter to measure resistance across the 2 terminals.

A good heating element should have a resistance of between 10 and 16 ohms. If you get no reading on your multimeter the heating element needs a replacement.
- Leave one multimeter probe on one terminal, and make contact with the tank body using the other probe.
- Repeat the above procedure but reverse the probes and terminals in contact.
If you get a reading on your multimeter, it means the heating element is indeed grounded and you need to replace it.
7. Test the Lower Thermostat and Heating Element
Once you are done troubleshooting the upper thermostat, heating element and reset button, proceed to the lower access panel.
- Remove the cover plater, insulation and plastic cover.
- As you will discover, the lower thermostat has only 2 terminals.
- Disconnect the wires connected to the thermostat and heating element
- Set the temperature reset dial to the highest setting.
- Test for continuity between the 2 thermostat terminals.
- Adjust the thermostat temperature dial to the lowest settings.
- Repeat the test. Again the results in both of this tests should read zero ohms.
- Now test the lower heating element for continuity. You should also look for a 10-16 ohms reading in this test, otherwise the heating element is defective.
8. Replace the Thermostats

Replacing a faulty thermostat is easy peasy! You just need to make sure you are replacing the right one. I personally like to buy a set and replace the upper and the lower one a once.
- A water heater is held in place by a metal bracket at the bottom.
- Start by making sure that all the wires are disconnected from all the screws.
- Pull the bracket out gently and lift off the old thermostat.
- While still pulling the bracket out, insert the new thermostat.
- Connect the wires on the screws and tighten them together.
- Ensure the reset button is not tripped.
- Adjust the water heater temperature dial on the thermostat to your preferred settings.
- Put back the plastic cover, insulation and metal cover plater.
- Turn on power to the water heater.
- Wait for 20 minutes for the water to be fully heated.
9. Replace the Heating Elements
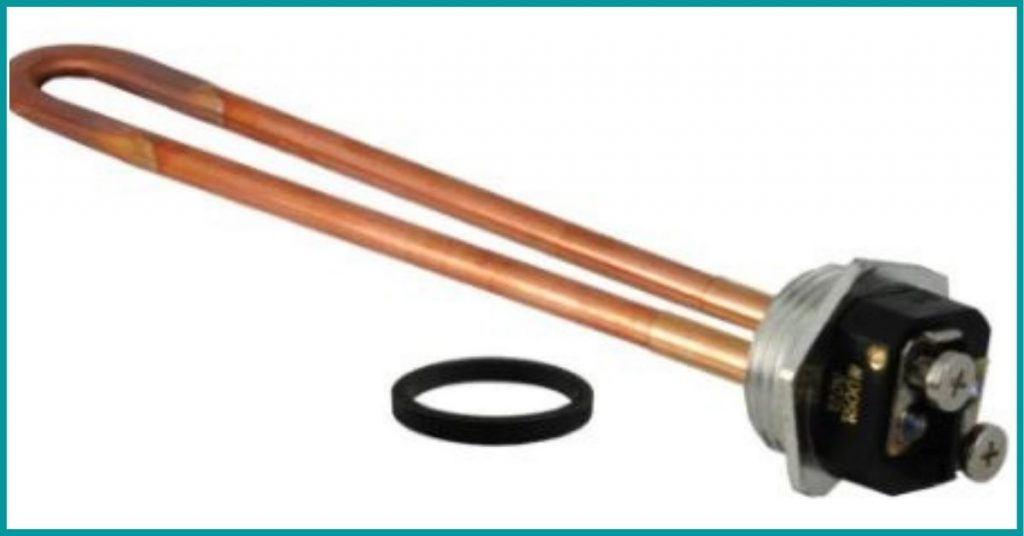
Again, I like to replace both the heating elements, which guarantees me that I will not need to replace the other good one in a few years or months.
- Turn off the cold water shut off valve. This is because you will need to drain the tank.
- Connect a garden hose on the drain valve at the bottom of the tank. Turn on the valve with a flathead screwdriver. Wait for the tank to drain out.
- Once the tank is fully drained, turn off the drain valve and remove the garden hose.
- Use a 1 ½ inch socket wrench to loosen the water heaters and pull them out. if your water heater tank is full of sediment, you may want to get it out (the sediment) before replacing the heating element. Check out more information on that here.
- Slide in a washer on the new element (very important) and thread the element in the tank. Tighten it with the socket wrench.
- Turn on the cold water supply valve. To prevent air from building up, open the nearest hot water faucet. Close the faucet once it stops sputtering air.
- Check for leaks around the heating element connections. If there are none, connect the wires to the screws and tighten them together.
- Turn on the power to the water heater.
- Check if the water is properly heated in 20 minutes.
And basically that is how to troubleshoot and fix a water heater that is not heating. In case you don’t feel comfortable undertaking the repair yourself, don’t hesitate to call a licensed plumber. It will cost you though!


