Are you a homeowner, navigating the complex landscape of household plumbing issues? Whether you’ve just moved into your dream home or you’re a seasoned homeowner facing the trials of aging pipes, having a basic understanding of DIY plumbing repairs is paramount. In this extensive guide, we’ll delve into an array of plumbing problems every homeowner should be equipped to handle. From mastering the art of shutting off the water to tackling leaky pipes, running toilets, clogged drains, and more, this comprehensive exploration aims to empower you as the maestro of your home’s plumbing symphony.
1. The Fundamental Skill: How to Shut Off the Water

The ability to shut off your home’s water is the cornerstone of any successful plumbing DIY endeavor. Imagine a burst pipe or a leaky faucet – knowing how to stop the flow of water is the first step in preventing extensive damage. This section will guide you through locating your main shutoff valve, understanding secondary valves, and individual fixture shutoffs. Knowing when and how to turn off the water supply can be the difference between a minor inconvenience and a major catastrophe.
Understanding Your Water Supply System:
Before delving into shutting off the water, it’s crucial to understand the layout of your home’s water supply system. Most homes have a main shutoff valve that controls the entire water supply to the house. This valve is often located near the outdoor water meter.
Locating Your Main Shutoff Valve:
- Outdoor Water Meter: Most meters sit in the ground near the street under a metal or concrete lid. Remove the lid and turn the shutoff valve 90 degrees clockwise with a water meter key or an adjustable wrench.
- Secondary Shutoff Valves: Some houses have a secondary shutoff valve near where the main water line enters the home, usually in the basement. Identify and use this valve to stop all water in the house.
- Individual Fixture Shutoffs: For sinks, toilets, and other appliances, there are individual shutoff valves under or next to them. Learn to locate and use these valves to cut water to specific areas without affecting the entire house.
Practical Tips:
- Periodically test your main shutoff valve to ensure it operates smoothly in case of an emergency.
- Educate all family members on the location and operation of the main shutoff valve.
Knowing how to cut off the water is crucial, especially during emergencies. It’s a fundamental skill that can prevent extensive damage and costly repairs.
2. Water Heater Wisdom: Safely Turning Off and Maintaining

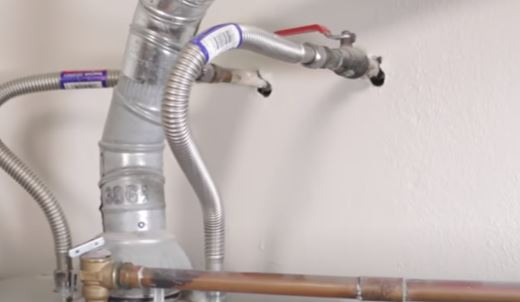
Your water heater, a silent hero in your home, can sometimes turn into a potential hazard. Understanding how to safely turn off a water heater is not only a crucial safety measure but also essential for maintenance tasks. We’ll provide a step-by-step guide, covering both gas and electric water heaters. By mastering this skill, you not only ensure the safety of your home but also contribute to the longevity of your water heating system.
a. Cut Power for Gas Water Heaters:
- Locate the Gas Valve: The gas valve is usually located on the side of the water heater.
- Turn the Valve to “Off”: Rotate the valve to the “off” position to cut off the gas supply.
b. Cut Power for Electric Water Heaters:
- Find the Circuit Breaker or Fuse Box: Locate the circuit breaker or fuse box that controls the water heater.
- Turn Off the Breaker or Remove the Fuse: Flip the circuit breaker to the “off” position or remove the fuse to cut off the electricity.
c. Stop Water Flow:
- Find the Water Heater Valve: Locate the water valve connected to the water heater.
- Turn the Valve to “Off”: Rotate the valve to stop the flow of water to the heater.
d. Maintenance Tips:
- Regularly flush your water heater to remove sediment buildup and improve efficiency.
- Consider insulating your water heater to conserve energy and reduce heat loss.
Properly turning off your water heater is crucial for preventing leaks, and overheating, and ensuring the longevity of the appliance.
3. Confronting Leaky Pipes: DIY Solutions for Home Resilience

Leaky pipes are a homeowner’s nightmare, but fear not, for in this section, we’ll unravel the mystery of addressing pipe leaks. From understanding the causes of leaks to providing a detailed guide on using epoxy putty or clamps for quick fixes, you’ll be well-versed in handling this common plumbing woe. The goal is not just to stop the leak but to equip you with the skills to mitigate the damage until a permanent solution is implemented.
a. Causes of Leaky Pipes:
- Extensive Corrosion: Over time, pipes can corrode due to various factors, leading to leaks.
- Extreme Water Pressure: High water pressure can strain pipes, causing them to develop leaks.
- Poor Laying of Pipes: Incorrect installation or poor craftsmanship can contribute to pipe leaks.
- Shifted Connections: Movement in the ground or building can cause pipes to shift, leading to leaks.
- Clogging: Accumulation of debris or sediment can create pressure and result in leaks.
- Intruding Tree Roots: Tree roots seeking water can infiltrate and damage underground pipes.
- Rapid Changes in Temperature: Sudden temperature fluctuations can stress pipes, causing leaks.
b. DIY Solutions for Pipe Leaks:
- Locate the Main Valve: In case of a leak, the first step is to find the main shutoff valve and turn off the water supply.
- Dry the Leaking Section: Ensure the area around the leak is thoroughly dry before proceeding.
- Using Epoxy Putty:
- a. Knead the Putty: Mix the two-part epoxy putty thoroughly until it forms a uniform color.
- b. Apply to Leak: Wrap the putty around the leaking section, covering it completely.
- c. Let it Dry: Allow the putty to dry completely before turning the main water supply back on.
c. Using Clamps and Wraps:
- Wrap Around the Leak: Use a rubber or metal clamp or a leak repair wrap specifically designed for pipes.
- Secure the Clamp: Tighten the clamp or wrap securely around the leaking area.
- Check for Tightness: Ensure the clamp or wrap is snug to prevent any further leakage.
d. Temporary Solutions for Long-Term Success:
- DIY pipe leak repairs are often temporary solutions. It’s essential to consult a professional plumber for a permanent fix.
- Leaks may be indicative of underlying plumbing issues. Regular inspections can help identify and address such problems promptly.
Mastering the art of addressing pipe leaks empowers homeowners to tackle emergencies effectively and protect their homes from water damage.
4. Taming the Runaway Toilet: A DIY Guide to Flushing Woes

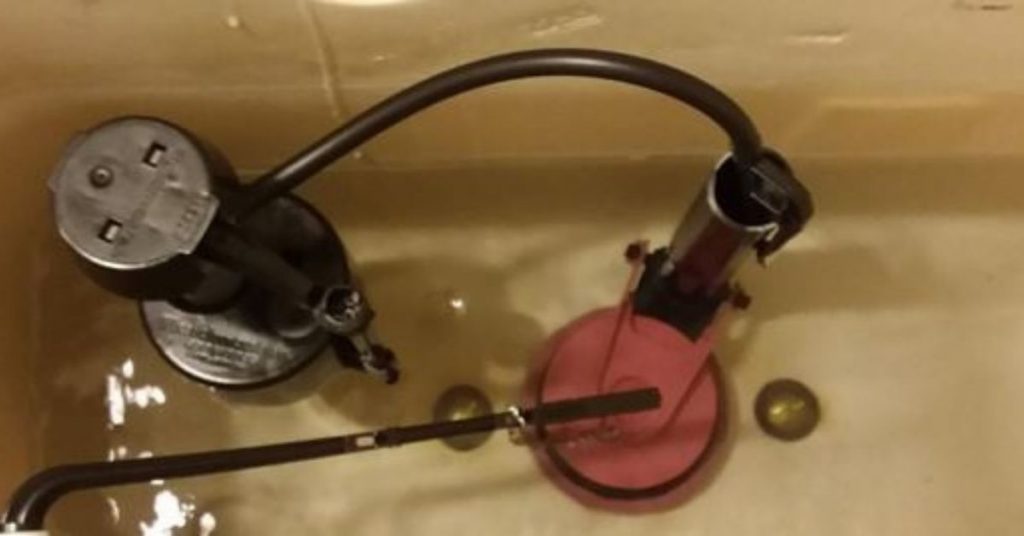
A running toilet is not only annoying but can lead to water wastage and increased bills. In this extensive segment, we’ll guide you through the process of assessing the fill tube, checking the float, adjusting the water level, and replacing the flapper. By the end, you’ll be adept at troubleshooting and fixing a running toilet, ensuring efficient water usage in your home.
a. Assessing the Fill Tube:
- Locate the Fill Tube: The fill tube runs from the fill valve to the overflow tube inside the toilet tank.
- Reattaching the Fill Tube: If detached, reattach the fill tube securely to ensure proper water flow during flushing.
b. Checking the Float:
- Identify the Float: The float controls the water level in the toilet tank and is connected to the fill valve.
- Adjusting the Float Level: Ensure the float is set to the correct level to prevent overflows or weak flushes.
c. Adjusting the Water Level:
- Remove the Tank Lid: Set aside the tank lid and locate the float rod or screw connected to the float ball.
- Lowering the Float Rod or Turning the Screw: Adjust the float rod or turn the screw counterclockwise to lower the water line.
- Checking for Proper Water Level: Allow the tank to refill and check if the water rises past the overflow tube. Repeat adjustments until the proper water level is achieved.
d. Replacing the Flapper:
- Identify a Faulty Flapper: A flapper that doesn’t seal properly is a common cause of running toilets.
- Steps for Replacement:
- a. Turn Off the Water Valves: Shut off the water supply to the toilet.
- b. Remove the Tank Lid and Flush: Flush the toilet to drain water from the tank.
- c. Remove the Old Flapper: Disconnect the old flapper and replace it with a new, compatible one.
- d. Reassemble and Test: Put the tank lid back on, turn on the water supply, and test the toilet to ensure proper flushing.
Understanding the mechanics of your toilet and how to address running issues ensures efficient water usage and prevents potential water damage.
5. Unclogging Drains: Eco-Friendly DIY Methods for a Free Flow

Clogged drains can bring your household to a standstill, disrupting daily activities. Rather than reaching for harsh chemical drain cleaners, we’ll explore eco-friendly DIY methods. From the classic plunger to the magic of baking soda and vinegar, you’ll have an arsenal of techniques to clear those stubborn clogs. This section aims not only to provide solutions but to empower you to maintain a free-flowing plumbing system.
a. Plunging the Drain:
- Choose the Right Plunger: Use a cup plunger for sinks and tubs and a flange plunger for toilets.
- Create a Seal: Ensure the plunger creates a tight seal around the drain opening.
- Apply Firm Pressure: Push and pull the plunger with firm pressure to dislodge the clog.
- Repeat if Necessary: If the clog persists, repeat the process until the drain is clear.
b. Baking Soda and Vinegar Method:
- Pour Baking Soda: Pour about half a cup of baking soda down the drain.
- Add Vinegar: Follow it with a cup of vinegar to create a fizzy reaction.
- Let it Sit: Allow the mixture to sit for 15 minutes to break down the clog.
- Flush with Hot Water: Pour boiling water down the drain to flush away the debris.
c. Wire Coat Hanger or Plastic Snake Tool:
- Create a Hook: Bend a wire coat hanger or use a plastic snake tool to create a hook.
- Insert into the Drain: Gently push the tool into the drain to hook and pull up debris.
- Avoid Forceful Insertion: Be cautious not to push too hard, which may cause damage to the pipes.
d. Chemical Drain Cleaner (For Severe Clogs):
- Read Instructions Carefully: If opting for a chemical drain cleaner, carefully follow the manufacturer’s instructions.
- Use as a Last Resort: Reserve chemical cleaners for severe clogs that other methods can’t resolve.
Understanding different methods of unclogging drains empowers homeowners to address common plumbing issues without resorting to harsh chemicals that may damage pipes.
