Here is how to visually check an AC capacitor:
- Safety Precautions: Prioritize safety by turning off the power to your AC unit at the circuit breaker and ensuring it’s disconnected.
- Locate the Capacitor: Identify the capacitor within your AC unit. It’s typically cylindrical and can have one or two terminals.
- Examine for Damage: Visually inspect the capacitor for signs of damage, including bulging, leaking oil, or a distorted appearance. If any of these are present, the capacitor likely needs replacement.
Testing with a Multimeter
-
- Safety First: As always, turn off the power to your AC unit and disconnect it.
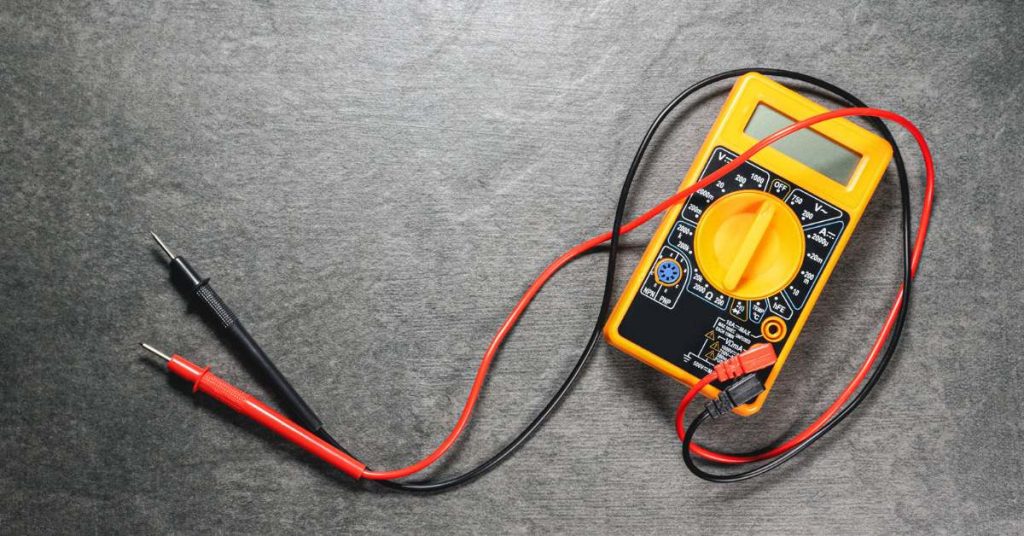
- Select the Right Settings: Set your multimeter to the capacitance (farads) measurement function and choose the appropriate range (often labeled as μF on the multimeter).
- Discharge the Capacitor: Safely discharge the capacitor by shorting the terminals with an insulated screwdriver to avoid electrical shock.
- Disconnect Wires: Label and disconnect the wires attached to the capacitor.
- Testing Single Capacitor: For a single-run capacitor, touch the multimeter leads to the respective terminals. The multimeter should display a reading close to the capacitor’s labeled microfarad (μF) rating. If the reading is significantly lower or higher, the capacitor is faulty.
- Testing Dual Capacitor: If you have a dual-run capacitor (for both fan and compressor), test each set of terminals separately. They should each read close to their respective microfarad ratings.
- Interpreting the Reading: A reading that doesn’t match the capacitor’s rating indicates a faulty capacitor that should be replaced.
- Reconnect and Test: After testing, reconnect the wires and restore power to your AC unit. Observe its performance, and if issues persist, consult a professional technician.
Run vs Start AC Capacitors

There are start and run capacitors in HVAC systems. Start capacitors provide torque to the compressor motor during startup and then disconnects from the circuit.
Run capacitors provides torque to the motor during startup but also continues to be engaged to the circuit during the cooling cycle. Not may AC systems use start capacitors which means you most likely only have a run capacitor.
Warning: Testing and replacing AC capacitors is not recommend to homeowners unless you are experienced or trained to do so. It is a job best left to HVAC technicians. Capacitors carry a lot of charge and can shock you when you touch the terminals even when power to the unit is turned off.
Run capacitors are however safer to work with since most of their charge is usually drained out by the motor unlike start capacitor which stores a high charge since they disconnect from the circuit as soon as the motor picks up.
How to Test an AC Capacitor
To safely and correctly perform this task, you need the following:
- Screwdriver with an insulated handle
- Multimeter (preferably digital)
- Insulated gloves
Once you have all that you need in place, follow the following steps to test your air conditioner capacitor:
Step 1: Turn Off Power to AC
Needless to say, you can’t work with 240 volts still flowing to the AC unit. Start by turning off power to the unit at the breaker box. It is always a good idea to use your multimeter to ascertain that indeed no power is flowing to the unit.
Just to be safe, I also like to unplug the furnace from the power supply. I suggest that you do that as well. You can turn off the thermostat too.
Step 2: Remove the Condenser Unit Side Panel
If you are not sure where your capacitor is, it is located in the condenser unit, also known as outside unit concealed by a side panel. Use a screwdriver to remove the side panel and expose the capacitor.
Once the side panel is out, you will now see the capacitor. It will most likely be a cylindrical component with a shiny metallic exterior and wires connected to it at the top.
Before you do anything more, I would suggest that you first note down how the wires are connected to the capacitor. Better still, use your phone to take a picture or video of the connections.
Step 3: Visually Inspect the Capacitor
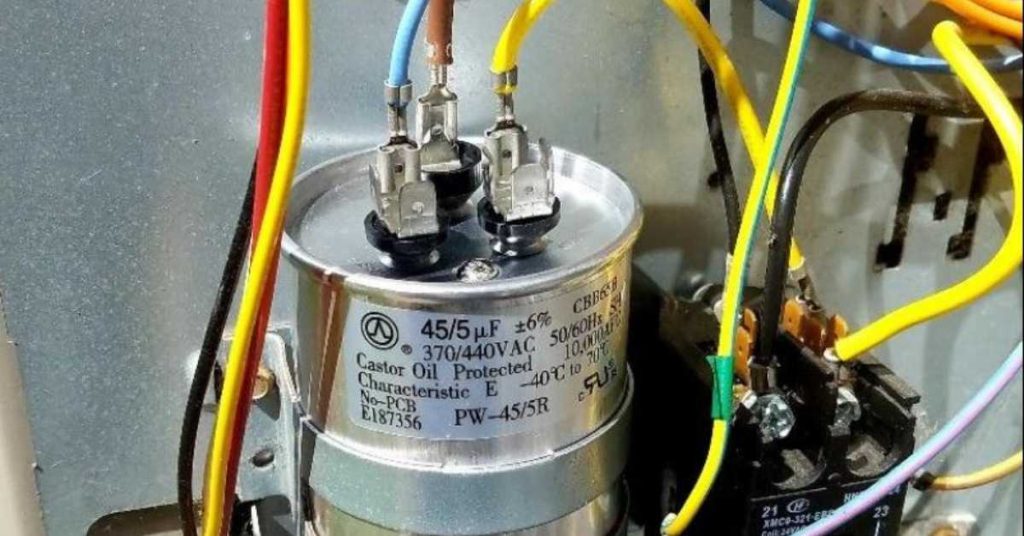
You do not have to test a capacitor with a micrometer to tell if it is bad. Sometimes a simple visual inspection can help you know if you have a bad capacitor.
Can you see the dielectric fluid leaking from the capacitor? Does the capacitor look swollen? Has the top part of the capacitor mushroomed or is the capacitor’s top cap wet with oil? All these are signs of a bad capacitor.
If you see any of the above signs, your capacitor is bad and you don’t even need to test it with a multimeter. Just have it replaced.
Another thing you need to check (still without touching the capacitor) is if you have a single or dual run capacitor. An AC unit will either have 2 single run capacitor or 1 dual run capacitor.
A single run capacitor has only 2 terminals. There will be one capacitor for the compressor and another for the condenser fan. A dual capacitor has 3 terminals which are COMMON, HERM and FAN. It powers both the compressor and fan motors.
Don’t forget to also check the rating of the capacitor. Capacitors will have both the voltage and capacitance clearly indicated. In this test we are interested with capacitance (the amount of charge that the capacitor can hold).
Next to the capacitance (measured in microfarads or simply uF), there will be another figure, usually 6%. That means that the capacitance of the capacitor can be less or more than 6% of the value indicated. No more and no less.
If you have a dual capacitor, there will be 2 capacitance values, something like 45/5 uF. In such a case, the higher value is for the compressor motor while the lower value will be for the condenser fan motor.
Step 4: Discharge the Capacitor
When working with capacitors, always work with assumption that the capacitor is storing electrical charge. That is why it is important to discharge a capacitor before handling it.
Start by wearing your insulated hand gloves. Also, make sure that the insulation on your screwdriver is solid and that there are no cracks.
If you have a single capacitor, start by making contact with the positive terminal using the metal part of the screwdriver then make contact with the negative terminal. In short, use the screwdriver to short the 2 terminals.
Things are a little different with dual run capacitors. First make contact with COMMON and HERM terminal to discharge that side of the capacitor and then short the COMMON and FAN terminals.
Note: Even though you have successfully discharge the capacitor avoid touching the terminals with your bare hands.
Step 5: Disconnect the Capacitor
To test the capacitor, you need to get it out of the condenser unit. Start by disconnecting the wires connected to the different capacitor settings.
Also, the capacitor will be connected to the unit using a strap. Undo the strap as well and remove the capacitor. Place it on a work table or just a flat surface that is comfortable to work on.
Step 6: Test the Capacitor’s Capacitance
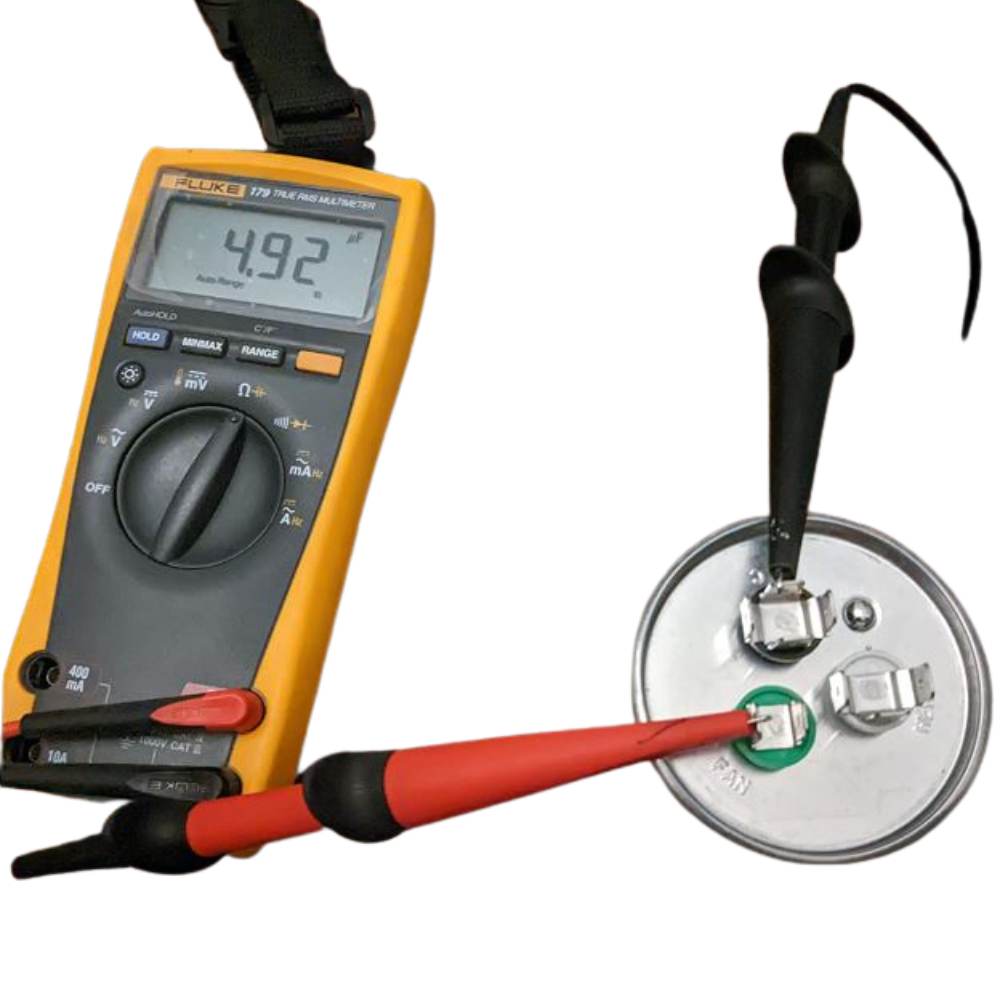
Here you will need a multimeter. Although a digital multimeter is preferred, you can still use an analogue multimeter if that is what you have.
With a digital multimeter, set it to the capacitance settings (MFD/uF). If you have an analogue multimeter, set it to the highest ohms or resistance.
Here is how to test the capacitor:
- With a single run capacitor, place the multimeter probes on the 2 capacitor terminals. If you have a digital multimeter you will get a readout on the screen in microfarads. With an analogue multimeter, the reading will increase from zero to maximum and then fall back to zero. Note the maximum reading.
- If you have a dual run capacitor, place one of the multimeter probes on the COMMON terminal and the next on the HERM terminal. Note down the reading on the compressor side of the capacitor.
- With one of the terminal still on COMMON, remove the terminal from HERM and place it on the FAN terminal. Note down the reading as well. Do the same also if you have an analogue multimeter.
If the capacitance reading is within the allowed range, your capacitor is good otherwise just replace it. For example, if your capacitor is rated 45/5 uF and the margin allowed is 6%, the expected range for a good capacitor is 42.3-47.7 microfarads on the compressor side and 4.7-5.3 microfarads on the condenser fan side.
Remember: Upon testing a dual run capacitor, it is possible to find out that one side of the capacitor is good while the other side is bad. Unfortunately, in such a case you will still need to replace the capacitor.
Step 7: Put Back or Replace the Capacitor
If your capacitor turns out to be good, simply put it back just the way you removed it but in reverse order. However, if the capacitor is bad just go ahead and replace it.
When replacing capacitors, make sure that you buy another one with the same rating as the old one. By rating I mean both capacitance and voltage. Also, buy a dual run capacitor if you need a dual run capacitor or a single run capacitor if that is what you need.
Need help from a Local HVAC contractor in your area?


