Troubleshooting and replacing an AC capacitor is a crucial task in maintaining your air conditioning system’s functionality. Here’s a brief summary of the steps involved:
Troubleshooting:
- Safety First: Turn off the power to your AC unit at the circuit breaker and ensure it’s completely disconnected.
- Visual Inspection: Examine the capacitor for visible signs of damage, such as bulging or leaking.
- Using a Multimeter: Test the capacitor’s capacitance and resistance with a multimeter to determine if it’s faulty. A capacitor with values significantly different from its rating may need replacement.
- Listen for Clicking Sounds: If your AC unit emits clicking sounds during startup but the fan doesn’t spin, it’s a sign the capacitor might be malfunctioning.
- Seek Professional Help: If you’re unsure about diagnosing or replacing the capacitor, it’s best to consult an HVAC technician.
Replacing the Capacitor:
- Safety Precautions: Always disconnect power and discharge the capacitor by shorting the terminals with an insulated screwdriver before handling it.
- Identify Capacitor Type: Determine if your AC unit has a dual capacitor (serving both the fan and compressor) or separate capacitors for each.
- Select the Right Replacement: Purchase a new capacitor with the same specifications (voltage rating, microfarad rating) as the old one.
- Disconnect Wires: Carefully label and disconnect the wires from the old capacitor.
- Remove Old Capacitor: Use a nut driver or socket wrench to remove the old capacitor from its bracket.
- Install the New Capacitor: Secure the new capacitor in place and reattach the wires following your labels.
- Reconnect Power: Restore power to the AC unit and test it to ensure the fan and compressor start as expected.
- Monitor Performance: Monitor your AC unit’s performance to ensure it’s cooling properly. If issues persist, consult a professional technician.
Troubleshooting an Air Conditioner Capacitor

There are 3 ways you can tell if your air conditioner capacitor is blown. They include:
- Telltale signs exhibited by the air conditioner
- Visually inspecting the capacitor
- Testing the capacitor’s capacitance.
So what are the telltale signs that your air conditioner capacitor is out? The following are some of the signs of a bad AC capacitor:
- The air conditioner will not turn on at all – The capacitor provides the compressor motor with startup torque needed to start. If the capacitor is bad, the air conditioner may not come on at all.
- Air conditioner is hesitating before coming on – Does your air conditioner take longer to come on than usual? That could be a sign that the capacitor is not providing the motor with torque need to start promptly and hence the reason it takes too long to come on.
- Outside unit is making humming noises – If the capacitor has failed, it will not deliver the powerful electricity jolt needed by the motor. As a result, every time the thermostat calls for cooling, the motor will strain as it tries to kick in and hence the humming sounds.
- Burning smell from the outside unit – Is there a burning smell from the AC outside unit? That is another sign of a bad capacitor. Since the capacitor cannot quickly start the motor, the motor strains to start which causes it to overheat and hence the burning smell.
- Fan not spinning – If the AC is running but when you peep through the top of the outside unit you notice that the fan is not spinning, the capacitor could be out. Just to be sure, use a long screwdriver or a thin stick to manual turn the fun blades (clockwise) through the grille. If the fan starts running properly, the capacitor has failed.
- High power bills – As you can imagine, without the capacitor supplying the AC motors with the needed torque to start and run, the motors will need to draw a lot of power from the line and also run for longer. For that reason, you will notice an increase in your energy bills at the end of the month.
- AC Shuts off randomly – A bad capacitor can cause the AC to short cycle. Run capacitors maintain an even and sufficient supply of current to the motor’s circuit. If the capacitor is bad, the circuit will not receive enough current to keep it running forcing it to turn on and off randomly.
The thing with air conditioners is that different problematic issues will often have the same symptoms. For instance, if your conditioner has not have the air filter changed or if the refrigerant levels are low, it will have the same problems as some of the ones I have outlined above.
For that reason, the best way to tell if you have a bad AC capacitor is by testing it. Visually inspecting the capacitor can also help you know if the capacitor is bad.
I will combine the process of testing the capacitor with steps to take when replacing the capacitor in the section below.
How to Replace an Air Conditioner Capacitor
To test and replace an air conditioner capacitor, you will need the following:
- Screwdriver with an insulated handle
- Multimeter
- Insulated gloves
- A new capacitor
- Needle-nose pliers (optional)
The following are the steps to follow when replacing an air conditioner’s capacitor:
Step 1: Turn off Power to the AC
There will be 240 volts flowing to the AC unit outside your house (that is where the run capacitor is located). To work safely, you need to first make sure that no power is being supplied to the unit.
There are 2 ways to do that. In most cases, there will be a break box next to the condenser unit mounted on the wall with a lever/switch. That is where you turn off the power from. In some causes you will need to pull out a plug.

If you don’t have that setup, go inside your house where the main electric panel is and look for the circuit breaker labeled “air conditioner” or simply “AC”. Pull the double bar (each 120 volts) to the off position.
Even though the power is now turned off, some voltage will still flow to the unit when the thermostat calls for cooling. For that reason, make sure to also turn off the thermostat.
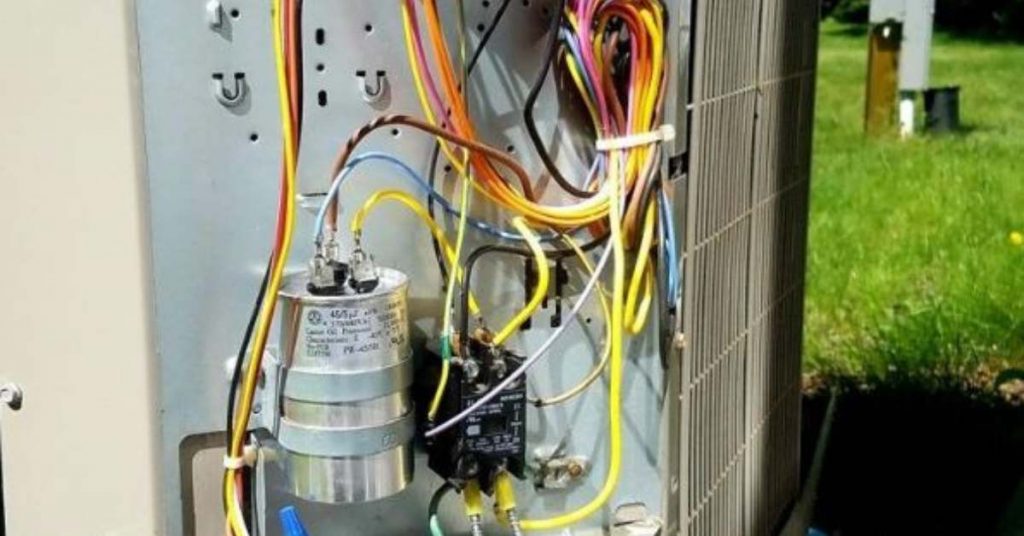
Step 2: Remove the Side Panel
Now that it is safe to work on the condenser unit, you can go ahead and start by removing the side panel. The side panel conceals the capacitor and other electrical components like the contactor or hard start kit.
It will be on the side of the unit secured using 4 screws. Use the screwdriver to remove the panel/cover and expose the capacitor.
Step 3: Inspect the Capacitor

As I had mentioned earlier, it is possible to tell if your air conditioner is bad by just having a look at it. There are signs which will let you know that the AC capacitor is bad and you don’t even need to test it.
These are things you can do without even touching the capacitor which I don’t recommend doing at this stage since it is yet to be discharged.
First, look at the shape of the capacitor. Is it swollen or bulging, unlike the usual nice cylindrical shape from top to bottom?
To be precise, has the top part of the capacitor mushroomed? If the capacitor looks deformed, it is clearly bad and will need to be replaced.
Another sign that the capacitor is bad is if it is leaking out the dielectric fluid. Capacitors are filled with a fluid/oil to prevent them from overheating. If the capacitor fluid is leaking, you don’t need to test it. It is bad.
It is important to note that the capacitor could still be bad and still not exhibit the signs indicated above. That is why testing is important.
Step 4: Discharge the Capacitor

This is the point where you want to wear your gloves and use your screwdriver to remove any charge stored by the capacitor by short-circuiting the terminals.
First determine if you have a single or dual capacitor. The process of discharging them is different. Also, ensure that you are grabbing the insulated screwdriver handle and not the metal part.
If you have a single run capacitor, place the tip of the screwdriver on the positive terminal and then short the capacitor by also making contact with the negative terminal, using the screwdriver metal part as well.
If you have a dual run capacitor, use the screwdriver to short the COMMON and HERM terminal and then COMMON and FAN terminals to discharge it.
That is how easy it is to discharge a capacitor.
Step 5: Disconnect the Capacitor
Before you can disconnect the capacitor, take your time to notice how the wires are connected to the capacitor. That is how you will connect them to the new capacitor. Taking a picture or video with your phone is an excellent idea.
Use the pliers to disconnect the wires from the capacitors. The capacitor will also be secured to the unit using a strap. Undo the strap as well.
Place the capacitor on working table where you can test the capacitance using a multimeter.
Step 6: Test the Capacitor

This step is optional. If you have decided that your capacitor is bad you don’t need to test it. You can go ahead and just install the new one. This step is necessary if you want to find out if indeed your capacitor is bad or your AC problem is being caused by something else.
A capacitor has 2 ratings which are voltage and capacitance. In this test, we are interested in capacitance, which describes the amount of charge that the capacitor can accumulate or store.
If you look on your old capacitor, you can clearly see the capacitance indicated in uF (microfarads). You will see another figure next to it (usually 6%) which means that the needed capacitance is less or more than 6% of the value indicated.

Dual run capacitors will have 2 values, something like 45/5 uF. The large value is for the compressor while the lower value is for the fan motor.
To test capacitance in you capacitor, start by having your multimeter dial in the capacitance setting (MFD/uF).
With a single run capacitor, put the multimeter probes on the 2 terminals and then note down the capacitance reading.
If you have a dual run capacitor, place one probe on the COMMON terminal and the other on the HERM terminal. Note down the readings. Next place the probes on COMMON and FAN terminals and not down the reading as well.
If for example you have a dual run capacitor rated 45/5 uF +/-6%, the allowed range of capacitance is 4.7-5.3 microfarads for the fan side of the capacitor and 42.3-47.7 microfarads on the compressor side of the capacitor.
If your readings fall out of this range, your capacitor is clearly bad and you will need to replace it.
So, what if you find out that in dual run capacitor, the compressor side is good but the fan side is bad or vice versa? You will still need to replace the capacitor. You need both sides of the capacitor to be good.
Step 7: Replace the Capacitor

Needless to say, a bad capacitor will need to be replaced. It is however extremely important to make sure that you replace the capacitor with another one of the same rating as the old one.
AC manufacturers conducts extensive tests to determine which capacitor will work well with which AC motor. That helps the AC motors to start and running seamlessly and efficiently too.
Also, don’t buy the cheapest capacitor you can find. Try to buy a quality one and from a reputable manufacturer.
Once you have the needed capacitor, proceed to install it using the same steps as when you were removing the old one, but in reverse. Be careful to make sure that you connect the correct wires to the correct terminals.
Put back the side panel as well and turn the power to the unit back on. Don’t forget to also turn on the thermostat. Give your air conditioner time and check how well it cools.
And basically that is how to replace an air conditioner run capacitor. As I mentioned before, although it is not a hard thing to do, it can be dangerous. If you don’t feel comfortable doing it just bring in an HVAC technician to do it for you.