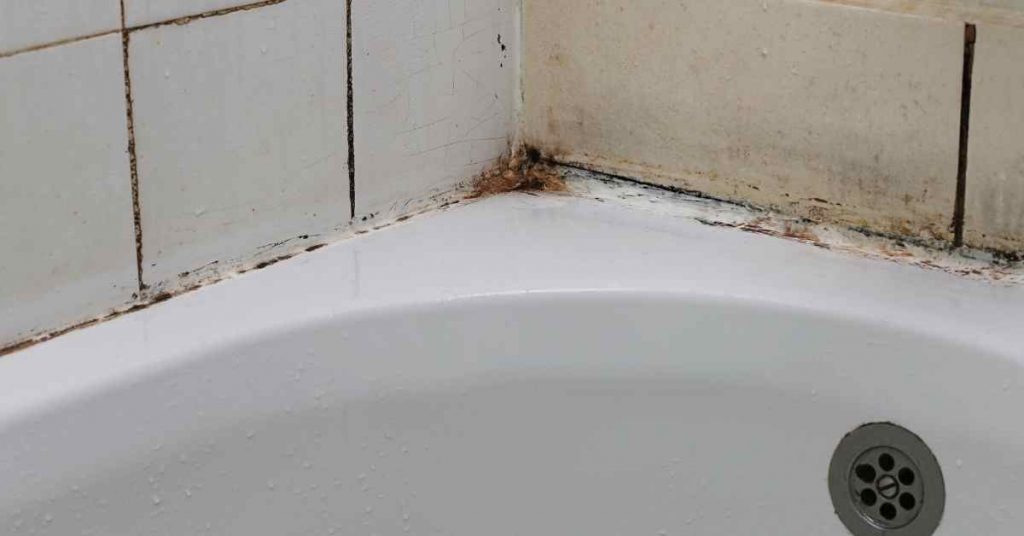
The high humidity, presence of organic matter, and poor ventilation is the reason why mold grows easily on the bathroom caulk.

While getting rid of the mold is the first step, you need to make sure that the mold will not grow again.
The following are the steps to follow to remove mold from shower caulk:
Step 1: Gather Your Supplies
To successfully remove mold from your shower caulk, you will need the following materials:
- Bleach
- Baking soda
- Mixing bowl
- Small application brush
- Plastic wrap
- Vinyl gloves
- Respirator
The reason I am recommending a respirator is due to the strong smell from the bleach. You can of course do without but I strongly recommend it.
Step 2: Prepare a Baking Soda and Bleach Paste
- Put on your respirator and gloves.
- Pour about half a cup of baking soda in the mixing bowl and gradually add the bleach until you have a thick consistency.
- You can use more baking soda and bleach in accordance to the amount of mold you have in your caulk.
Once you have the right amount of paste with the required consistency, take it with you to the bathroom.

Step 3: Remove Dust/Grime from the Caulk
You want to apply the paste directly on the mold. Dust, hair, grime or soap scum can inhibit this. It is for this reason that you should first take your time to remove all the dirt embedded on the caulk.
As soon as you are done cleaning the caulk, use a dry rag/towel to dry it as well as the floor of the shower. You want to have as little moisture as possible.
Step 4: Apply the Paste on the Moldy Caulk
If you do not have a respirator (or even if you do) open the bathroom window and door to have fresh air coming in freely. If the bathroom has a fan start it as well.
- Take your brush and start applying the paste generously all over the caulk.
- Use the plastic wrap to cover the paste. This will prevent the bleach from evaporating too fast.
- Wait for an hour and come back to check the results
What you will notice is that the black mold will fall off on its own. Even if you had really nasty mold you may have to do this only a second time to remove all the molds.
Method 2: Using Bleach and Cotton Coils
Another quick method you can use to remove mold from your shower caulk is using cotton coils soaked in bleach. This pretty much works like in the first method but you don’t need baking soda.
Just like in the above method, start by dusting off the shower to make sure that there is no any dirt embedded on the caulk.
- Take the bottle of bleach and cotton coils and head to the bathroom.
- Dip the cotton coils inside the bleach bottle and pull them out without squeezing out the bleach.
- Lay the now soaked cotton coils on top of the caulk all around the bathroom.
- Where the cotton coils look as if they can fall off support them with duct tape.
- Leave the cotton coils in place preferably overnight.
- Remove the cotton coils and scrub the caulk with a sponge.

If you do not have cotton coils you can be a little innovative and use toilet paper. Roll sheets of toilet paper the way the cotton coils are usually rolled and place them on top of the caulk.
Pour the bleach on top of the toilet paper until they are nicely soaked. Since toilet paper is not as good absorbent as cotton, have some bleach in a spray bottle and spray on the toilet paper periodically.
Method 3: Using a Natural Method
Are you looking to get rid of caulk from your shower caulk without using bleach? Baking soda and Vinegar are the best products to remove mold from silicone caulk naturally.
They are however not used together. For best results use each of them independently. Proceed as follows:
- Mix baking soda and water in a bowl to form a thick paste. The quantities of each used will depend on the amount of mold you have. The important thing here is to have enough and thick paste.
- Apply the paste generously on the mold and wait for about an hour.
- Come back with a sponge and clean the caulk.
Baking soda alone is enough to remove the mold. Apart from that it is also a fantastic cleaning agent and safe for you and your pets. It also is the best option for people on a septic system since it does not harm the good bacteria in the septic tank.
- Put some vinegar in a spray bottle and spray it all over the caulk and wait for about 30 minutes.
- Clean with water and let it dry.
The thing with vinegar is that it very effective in permeating the caulk, completely killing all the remaining mold.
Preventing It From Growing Back
In order to prevent mold from growing on your shower caulk, you first need to know why it grows there in the first place. For mold to grow, it needs food (cellulose material found in soap scum, hair and oils,) moisture, air, low light and humidity. All these conditions are present in the shower caulk.
To inhibit the growth of mold, you should try to as much as possible to eliminate or reduce these conditions. Here are a few ways you can do that:
- Clean you shower with vinegar frequently. Although there are a few decent products sold that can do this, vinegar is fantastic and cheap. As you are cleaning the entire bathroom (most often once in 2 weeks) spray vinegar all around the caulk and scrub after about 30 minutes.
- Leave your shower clean every time you use it. Clean the floor and walls with clean water to remove soap and hair. It would be very hard for mold to grow in the absence of this conditions.
- Improve the bathroom’s ventilation. It is very important to open the bathroom windows as you shower or immediately after showering. Turn on the exhaust fan as well. This will bring down the bathroom humidity as fresher and cooler air will flow in.
- Have more natural light in the bathroom. Mold thrive in darkness. The more natural light you have in the bathroom the lesser the chances of mold thriving on the shower caulk.
Conclusion
You do not have to replace your shower caulk every time you notice mold growing. Getting rid of the mold is fast and cheaper comparing to a replacement. If on the other hand the caulk is way too old and has even decolorized, you should consider removing and replacing it.
Related post: How to get rid of pink mold in bathroom fixtures
Summary
To get rid of mold from shower caulk, follow these steps:
- Safety Precautions: Wear gloves, a mask, and eye protection to avoid direct contact with mold spores.
- Ventilation: Ensure proper ventilation in the bathroom by opening windows and doors or using exhaust fans to reduce the concentration of mold spores in the air.
- Dry the Area: Before cleaning, make sure the caulk is dry. If it’s damp, use a towel to blot excess moisture.
- Prepare a Cleaning Solution: Mix equal parts of white vinegar and water or use hydrogen peroxide (3%) in a spray bottle. Alternatively, you can use a commercial mold and mildew cleaner.
- Apply the Solution: Spray the cleaning solution directly onto the moldy caulk, ensuring full coverage. Allow it to sit for 10-15 minutes to penetrate and loosen the mold.
- Scrub the Mold: Use an old toothbrush, scrub brush, or a specially designed grout brush to scrub the moldy caulk. Scrub vigorously to remove the mold stains.
- Rinse and Wipe: Rinse the caulk with clean water to remove any remaining cleaning solution. Wipe the area dry with a clean, dry cloth.
- Prevent Future Mold Growth: To prevent mold from returning, consider using a silicone-based caulk with mold-resistant properties for resealing. Ensure proper ventilation in the bathroom, and periodically clean the caulk to prevent future mold growth.
- Dispose of Cleaning Materials: Safely dispose of any used cleaning materials, such as paper towels or brushes, in a sealed plastic bag.
- Monitor and Maintain: Regularly check the caulked areas for signs of mold and address them promptly to prevent extensive mold growth.


