A leaking main water shut-off valve is a common plumbing issue that can lead to water waste, damage, and increased utility bills if not promptly addressed. Here’s a summary of ways to fix a leaking main water shut-off valve:
- Identify the Source of the Leak: Before attempting any repairs, locate the exact source of the leak. Inspect the valve and surrounding pipes for visible signs of dripping or moisture.
- Tighten Loose Connections: Sometimes, a leaking valve can be fixed by simply tightening loose connections. Use a wrench or pliers to snugly tighten the packing nut and the valve handle. Be cautious not to overtighten, as this could damage the valve.
- Replace the Packing Nut: If tightening the nut doesn’t resolve the leak, you may need to replace the packing nut. Turn off the water supply to the valve and use a wrench to remove the old packing nut. Replace it with a new one, ensuring it’s properly seated and secure.
- Apply Teflon Tape or Pipe Dope: If the leak appears to be coming from the threaded connections, apply Teflon tape (thread seal tape) or pipe dope (thread sealant) to the threads before reassembling. This can create a watertight seal.
- Repair or Replace the Valve Stem: If the valve stem itself is damaged or corroded, it may need to be repaired or replaced. This can be a more involved process, and you may require the expertise of a professional plumber.
- Install a Valve Leak Detector: For added protection, consider installing a valve leak detector or alarm. These devices can provide early warning of leaks and prevent extensive water damage.
- Replace the Entire Valve: In some cases, especially if the valve is old or severely damaged, it may be more cost-effective and practical to replace the entire shut-off valve. This typically involves turning off the water supply to your home, cutting the pipe, and installing a new valve.
- Consult a Professional Plumber: If you’re uncertain about the cause of the leak or lack the necessary plumbing skills and tools, it’s advisable to consult a professional plumber. They can assess the situation, recommend the best course of action, and perform any necessary repairs or replacements safely and effectively.
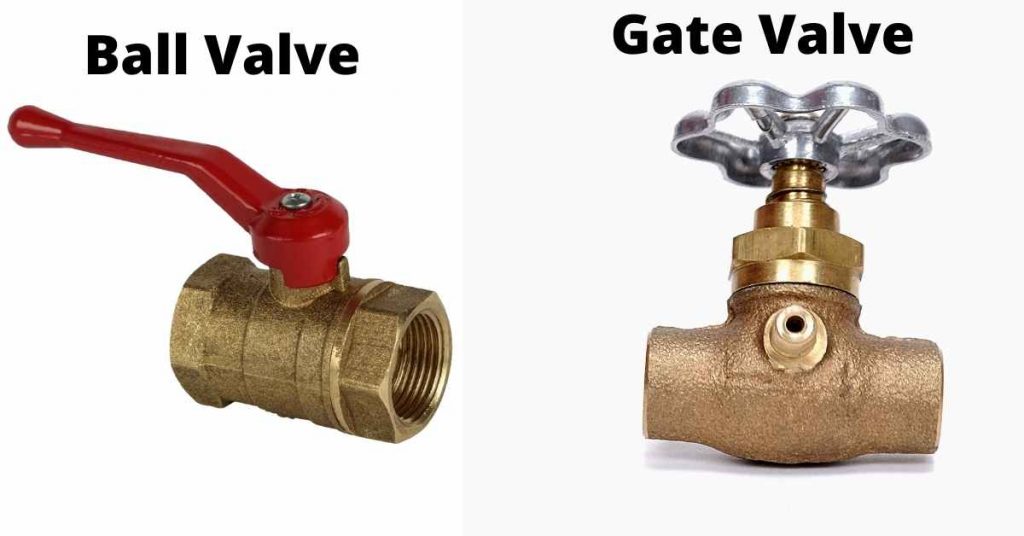
Due to their design, gate valves leak at a higher rate compared to ball valves due to their ease of corrosion and damage. Replacing a gate valve with a ball valve is therefore a better and long-term solution.
How to Fix a Leaking Main Water Shut off Valve
Let us now look the different methods to fix a leaking shut off valve in more details. There are 4 ways you can stop your main shut off valve from leaking.
They are:
1. Tighten the Packing Nut
A shut off valve’s packing nut is the nut next to the handle. It is supposed to create a water tight seal by compressing the packing washer around the valve stem. The packing washer is usually inside the packing nut at the top.
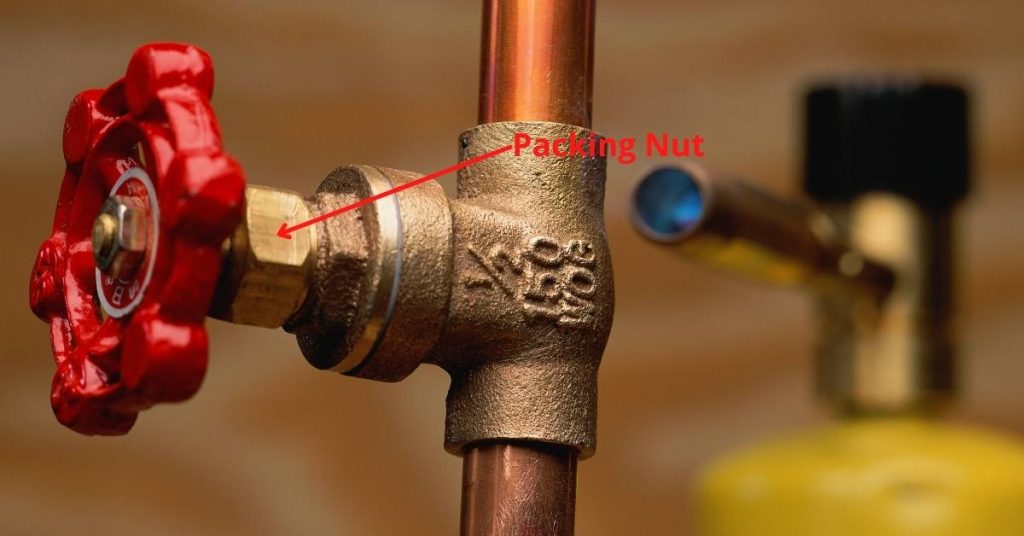
After years of usage, the water pressure vibrations around the valve and continued manipulation of the handle can cause the packing nut to loosen a little. This will break the seal created by the packing washer resulting in a dripping valve.
If you can see exposed threads at the bottom of the packing nut, it is clearly evident that the packing nut is loose. Tightening the nut might just be enough to stop the leak.
Grab an adjustable wrench or slip-joint pliers and tighten the packing nut. It doesn’t need to be crazy tight. About ¼ turn clockwise is sometimes all you need to stop the leak.
If the leak stops after tightening the packing nut then you are “home and dry”. However, if the leak persists you will need to explore other ways of fixing the leak.
2. Wrap Packing Material on the Valve Stem
Sometimes your main water shut off valve is leaking because the packing washer has hardened over time and disintegrated. When that is the case, the valve will not stop leaking no matter how much you tighten the packing nut.
The only solution is to apply more packing material on the valve stem. Teflon packing is an excellent material for this job and is readily available on Amazon and home improvement stores.
Note: Teflon packing and Teflon tape are not the same thing. Teflon tape is a thin film rolled up in plastic groove and used as a thread sealant while Teflon packing is a thick sealing material that looks like a wire cord.
If you need to stop the leak instantly but don’t have Teflon packing, you can use a lot of Teflon tape instead.
This is how to apply Teflon packing on a valve stem and stop leaks:
- Start by turning off water supply to the house at the main shut off valve at the street. This is usually next to the curb or sidewalk and is also mostly housed in the same place as the water meter.
- Turn on one or several faucets to drain the water already inside the pipes.
- Remove the valve handle. You will need a screwdriver for this. As you turn the screw counterclockwise, you may need to hold the handle with your other hand and counter the force of the screwdriver.
Note: Even after remove the screw, you may realize that the handle will still not slide out easily. That is due to corrosion and mineral build. Spray WD-40 or vinegar around it and after 15 minutes try to gently knock it off.
- With the valve handle out, use the adjustable wrench to loosen the packing nut and remove it. Remove the old packing washer or whatever packing material was used. It will be hard but try to pull out everything.
- Before applying the Teflon packing, clean the valve stem. Mineral build up can prevent the packing from sealing properly and you should therefore start by removing all of it. An emery cloth (sand paper) is what I would use in this case.
- Apply about 3-4 wraps of the Teflon packing on the valve stem (and not the threads. The packing should be just above the threads) in a clockwise direction.
- Screw in the packing nut and gently tighten it with the wrench.
- Install the valve handle back.
- Turn the water supply back on and check if the leaking has stopped.
In most of the cases, adding more packing material will be enough to stop a leaking main water shut off valve.
3. Replace the Valve Stem Washer
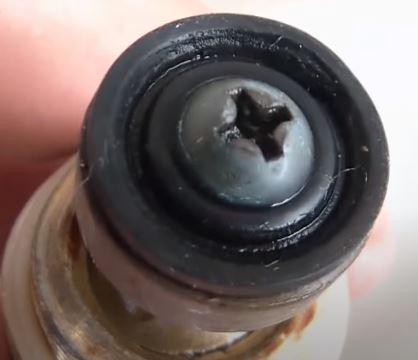
What you may not know is that the valve stem has a small washer which seals around the stem when the valve is open. If your main shut off valve leaks when it is opened then the valve stem washer is most likely worn out and therefore not sealing properly.
Replacing the valve stem washer is easy but you will need to take it with you to a home improvement store to buy an exact replacement.
Here is how to replace a main shut off valve stem washer:
- Turn off water at the street shut off valve.
- Turn on a faucet to drain the water already in the pipes.
- Remove the valve handle and place it away.
- Loosen the packing nut and slide it out.
- Attempt to loosen the bonnet nut. This is the nut holding the valve stem in place.
Due to corrosion, the bonnet nut will most likely not come off easily and attempting to use an extension bar on the wrench will damage the valve or pipes. What you can do is use a torch to heat the nut all round and in the process break the mineral buildup.
- Try to loosen the bonnet nut again.
- When you have loosened it, inspect the condition of the stem washer. It is the little washer at the tip of the stem secured using a screw.
- Take a picture of the washer and stem or take it with you to hardware store and buy and exact same washer.
- Remove the washer by using a screwdriver to remove the screw the put in the new washer. Secure it with the screw.
- Thread in the bonnet nut and once hand-tight tighten it using a wrench.
- Connect the packing nut as well.
- Install the valve handle.
- Turn on the water at the street valve and check if the leaking has stopped.
One of the above 3 methods will surely stop the main water shut off valve from leaking.
4. Replace the Gate Valve with a Ball Valve
As I had mentioned earlier, you can decide to replace your old gate valve with a modern ball valve. Ball valves don’t leak as much as gate valves and generally speaking a new valve will serve you well for the next few decades.
The first thing you need to do is check if your current gate valve is threaded to the water pipes or welded. If it is threaded, the replacement will be easier and you can actually do it on your own.
You will only need to unscrew the old valve and screw in the new one. It is a bit difficult if the valve is welded to the water pipe.
You need to use a torch for this and I would recommend hiring a professional plumber to do it properly. Check out more about that in this post.
And basically that is how to fix a leaky main water shut off valve. I hope that this guide was of help to you.


