Your water filter works hard to keep your water clean, but without regular maintenance, it can fail to do its job. Here are the key takeaways to ensure your filtration system stays effective and lasts longer:
- Replace filters on time: Follow the recommended schedule for your filter type (e.g., every 6–12 months for carbon filters).
- Watch for warning signs: Reduced water flow, unusual tastes, or cloudy water often mean it’s time for a replacement.
- Clean filter housings: Regularly sanitize components to prevent bacteria buildup and maintain system performance.
- Check for leaks: Inspect connections, O-rings, and housings for cracks or wear after maintenance.
- Test water quality: Use home kits or professional services to monitor contaminants and ensure your system works as intended.
Staying on top of these tasks prevents costly repairs, keeps your water safe, and extends the life of your filtration system.
How to MAXIMIZE the LIFE of Your WATER FILTRATION System
Replace Filters on Schedule
Keeping up with regular filter replacement is key to ensuring clean water and maintaining your filtration system’s efficiency. Over time, filters can become clogged with contaminants, which not only reduces their ability to purify water but may also allow trapped pollutants to reenter your water supply.
Delays in replacing filters can compromise water quality, strain system components, and even lead to higher energy costs or damage. Regular maintenance helps extend the life of your filtration system and ensures it performs reliably. Up next, let’s explore how to spot the signs that your filters need replacing.
How to Tell When Filters Need Changing
Here are some common warning signs that your filter might be overdue for a replacement:
- Reduced water flow: If faucet pressure drops or it takes longer to fill containers, your filter may be clogged.
- Changes in taste or smell: Water that tastes metallic, chlorinated, or just “off” could signal a failing filter. If your refrigerator’s water or ice tastes like plastic or chemicals, it might mean the filter material is breaking down.
- Cloudy or discolored water: Murky or tinted water suggests the filter is no longer effectively trapping sediment.
- Unusual system noises: Sounds like gurgling or grinding can indicate a clogged filter.
- Health symptoms: If household members experience unexplained gastrointestinal issues, your filter might not be doing its job.
If you notice any of these signs, consult your manufacturer’s guidelines to determine the recommended replacement schedule.
Common Replacement Schedules
Different filters have varying lifespans, so it’s important to follow the manufacturer’s recommendations. Here’s a quick guide to typical replacement intervals for common filter types:
| Filter Type | Replacement Frequency | Notes |
|---|---|---|
| Sediment Filters | 3–9 months (residential) | Commercial use: every 3–6 months |
| Carbon Filters | 6–12 months | Frequency depends on water quality and usage |
| Reverse Osmosis Pre-filters | 6–12 months | Replaced more often than RO membranes |
| Reverse Osmosis Membranes | Every 2 years | Longer lifespan with effective pre-filtration |
| Whole-House Systems | 6–12 months | Varies based on water conditions |
For other filters, here are a few additional guidelines:
- Refrigerator filters: Replace every 6 months, regardless of water clarity.
- Pitcher filters: Swap out every 2 months or after filtering around 40 gallons.
- Faucet-mounted filters: Typically last 3 months but should never be used for longer than 6 months.
Keep in mind that local water quality impacts how quickly filters wear out. For instance, areas with higher levels of contaminants may require more frequent filter changes. If you use well water, consider testing your filtered water monthly with a TDS (total dissolved solids) meter to monitor its effectiveness.
To stay on track, set reminders on your phone or calendar. Many people find it helpful to replace multiple filters – like whole-house and refrigerator filters – on the same day to simplify maintenance. Buying filters in bulk can also save money and ensure you’re always prepared.
Clean Filter Housings and Parts
Keeping your filter housings and components clean is an essential step in maintaining your water quality. Over time, sediment, bacteria, and other contaminants can build up inside the housings, even if you’re diligent about replacing the filters. This buildup can create the perfect environment for bacteria and mineral deposits, potentially affecting the performance of your filtration system. Regular cleaning ensures your system works as intended and complements your filter replacement schedule.
“It is highly recommended that your water filter and system be sanitized each year.” – H2O Distributors
Cleaning goes beyond just scrubbing away visible dirt – it’s about protecting the overall integrity of your filtration system. Neglecting this step can lead to bacterial growth and cross-contamination when you replace old filters with new ones.
Step-by-Step Cleaning Instructions
Here’s how to properly clean your filter housings and maintain your system. Gather these supplies before starting:
- A housing wrench
- Warm, soapy water
- A non-abrasive brush or sponge
- Unscented household bleach
- Replacement O-rings
- Shut down the system: Close the shut-off valve and open the faucet where filtered water flows to relieve pressure.
- Remove the housings: Use a wrench or your hands to unscrew the housings. Be careful – they’ll be full of water. Remove all housings and cartridges.
- Clean the housings: Wash the interior of each housing with warm, soapy water and a non-abrasive sponge. Pay close attention to the filter caps and the threads where the housings connect.
- Rinse thoroughly: Remove all soap residue with clean water.
- Inspect the O-rings: Check for wear, cracks, or buildup on the O-rings and their grooves. Clean them and replace if necessary to ensure a proper seal.
- Sanitize the housings: Mix 1 gallon of water with 1/3 teaspoon of unscented bleach. Add 1 cup of this solution to each housing sump. Reassemble the housings with the solution inside, but don’t install the new cartridges yet.
- Circulate the solution: Open the shut-off valve to fill the housings with the bleach solution. Once water flows from your faucet, close it and let the solution sit for 30 minutes.
- Flush and reassemble: After 30 minutes, turn off the valve, remove the housings, and pour out the bleach solution. Rinse everything thoroughly, install the new filter cartridges, and reassemble the system. Be careful not to overtighten the housings to avoid damaging the caps.
Once everything is put back together, flush the system thoroughly to ensure it’s ready for use.
Safe Disposal and Cleaning Practices
Properly dispose of old filters and debris according to your local waste guidelines. Most residential water filters can be thrown out with regular household trash, but it’s a good idea to double-check with your local waste authority for any specific instructions.
When cleaning, avoid harsh chemicals that could damage the filter housings or leave harmful residues. Stick to mild dish soap and the diluted bleach solution mentioned earlier.
If you’re using bleach, always opt for unscented household bleach, and never mix it with other cleaning products. Work in a well-ventilated area and wear gloves to protect your hands. The diluted bleach solution is safe for household plumbing and septic systems when disposed of properly. Pour any leftover solution down the drain while running plenty of water to flush it through.
Finally, after reassembling your system, let it run for several minutes to flush out any remaining sanitizer. This ensures your water tastes fresh and is ready to drink.
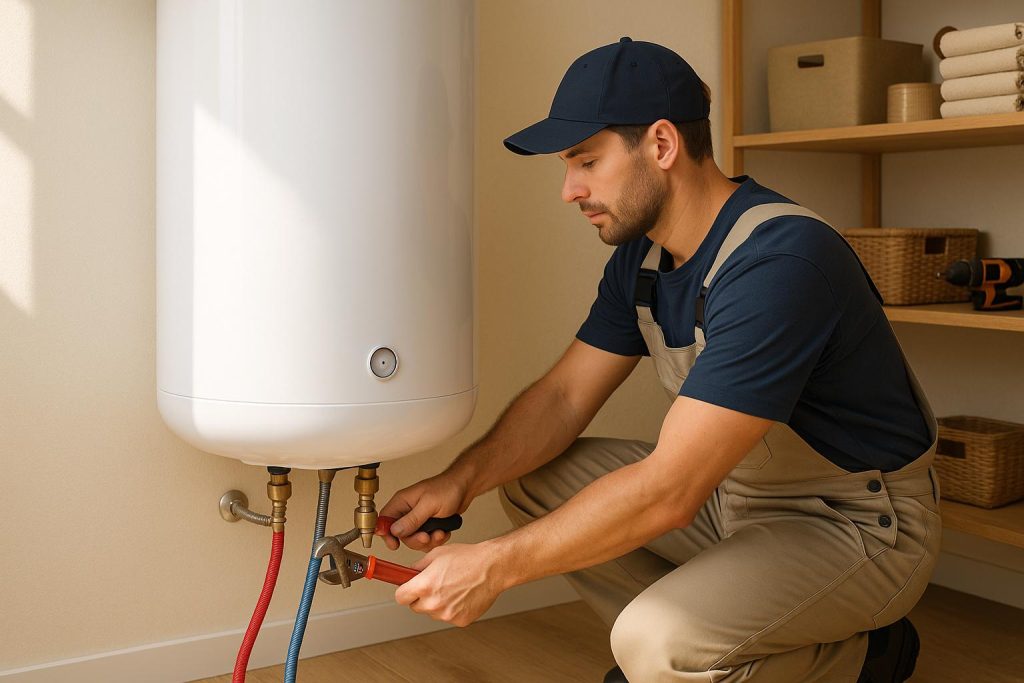
Check for Leaks and System Problems
Once you’ve replaced the filters and cleaned your system, it’s time to check for leaks and other potential issues. Regular inspections are key to catching small problems before they turn into expensive repairs. Over time, leaks or performance issues can develop, so staying on top of maintenance not only ensures your water quality but also extends the life of your filtration system.
After cleaning the filter housings and installing fresh cartridges, take a moment to examine the entire system. This simple habit can save you money and keep your filtration system running smoothly.
Visual Checks
Start your inspection by visually examining all parts of the system. Before you begin, make sure to turn off the water supply.
Here are the key areas to focus on:
- Connections and Fittings: Check for signs of water dripping, wet spots, or reduced water pressure, which could point to loose or damaged fittings.
- Filter Housings: Look carefully for cracks, even tiny ones. Make sure the housings are completely dry before inspecting, as leftover moisture can hide real leaks. Pay close attention to the threaded areas where the housings connect.
- O-Rings and Seals: These rubber components are essential for preventing leaks. Inspect them for cracks, pits, or wrinkles. Replace any damaged ones immediately, and apply a sealing lubricant when reassembling.
- Control Heads and Connector Tubing: Look for wear, water stains, peeling paint, or musty odors, which could indicate hidden moisture or damage.
- Surrounding Areas: If your system is in a basement or utility room, check for dampness in the surrounding area. For single-tank systems, make sure condensation isn’t mistaken for a leak.
When tightening any loose connections, use a wrench with care. Usually, hand-tightening followed by an extra quarter turn is enough. Over-tightening can crack housings or damage threads.
Test System Performance
Once your visual inspection is complete, move on to testing the system’s performance. This step ensures everything is functioning as it should.
Here’s how to evaluate performance:
- Pressure Monitoring: The ideal water pressure range is between 40–60 PSI. If the pressure drops below 30 PSI, it could mean the filter is clogged. Regularly checking the pressure gauge can help you spot issues early.
- Water Quality Testing: Test your water before and after filtration to confirm the system is working properly. For detailed results, you can send samples to a certified lab, or use a home testing kit for a quicker check.
- TDS Monitoring: A Total Dissolved Solids (TDS) meter can track how well your system is performing over time. While TDS isn’t a direct measure of water quality, a noticeable increase in post-filtration TDS might signal that your filters are losing effectiveness.
- Taste, Odor, and Color: Changes in taste, smell, or water color can indicate a problem with the filter. However, keep in mind that some contaminants are undetectable by taste or smell alone.
Watch for warning signs like unusual tastes or odors, cloudy or discolored water, reduced water pressure, strange noises, visible sediment, scale buildup on fixtures, higher water bills, or any leaks around the system.
To stay organized, maintain a log or service schedule to track filter replacements and monitor your system’s performance over time.
“Regular maintenance keeps your water clean, your system efficient, and your household safe.” – Lone Star Water Services
If you notice multiple issues or problems that persist despite your efforts, it’s best to call a professional to
address them.
Monitor Water Quality and Fix Problems
Keeping your water filtration system in top shape means regularly testing water quality and addressing any issues as they arise. Regular filter maintenance, paired with consistent water testing, ensures clean water and efficient system performance. Let’s dive into how to monitor water quality and tackle common problems.
Track Water Quality
Testing your water is the best way to confirm your filtration system is doing its job. There are several ways to test, ranging from simple at-home kits to more detailed lab analyses.
Home Testing Kits come in two varieties: DIY rapid tests and send-away kits. DIY kits use paper strips for quick, on-the-spot results and are affordable. Send-away kits, on the other hand, require mailing a sample to a lab for an in-depth analysis. While DIY kits are convenient and budget-friendly, send-away kits provide more precise and detailed results.
For basic monitoring, digital meters are a handy option. They give instant readings for pH and Total Dissolved Solids (TDS). Basic models cost around $14, while more advanced 4-in-1 testers, which measure multiple parameters, are available for under $9.
If you’re looking for comprehensive testing, multi-contaminant kits are a great choice. For example, the Varify 17-in-1 Complete Drinking Water Test Kit costs $27, while the Safe Home Ultimate Drinking Water Test Kit offers extensive testing for $500.
When testing, keep an eye out for contaminants like lead, chlorine, arsenic, nitrates, hardness, and bacteria. Also, monitor pH levels, as the EPA recommends a range of 6.5 to 8.5 for municipal water systems.
Your location can also influence what you should test for. For instance:
- If you live near farmland and use a private well, testing for nitrogen is wise.
- If there’s been a fuel spill or leak in your area, include benzene, toluene, and MtBE (Methyl t-Butyl Ether) in your tests.
- Expecting a baby? Make nitrates a priority.
For professional-grade analysis, you can collect a water sample and send it to your state’s Department of Public Health. Another option is the Tap Score Advanced City Water Test, which costs $285 and is praised for its easy-to-understand results.
Fix Common Problems
When water testing identifies issues, here’s how to address them and keep your system running smoothly.
- Slow water flow: This is often due to sediment buildup or blockages in the filter. Inspect the filter cartridge, clean it, or replace it if clogged.
- Foul odors or strange tastes: These could mean the filter cartridge has expired or isn’t removing impurities effectively. Flush the system by running water through it for several minutes, then replace the cartridge. If the issue persists, the problem may stem from your water source.
- Cloudy water: Suspended particles like dirt or silt can cause cloudiness. Replace the sediment filter or clean the system thoroughly. Check all filter stages and replace any that are heavily saturated.
- Unusual noises: Gurgling or rattling sounds might indicate trapped air or improper installation. Disassemble and reassemble the filter to ensure everything is fitted correctly. Bleed the system by opening the pressure relief valve or running water until the noise stops.
- Short filter lifespan: If filters wear out faster than expected, your water may have higher contamination levels. Upgrade to a higher-capacity filter or add a pre-filter to handle heavy sediment loads. Adjust your replacement schedule as needed.
Sticking to a regular maintenance routine helps prevent most of these problems. Follow the recommended schedule for replacing cartridges, cleaning filter housings, monitoring water pressure, and testing water quality. If you’re unable to resolve an issue or face multiple problems at once, reaching out to a qualified technician is a smart move.
When to Call a Professional
Once you’ve checked your system’s basic performance, some problems might still linger or keep coming back. That’s when it’s time to bring in a professional. While many water filter maintenance tasks are manageable on your own, there are situations where expert help is essential. Knowing when to call for assistance can save you time, money, and prevent significant damage to your filtration system.
Here are some key signs that you should reach out to a professional:
- Persistent water quality issues, such as cloudy or discolored water.
- Unusual noises coming from the system or noticeable leaks.
- Low water pressure that doesn’t improve after basic troubleshooting.
- Visible sediment, scale buildup on fixtures, or unexplained spikes in your water bill.
- Frequent health concerns in your household that could be linked to water quality.
Professionals have access to advanced diagnostic tools that can identify hidden problems and ensure your system operates effectively. For example, leaks that seem minor can lead to serious damage if ignored, so it’s crucial to have them inspected right away.
When basic maintenance doesn’t resolve the issue, professionals can offer tailored solutions. They’ll handle tasks like thorough inspections, proper filter replacements, and fine-tuning your system to ensure it works at its best. Ignoring unresolved issues can lead to costly repairs or even the need for a full system replacement.
To stay ahead of potential problems, consider scheduling regular professional check-ups. These inspections, combined with your routine DIY maintenance, can help maintain water quality and extend the life of your filtration system.
Conclusion
Keeping your water filter system in top shape requires attention to a few key tasks. Regularly replacing filters, cleaning parts, checking for leaks, and monitoring water quality are essential steps. And when issues go beyond your expertise, knowing when to call in a professional ensures your system stays in peak condition.
With over 77% of American households relying on water filtration systems, proper maintenance is more important than ever. These practices not only help your system effectively remove contaminants but also extend the life of costly components. Regular upkeep can also prevent common problems like reduced water pressure and flow caused by clogged or aging filters.
To stay on track, consider setting up calendar reminders for filter replacements or enrolling in auto-ship programs for convenience.
Well-maintained water filters also bring added benefits, like boosting the efficiency of household appliances. Dishwashers, washing machines, and water heaters run better with less mineral buildup, which means fewer repairs, improved performance, and lower energy bills.
A balanced approach to maintenance is key. While tasks like filter changes and general cleaning are manageable DIY jobs, professional support provides an extra layer of protection. Experts have the tools and knowledge to spot potential problems early, saving you from costly repairs down the road. This combination of regular maintenance and professional care ensures your family enjoys clean, great-tasting water while maximizing the performance and lifespan of your filtration system.
For more expert tips on maintaining your water filter system, visit Plumbing Sniper at https://plumbingsniper.com.
FAQs
How often should I check my water quality to make sure my filtration system is working properly?
To keep your water filtration system working well, it’s a good idea to test your water at least once a year. If you notice any changes in its taste, smell, or appearance, consider testing it sooner.
Routine testing can catch problems early, helping to ensure your water remains clean and safe to use.
What happens if you don’t replace your water filter on time?
Failing to replace your water filter when needed can cause a range of problems. As filters age, they collect more contaminants, which reduces their ability to purify your water. This often leads to lower water quality, along with unpleasant tastes and odors in what you drink.
Even worse, old filters can become a breeding ground for bacteria and other harmful microorganisms, which could pose health risks. Ignoring replacement schedules might also overwork your filtration system, potentially causing breakdowns or expensive repairs. To keep your water clean and safe – and to avoid unnecessary system issues – stick to the recommended schedule for replacing your filter.
Can I maintain my water filter system on my own, or should I hire a professional for certain tasks?
Yes, you can take care of most water filter maintenance tasks on your own. These include cleaning the filter housings, replacing the filters, and flushing the system. Many water filtration systems are built with ease of use in mind, so routine maintenance is often simple and manageable.
That said, when it comes to more intricate tasks – like inspecting membranes, checking seals, or fine-tuning whole-home systems – it’s wise to call in a professional. An experienced technician can ensure everything is running as it should and help avoid any potential issues. To keep your system in top shape, it’s a smart move to schedule a professional inspection every 2–3 years.