Removing and replacing a sink pop-up stopper is a straightforward DIY plumbing task that can improve drainage and prevent leaks. Here’s a brief summary of the process:
Removing the Sink Pop-Up Stopper
- Clear the Area: Remove any items from the sink cabinet below and place a bucket or towel to catch any water or debris.
- Locate the Rod: Reach beneath the sink and locate the pivot rod connected to the back of the drainpipe. This rod connects to the pop-up stopper.
- Unscrew the Nut: Loosen the retaining nut on the pivot rod using pliers or an adjustable wrench. Carefully slide out the pivot rod and remove it from the pop-up stopper.
- Disconnect the Stopper: The pop-up stopper is usually attached to the pivot rod via a horizontal rod or strap. Disengage it from the pivot rod or strap by unclipping or unscrewing the connecting mechanism.
- Remove the Stopper: Lift the pop-up stopper out of the drain. Some may simply pull out, while others may require twisting or maneuvering to release.
Replacing the Sink Pop-Up Stopper
- Prepare the New Stopper: Ensure you have a compatible replacement pop-up stopper. Clean it if necessary.
- Insert the Stopper: Insert the new stopper into the drain hole, ensuring it fits snugly and covers the drain opening.
- Reconnect to the Rod or Strap: If your new stopper comes with a connecting rod or strap, attach it to the pop-up stopper. Align the stopper with the drain opening.
- Insert the Pivot Rod: Slide the pivot rod through the retaining nut and connect it to the horizontal rod or strap on the pop-up stopper.
- Secure the Nut: Tighten the retaining nut on the pivot rod using pliers or a wrench. Ensure it’s snug but not overly tightened to allow for smooth operation.
- Test the Stopper: Run water in the sink and check if the pop-up stopper opens and closes properly. Adjust the pivot rod if needed to ensure proper operation.
- Check for Leaks: Look for any leaks around the drain area. If you notice leaks, ensure all connections are properly tightened.
The Diagram
How it Works
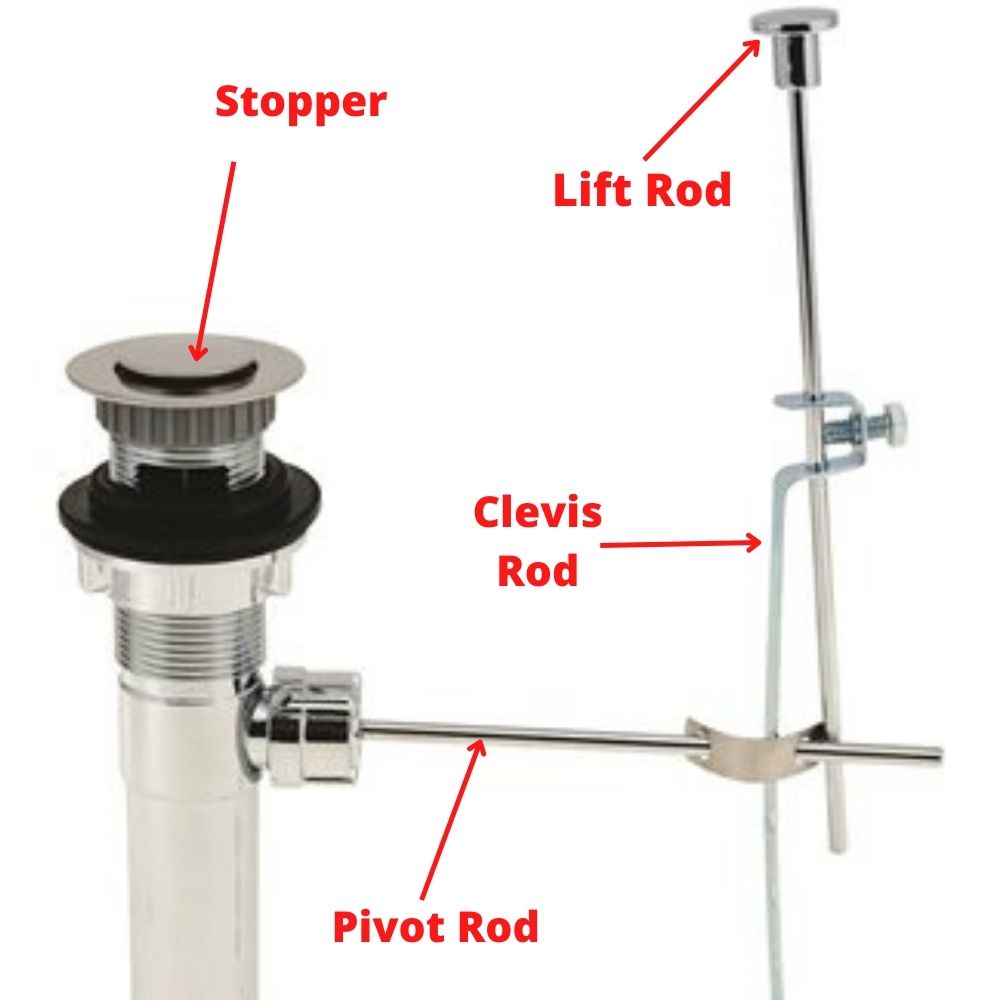
A sink drain pop up mechanism is made up of 4 parts:
- Stopper
- Lift rod
- Clevis rod
- Pivot rod
From the top of the sink you can only see the sink stopper cap and the tip of the lift rod. The stopper and the lift rod are connected underneath the sink.
A clevis rod, also known as an extension bar is a thin metal strip with holes along its length. It connects the lift rod to the pivot rod.
The function of the clevis rod is to help you install the sink pop up mechanism in sinks of different heights. That is why there are several holes for attaching the pivot rods relative to the height of the sink.
On the other hand, the pivot rod is connected to the stopper/plug. Although you are only able to see the stopper cap from the top of the sink (usually stainless steel), there is a long plug inside the drain with a hook or hole at the bottom.
The pivot rod attaches to the hole or hook at the bottom of the sink stopper plug. Also, underneath the stopper cap is a rubber gasket.
The gasket helps to create a watertight seal around the sink drain when the stopper is down. That way, the sink can fill with water without leaking.
So, how does this sink pop up mechanism work? Very simple actually!
When you pull up the lift rod handle (next to the faucet), the pivot rod pulls down the stopper thereby sealing the sink drain. The sink can then fill with water. Pushing down the lift rod forces the pivot rod to push the stopper up, allowing the sink to drain.
How to Replace a Pop-Up Sink Stopper

You can opt to only replace the stopper or the whole assembly. Let us look at how to replace just the stopper while adjusting or just maintaining the rest of the pop-up mechanism
You will need the following items:
- Marker pen
- Bucket
- Adjustable wrench
- Old toothbrush
1. How to remove a Pop Up Sink Stopper
- Start by clearing the area under the sink. If you use the area under the sink to store items, remove them to give yourself ample space to work with.
- Also, make sure that the area is receiving enough lighting. You can use natural light or a even a flash light
- Disconnect the pivot rod from the clevis rod. Check the hole on the clevis rod where the pivot rod is connected to. Better still; mark it using the marker pen. That will help you later when connecting back the pivot rod.

- To disconnect the pivot rod from the clevis clip, remove the spring clip that is used to attach the pivot rod to the clevis rod. Place the clip is a safe area where you can easily lose it.
- Place the bucket under the sink drain trap. There is always water inside the drain and you don’t want it spilling on the floor.
- Disconnect the pivot rod from the sink drain. The pivot rod is usually connected to the drain pipe using a plastic lock nut. This nut is usually hand tight and you should therefore try to loosen it with you bare hand. Only use a wrench if it is too tight but still be gentle.

- With the lock nut out of the way, you will only need to pull out the pivot rod. As you pull out the pivot rod, place your other hand under the drain pipe to grab any seals that might fall off as the pivot rod comes out.
- Lift off the stopper. Having removed the pivot rod, there is nothing holding back the stopper so you will just need to lift it off from the sink drain.
2. How to Install a Pop-Up Sink Stopper
- Before installing the new stopper, you should first clean the sink drain pipe. An old toothbrush comes in handy here.
- Also, depending on how dirty the sink drain is, you can also decide to remove and clean the P-trap while you are at it. Check out how to do that in this post.
- Slide in the new pop up stopper in the sink drain opening. As you do that, make sure that the stopper is properly aligned so that the hole at the bottom of the plug faces the direction the pivot rod will come in through.
- Connect the pivot rod to the stopper. Push the pivot rod through the opening on the drain pipe to attach it to the stopper. To know whether you have attached the pivot rod to the stopper, attempt to move the pivot rod up and down. If the stopper pops up and down then you have done it.
- Screw in the pivot rod lock nut. Again, be sure to only use you bare hands lest you deform the nut with a wrench or even strip the threads.
- Attach the pivot rod to the clevis rod. Remember the hole you marked on the clevis rod? That is the hole to attach the pivot rod.
- Use the spring clip to secure the pivot rod on the clevis rod.
- Test the new stopper. Pull up the lift rod to seal the sink drain. Fill the sink with water and wait for about 10 minutes. If the level of water does not drop, the stopper is working properly. Push down the lift rod to drain the sink.
And basically that is how to remove and replace a pop-up sink stopper. I hope you found this guide to be helpful.
Related reading: slow draining bathroom sink, how to clean a P-trap.