Replacing a shower/tub cartridge can help fix issues like leaks or temperature control problems. Here are the basic steps:
- Turn Off Water: Shut off the water supply to the shower/tub. The shutoff valves may be located in the bathroom or the main water supply for the house.
- Remove Handle and Trim: Take off the handle and any trim or coverings around the faucet. This may require removing screws or popping off covers.
- Identify Cartridge Type: Determine the type of cartridge your faucet uses. It could be a ceramic disk, ball, or compression cartridge. Knowing the type is crucial for selecting the right replacement.
- Remove Retaining Clip or Nut: Some cartridges are held in place with a retaining clip or nut. Use pliers or a wrench to remove this.
- Pull Out the Old Cartridge: Carefully pull out the old cartridge, using pliers or a cartridge puller if necessary. Take note of the orientation.
- Clean and Lubricate: Clean the cartridge housing and any O-rings or seals. Apply silicone grease to the new cartridge’s O-rings for a watertight seal.
- Insert New Cartridge: Insert the new cartridge into the housing, ensuring it’s correctly oriented. Push it in firmly but gently.
- Reattach Retaining Clip or Nut: Secure the cartridge in place with the retaining clip or nut. Tighten it to hold the cartridge snugly.
- Reassemble Trim and Handle: Put back the trim or coverings, followed by the handle. Tighten any screws or fasteners.
- Turn On Water: Gradually turn on the water supply. Check for leaks around the cartridge and handle.
- Test Functionality: Turn on the shower/tub and test both hot and cold water to ensure proper temperature control. Adjust the cartridge if needed.
- Fine-Tune as Necessary: If the water temperature or flow isn’t right, make minor adjustments to the cartridge as required.
- Finish Assembly: Once everything is working correctly, finish assembling the faucet by adding any decorative caps or handles.
To easily identify what type of cartridge you have, look for the brand name, logo or initials on the face of the faucet, handle or escutcheon. If there is nothing, you will need to remove the cartridge and use a chart identification chart or take it to the nearest home improvement store.
Most faucet manufacturers offer a lifetime warranty on their cartridges. If you can correctly identify your faucet, grab a phone and give them a call. They will send you the replacement kit a few days free of charge.
It is possible to just replace the shower cartridge and not the entire faucet. If the other parts of the faucet are working just fine, you can replace the cartridge only.
A shower cartridge costs between $20 and $50. It will however cost you between $50 and $200 to bring a plumber to replace it for you. If your old cartridge had a lifetime warranty the manufacture will send you a replacement for free.
How to Replace a Shower Cartridge
Now, that you have a brief overview of shower cartridges, it is time to go ahead and replace it, assuming you already have the replacement kit with you. The good thing is that replacing a shower cartridge is really easy and you do not need to pay a plumber to do it for you.
These are the steps to follow when replacing a shower cartridge:
1. Remove the Faucet Handle
Shower cartridges are often found in single-lever shower faucets. Most of the old 2 or 3-handle shower faucets still use compression shower stems unless they have been replaced recently.
- The first thing you should do is cover the shower/bathtub drain opening to prevent dropping anything down the drain.
- If you a have a single-lever shower faucet, the handle will be attached using an Allen screw from underneath it. Use an Allen wrench to loosen the screw and pull out the handle.
- A single-handle shower faucet with a knob will be connected to the cartridge using a screw. To access the screw, remove the small cap at the tip of the handle using a sharp knife. Grab the knob firmly with your hand and use the other hand to remove the screw with a screwdriver.
- Check if your cartridge has a handle adapter and/or anti-scald device at the tip. Those will be connected to it using a screw. Remove them as well
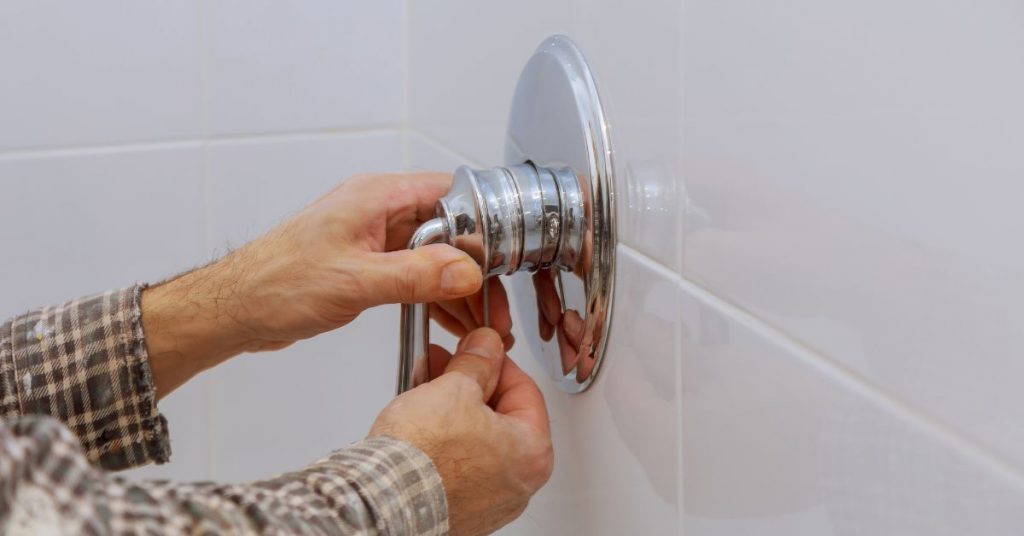
2. Remove the Escutcheon
An escutcheon is the decorative trip plate which is used to cover the unsightly opening on the wall. It is installed purely for aesthetic purposes.
Escutcheons are installed using screws. Remove the screws and pry off the escutcheon with a sharp knife.
Note: Sometimes escutcheons are caulked to the bathroom wall and you would need to first cut through the caulk with a knife.
3. Turn off the Water
This is the first thing some people do but I like to do things differently. Why is this a good option though?
Unlike a toilet or sink, shower faucets do not have a dedicated shut off valve near them. It therefore means shutting off water to the entire house while replacing them which is not very ideal.
Note: In some houses, there is a small access panel behind the shower which allows you to easily turn off water to your shower valve. Check if that is the case with your house.
Luckily, most shower valves have shut off valves. Check for 2 screws each on each side of the shower valve. The 2 screws open and close the cold and hot water supply to the valve.
If you see the screws turn them clockwise with a screwdriver, being carefully not to strip them. This allows you to only turn off water to the shower valve instead of the entire house.
If unfortunately you do not see the screws, your shower valve has no shut off valves. Dash to the basement or wherever your main shut off valve is and turn off the water to the entire house.
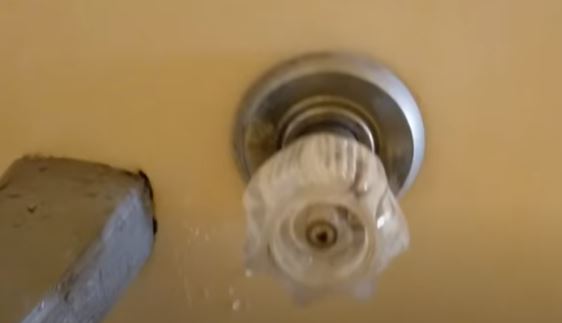
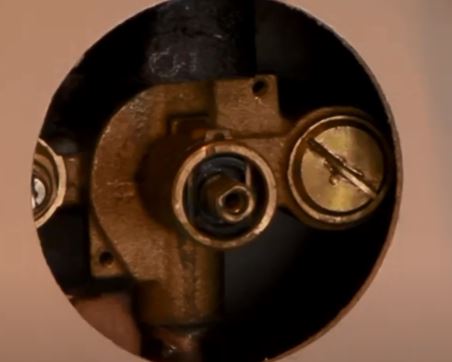
4. Remove the Cartridge
- Pull out the cartridge clip. The cartridge is held in the shower valve by a retainer clip which goes through the top of the valve. Insert an Allen wrench in the clip or grab it with pliers and pull it out, being careful not to drop it in the wall.
Here is the thing. You shower cartridge has been installed for a really long time. Pulling it straight with the pliers will most likely break it apart. In that case, you may have to remove the shower valve.
You will need a cartridge removal tool to help in pulling out the cartridge. There are 2 types of this tools.
The first one is what will most likely come with your new cartridge. A small plastic piece that you push and engage the cartridge and grab it with a pliers. Twist the cartridge right and left and left until it feels free and ready to come out.
The second type of a cartridge removal tool is metallic one with a handle and shoulders at the front which corresponds to shoulders on the cartridge. Once you engage the shoulders, turn the tool right and left to free it up.

After free up the cartridge, grab it with a pair of pliers and pull it out. It is important that you make sure that the cartridge is properly aligned before pulling it out.
Check if the cartridge O-rings have come out as well. Sometimes you may have to pull them out with a screwdriver.
Use a piece of rag and screwdriver to clean the inside of the shower valve. Sometimes I like to turn on the water slightly and flush the lines. To prevent the water from flowing inside the wall, I use a disposable plate to channel it to the tub.
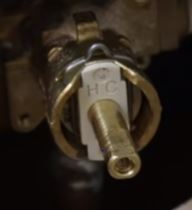
5. Install the new Cartridge
- Lubricate the cartridge first. A new cartridge will come with grease which you need to apply on the O-rings. This helps it to slide in smoothly and easy to remove the next time you are replacing it.
- Once lubricated, hold the cartridge and push it straight inside the valve. You need to be careful about the orientation of the valve. The part with the initials H/C needs to be at the top.
- Insert the clip. Carefully put back the retaining clip.
- Turn on the water to the shower valve. If you turned off the water from the shower valve shut off valves, do not forget to turn it back on.
- Put back the escutcheon and handle the same way you removed them.
- Turn on the faucet and check if it is working perfectly.
And simply that is how to replace a shower faucet cartridge. I hope this guide was helpful.